Showing posts with label Tonda. Show all posts

Monday, December 19, 2016

Slow Cooked Ropa Vieja

I live in Texas. So when the temperatures drop below 80, it's time to pull out the slow cooker to let dinner cook slowly during the day. Why I associate a slow cooker with cooler weather is beyond me. It doesn't heat up the house. Plus, it's a major life saver when we are scrambling to get a healthy dinner on the table after work. I need to work on pulling out my Hamilton Beach Slow Cooker year round!

This recipe calls for many herbs and spices, but they are simple ones that you will have on hand. They create a hearty dish filled with so many layers of flavor. Simply served over a bed of white rice with a side of sautéed plantains makes a perfect Cuban meal.

Slow Cooked Ropa Vieja
By Tonda
Adapted from Authentic Cuban Shredded Beef "Ropa Vieja" Cubana from Just a Pinch

2 medium yellow onions, diced small
1 medium red bell pepper, sliced thin
1 medium yellow bell pepper, sliced thin
1 medium jar of fire roasted red peppers, sliced thin
20 jalapeno stuffed olives
3-4 pounds rump roast
8 cloves of garlic
1 handful curly parsley
6 sprigs cilantro
1 teaspoon dried oregano
1 teaspoon ground cumin
1 teaspoon garlic powder
1 packet Sazon Goya seasoning with Culantro and Achiote
1 teaspoon salt
1/2 teaspoon black pepper
2 Tablespoons apple cider vinegar
2 Tablespoons fresh lime juice
1 teaspoon Worcestershire sauce
1/4 cup white wine
1/4 Cup ketchup
1 small can tomato paste
1/2 cup beef broth
2 large bay leaves

Layer the onions, peppers and olives in the bottom of the slow cooker. Add the roast on top. Add garlic, parsley, cilantro to a small food processor and process until chopped fine. Add oregano, cumin, garlic powder, Goya seasoning, salt pepper, apple cider vinegar, lime juice, Worcestershire, and white wine. Process to blend all of the dry spices with the fresh herbs and garlic. Add ketchup, tomato paste and beef broth. Process again to blend. Pour mixture over the roast. Add 2 bay leaves. Set the Hamilton Beach slow cooker to low for 8 hours. Once the roast is ready, shred the beef in the cooking liquid. Serve over rice.

Enjoy!

Tuesday, November 29, 2016

Cheese Fondue

When this challenge was posted, my husband and I started talking about what "retro" recipes meant to each of us. For me, I think of Jello salads, bologna, and other American dishes that I am happy to never encounter again. For him, it's all about the classics...sauces, pâté, stuffed meats and veggies, and delectable desserts.

Francoise Bernard is a classic French cookbook author that my husband's Mamie would cook from all the time. We have her oldest copy of Les Recettes Faciles (Easy Recipes) from 1965 that is packed with his Mamie's newspaper and magazine clippings. I pulled this book from our shelf and flipped through it to see what classical French fare was. This book is filled with drool worthy recipes. Although, I did not choose a recipe from this book, it did give me an idea of what to make. Cheese fondue. My husband has perfected his recipe through the years and we always look forward to the weather getting cooler so he can make it. This is a recipe that he typically eyeballs amounts, which means that it turns out a little differently each time, but this time I followed him around for measurements!

Cheese Fondue
by Franck and Tonda
Serves 6

1 pound 12 month aged Gruyere cheese
1 pound Jarlsberg cheese
1 pound Comté cheese
6 cloves garlic
2 Tablespoons butter
1/2 to 3/4 bottle dry white wine such as Apremont from Savoie or Entre Deux Mers (Dry White Bordeaux)
1 1/2 Tablespoons Kirsh
Dash of paprika
1/4 teaspoon white pepper
1/8 teaspoon freshly grated nutmeg
Juice from 1/8 of a large lemon

Cut the cheese into 1/4 to 1/2-inch cubes. Do not shred the cheese. It will turn into a ball when melting it. Cut one clove of garlic in half and rub it on the inside of the cooking pot and fondue pot. Slice one clove of garlic in very thin and place it into the fondue pot. Melt 2 Tablespoons of butter, add four cloves of chopped garlic and sauté. Remove half of the garlic and add approximately 1/4 cup of wine to deglaze the pot. Add about 4 handfuls of cheese. It is important to stir the cheese in an 8 pattern until it melts. Otherwise, it will turn into a big ball in the pan. Alternate adding more wine (approximately 1/4 to 1/2 cup at a time) and cheese (3 to 4 handfuls) and continue until all of the cheese is melted to the consistency that you prefer. Make sure to continuously stir in the 8 pattern. You will use 1/2 to 3/4 bottle of wine. Add 1 1/2 Tablespoons Kirsh and a dash of paprika and stir. Stir in 1/4 teaspoon white pepper along with 1/8 teaspoon freshly grated nutmeg. Finally, stir in the juice from 1/8 of a large lemon. Transfer to the fondue pot.

Enjoy with cubes of baguette. An old French rule is whomever loses their baguette while dipping in the caquelon of cheese has to run around the block naked! Thankfully, it has not been enforced in my years of enjoying this meal.

Wednesday, November 16, 2016

Cherry Fruitcake

When thinking about a retro recipe, the first thing that I did was pulled some of my oldest cookbooks off of the shelf. I flipped through pages of aspics, gelatin salads, and odd meat dishes. As tasty as they may have been back in the day, I couldn't bring myself to make anything that I saw. Then, I thought to make something from my own family. I found my Mom's recipe for Cherry Fruitcake. It's written on a weathered piece of paper that is splashed with remnants of ingredients from when she made it. Perfect for this challenge! My family loves fruitcake, and it's thanks to this recipe. It's heavy with fruit and pecans and delightfully highlighted with dark rum.

Cherry Fruitcake
by Tonda
Adapted from my Mom's recipe

1 1/2 cups flour
1 1/2 cups sugar
1 teaspoon baking powder
1 teaspoon salt
1 pound diced candied pineapple
32 ounces maraschino cherries, drained
18 ounces pecan halves
6 eggs
1/3 cup dark rum
1/4 cup light corn syrup

Preheat oven to 300°F. Grease two 9 x 5 x 3-inch loaf pans. Line with foil, allowing a two-inch overhang and grease again.

Mix flour, sugar, baking powder, and salt. Add candied pineapple, maraschino cherries and pecans. Toss to coat well. Beat eggs thoroughly. Slowly add in rum and beat until mixed. Pour over fruit mixture and toss until combined. Turn mixture into prepared loaf pans, pressing frequently with metal spatula to pack tightly. Bake for 1 hour 45 minutes, or until toothpick inserted in center comes clean.

Allow cakes to cool in pan for 15 minutes, then remove from pans. Remove foil from loaves. Brush loaves with corn syrup while still warm. Cool thoroughly before serving or storing.

Enjoy with an ice cold glass of eggnog!

Wednesday, October 19, 2016

Orange Canelé de Bordeaux

Pastries in France vary from region to region. The canelé hails from Bordeaux. This smaller than cupcake sized treat has a crunchy and chewy outside with a custard-like inside. True to the region, canelés are made with *vanilla and rum. However, other flavors can be substituted. In this version of canelé, I used Cointreau and orange extract from The Spice House. The orange flavoring in this extract is spot on. It's fruity without being overly orange or bitter. Oh. My. Yum. I am already planning frosted sugar cookies using this extract.

This recipe is best made by weighing the ingredients. Otherwise, the dough gets temperamental and will either puff too much or deflate like a fallen soufflé. Letting the dough rest in the refrigerator a day or two before baking also helps remove the air to render a custard-like interior.

Typical canelés are baked in copper molds lined with a mixture of butter and beeswax. Being that this was my first attempt at making this pastry, I opted for a more cost effective solution using butter-lined silicone molds. While the silicone molds did not produce the dark colored exterior that one would find using the copper molds, they did create the carmelized outer texture that are unique to this pastry. My American friends did not care about the color of these treats. They gobbled up two batches within a day. Even my French husband was singing my praise on these.

Orange Canelé de Bordeaux
by Tonda
Adapted from a recipe given to me from a friend in France

50 cl (2.11 cups) whole milk
50 grams butter
125 grams pastry flour
250 grams powdered sugar, sifted
2 whole eggs, plus 1 yolk
1 Tablespoon Cointreau
1 Tablespoon The Spice House Orange Extract
Butter for the molds

Add the milk and butter to a saucepan and boil until the temperature reaches 183°F. Remove the pan from heat and allow the liquid to cool. Add the flour, powdered sugar, eggs, Cointreau, and orange extract to a large bowl. Whisk until fully incorporated. Add the cooled milk and butter and whisk again to blend the ingredients. Cover and refrigerate for 24 to 48 hours.

Preheat the oven to 450°F. Melt a couple of Tablespoons of butter to brush inside the molds. Then, fill the molds 2/3 full with the batter. Set the silicone molds on a baking sheet and bake at 450°F for 15 minutes. Lower the temperature to 375°F, and bake and additional 40 minutes. This cook time is for the small molds. Immediately remove the canelés from the molds and allow to cool on a wire rack.

*To make the original recipe, slice open one Spice House Madagascar "Bourbon Islands" Vanilla Bean, and scrape out the beans into the milk and butter mixture. Add the sliced open bean to the milk before it boils to extract as much vanilla flavor as possible. Strain the cooled milk mixture through a fine sieve when adding it to the flour mixture.

Thursday, September 22, 2016

Sunny Paris Olive and Ham Cake

Have you ever had a tried and true recipe that you make over and over for gatherings? The French love to make savory cakes for outdoor gatherings, picnics and hikes. It's a perfectly portable and delicious treat. One that my family is fond of is an olive and ham cake. It's delicious on it's own, however, once I opened and smelled the Sunny Paris spice blend from The Spice House, I knew that it would take my recipe to a new level, and it did! The spices are so fragrant in the Sunny Paris blend, it will brighten up any dish. I can imagine adding it to vinaigrettes, soups, grilled veggies, fish, chicken, an old shoe...you get the point! It's very versatile.

Sunny Paris Olive and Ham Cake
by Tonda
Adapted and Translated From Marmiton's Cake aux olives

4 eggs
250 grams bread flour - approximately 1 1/3 packed cups (I used King Arthur Bread Flour)
1/2 cup dry white wine (I used an Anjou)
2/3 cup canola oil
1 packet (or 2 1/4 teaspoons) of yeast proofed in 1/4 cup warm water
1 Tablespoon The Spice House Sunny Paris Seasoning
1 1/2 cups shredded Gruyere cheese
1 1/2 cups honey ham, diced in 1/4 inch cubes
1 cup of whole manzanilla olives, sliced
Butter for the loaf pan

Heat oven to 355°F.

Mix the eggs and flour until just blended. Add the white wine and oil and mix until well blended.
Add the yeast and Sunny Paris spice blend, and continue to mix until the spice blend is evenly distributed. Add the cheese, ham and olives and mix until incorporated.

Butter a 9 x 5 loaf pan, then pour the mix into the pan. Bake at 355°F for 1 hour and 15 minutes. Test for doneness and bake longer, if needed. Serve at room temperature.

Wednesday, July 27, 2016

Jay D's Grilled Bacon Wrapped Onion Rings

Summer is here and it's time to break out the grill. Here is a different appetizer treat to satisfy the bacon loving crowd on a lazy summer day. These can also be made in the oven, but who wants to heat up the house in the summer?

The sweet and tangy taste of Jay D's Louisiana Molasses Mustard sauce pairs well with the bacon in this appetizer. I used a huge 10-15 onion, and it took 3 to 4 slices of bacon to wrap it...a bacon lover's dream!

Jay D's Grilled Bacon Wrapped Onion Rings
by Tonda
Adapted from Grilling 24x7's Smoked Bacon Wrapped Onion Rings

1 large yellow 10-15 onion, cut into thick rings
1/4 cup Jay D's Louisiana Molasses Mustard
1 pound of bacon
Fresh cracked pepper

Brush the onion rings with Jay D's Louisiana Molasses Mustard sauce. Wrap the bacon around the onion ring and skewer through the bacon and onion to keep the bacon secure. Add a generous amount of cracked black pepper on top of the bacon. Grill the onion rings at 275°F - 280°F for 90 minutes. After 60 minutes of cook time, brush the bacon with some more of Jay D's Louisiana Molasses Mustard Sauce to allow it to caramelize for the last 30 minutes. Enjoy!

Tuesday, June 14, 2016

Shrimp Tacos

Living in Texas, Tex-Mex food is aplenty with numerous options for tacos on the menu. Shrimp Tacos are some of our favorites to make at home for a quick and easy weeknight meal. The zest of the lime, the spice of the red pepper and the smokiness of the barbecue in the Chicken Salt products from Jada work perfectly with this dish.

Shrimp Tacos
by Tonda

1/2 cup sour cream
Juice of 1 large lemon
1/2 teaspoon Jada Lime Chicken Salt
1/2 teaspoon Jada Red Pepper Chicken Salt
1/2 cup cilantro

Add all ingredients to a mini food processor and process until the cilantro is chopped fine. Refrigerate while cooking the shrimp to allow the flavors to marry.

1 Tablespoon olive oil
1/2 medium onion, sliced thin
1 pound raw peeled and deveined jumbo shrimp
1 teaspoon Jada Barbecue Chicken Salt
1 bag Angel Hair Coleslaw
6-8 flour tortillas
1-2 limes

Heat tortillas in a small skillet, one at a time over medium-high heat. Set aside and keep warm.

In a medium sized frying pan, saute the onion in olive oil until translucent. Add shrimp, sprinkle the Jada Barbecue Chicken seasoning on the shrimp, and saute approximately 4 minutes depending on the size of shrimp used, or until done.

Add some coleslaw in the warm tortillas and top with shrimp and sauce. Squeeze fresh lime on top, if desired.

Friday, May 6, 2016

Slow Cooked Potato Soup with Dill

Having a Polish Babcia, growing up eating dill sprinkled in soups was very common in her house. I have been making this soup for years, but never in the slow cooker because you need to sauté the veggies before simmering them. Sautéeing the veggies adds a depth in flavor that you wouldn't get if you simply put them in the pot to simmer. It's a must. Enter the Instant Pot IP-DUO, which has both sauté and slow cook functions...game changer! This pot is not only an electric pressure cooker, it can sauté, make yogurt, steam, and slow cook, and much more. 

Slow Cooked Potato Soup with Dill
By Tonda
Adapted from Chunky Potato Soup with Dill by Ruth Cousineau

1/4 cup butter
3 large carrots, cut into 1/2-inch pieces
3 large stalks of celery, cut into 1/2-inch pieces
1 large onion, diced
1 1/2 pounds russet potatoes, peeled and cut into 1/2-inch pieces
4 cups water
1 1/2 teaspoons salt
1/4 teaspoon pepper
1 cup whole milk
2 Tablespoons chopped fresh dill

Set the Instant Pot to the Sauté function and press the Adjust button once to heat the pot on More. Once the pot is heated, melt the butter in the pot and then add all of the veggies. Sauté the veggies until the potatoes begin to brown and stick to the bottom of the pot, approximately 10 minutes. Press the Keep Warm/Cancel on the pot to stop the Sauté function. Press the Slow Cook button and then press the Adjust button twice to heat the pot to less. Add water, salt and pepper. Cover the pot (I used a lid that fits one of my pans, and it fit perfectly.) and cook for two hours on low. After two hours, remove 3 cups of the soup and blend to puree. I use an immersion stick blender for this and it works perfectly. Mix 5 Tablespoons of the puree, one Tablespoon at a time, into the milk, and then pour the milk mixture and the puree back into the pot. Stir in the dill.

Enjoy!

Monday, March 21, 2016

Golden Grahams Campfire Cocktail

When I opened the package that arrived for this challenge from General Mills and saw the box of Golden Grahams, their old commercial from the late 70's started singing in my head. "Oh those Golden Grahams, oh those Golden Grahams, golden honey, just a touch, with grahams golden wheat..." Reminiscing the mornings that I would eat Golden Grahams cereal before school not leaving a drop of the delicious cereal milk left in the bowl, I knew that this challenge was up my alley. Fast forward many years, I thought that an adult version to enjoy that sweet, delicious, cereal milk would be appropriate.


Golden Grahams Campfire Cocktail
by Tonda
Makes 1 drink

2 cups Golden Grahams cereal
1 1/2 cups half and half

Pour 1 1/2 cups half and half over 2 cups of Golden Grahams cereal. Place in the refrigerator to soak for two hours. After two hours, pass through a fine strainer to collect the cereal infused half and half. Toss the cereal. You will have more infused half and half than needed for one drink.

1 ounce chocolate, melted
1/2 cup Golden Grahams cereal, crushed

Turn the martini glass upside down and dip and twist in the melted chocolate. Then, dip the glass in the crushed cereal. Set aside.

2 ounces chocolate cream liquor (I used Belle Gabrielle Chocolatier Chocolate Cream Liqueur)
2 ounces Golden Grahams infused half and half
1 ounce bourbon whiskey, I used Winchester

Fill shaker with ice, pour in all of the liquid ingredients and shake to mix. Fill the rimmed martini glass. Top with a skewered marshmallow and light with a torch to roast.

Enjoy and "Have a Golden Day!"

Thursday, March 10, 2016

Shrimp with Snow Peas

A few of our cooks recently had the great opportunity to review The Six O'Clock Scramble Meal Planner: A Year of Quick, Delicious Meals to Help you Prevent and Manage Diabetes by Aviva Goldfarb! Here is the first of five recipes from this wonderful cookbook! 

*************************************************************************

Diabetes runs on both my maternal and paternal sides of the family. Therefore, making healthy meals for my family is very important to me. While going out to eat can be enjoyable, it also gets expensive in cash and calories. Therefore, my family goes out to eat once a week and eats at home the rest. Achieving restaurant flavors at home while cutting back on fat, sodium and calories is a big bonus. Cooking those meals in 30 minutes is an even bigger bonus.

I dove into The Six O'Clock Scramble Meal Planner: A Year of Quick, Delicious Meals to Help you Prevent and Manage Diabetes by Aviva Goldfarb, reviewing every recipe before I selected one to cook. Aviva Goldfarb has created a book filled with international delights that will please any palate. Her recipes are filled with flavor, packed with healthy ingredients, and are quick to make. Preparation and planning for the week ahead is key to success when cooking for the family after work. The Six O'Clock Scramble has you covered and is the perfect go-to for planning weekday meals. In this book, Aviva Goldfarb creates a weekly meal plan for you along with an organized grocery list. Snap a quick picture of the shopping list on your cell phone to review while you are doing your weekly grocery shopping, or print off a grocery list from TheScramble.com/Diabetes. How easy is that?

This cookbook has become my weekly go-to for my family. Once you try it, I'm sure that it will be yours as well.

Shrimp with Snow Peas
by Tonda
Adapted from Golden Tofu with Snow Peas, page 32 of The Six O'Clock Scramble Meal Planner: A Year of Quick, Delicious Meals to Help you Prevent and Manage Diabetes by Aviva Goldfarb

1 cup medium grain brown rice
2 1/4 cups water

Cook the brown rice according to the package or rice cooker directions.

2 Tablespoons reduced sodium tamari (or soy sauce)
1 Tablespoon rice wine vinegar
1 teaspoon honey
1/4 teaspoon sesame oil
1 pound large shrimp, peeled and deveined
2 Tablespoons olive oil, divided
1/2 yellow onion, sliced in thin strips
1 cup of snow peas
1 red or yellow bell pepper, julienned (I used a combination of 6 mini peppers)
1 1/2 inch ginger root, finely grated
2 cloves garlic, crushed

Mix the tamari, rice wine vinegar, honey and sesame oil together in a small bowl to create the sauce. Set aside.

Pat the shrimp dry with a paper towel. Heat 1 Tablespoon of olive oil in a large nonstick pan over medium-high heat. Add the shrimp and cook until done, approximately 4-5 minutes depending on the size of shrimp. Remove shrimp and set aside.

Add remaining 1 Tablespoon of olive oil to the pan. Add the onion and cook over medium high heat until they become translucent and start to brown, approximately 2 minutes. Add the snow peas, bell pepper, ginger, and garlic and stir fry for 2 minutes. Pour in the sauce and shrimp and continue to stir fry for another minute or two.

Serve with 1/2 cup of brown rice. My family prefers medium grain brown rice. It has a firm texture that stands up well in Asian inspired dishes.

Thursday, January 14, 2016

Goat Cheese Ice Cream with Wild Hibiscus and Strawberry Swirl

When I first received the Wild Hibiscus Flower Extract from the Wild Hibiscus Flower Company, I started exploring what would pair with the hibiscus flavor. Goat cheese kept coming up in my searches...and then it hit me! Goat cheese ice cream with a wild hibiscus and strawberry swirl.

I first heard of goat cheese ice cream from a friend that was visiting a boutique ice creamery in Maine. Hearing about it, I was intrigued. I love goat cheese, and I love ice cream. Mix them together? Yes, please! This ice cream is all about the goat cheese. If you use a cheese with a bite to it, your ice cream will have that same bite. This is the time to go to your local farmer's market and buy a mild, fresh goat cheese. You will be happy that you did. In my search for a mild goat cheese, I discovered The Pure Luck Farm, who have been making award winning cheeses since 1998. Their goat cheese is a treat.

Let's talk about the extract. It's the end of strawberry season and they are looking pretty tired in the market. The taste is not much better than they look. It's pretty flat. Adding the Wild Hibiscus Flower Extract from The Wild Hibiscus Company brought out that bright, sweet, juicy, peak of summer, strawberry taste to the berries and made this jam outstanding. This recipe does not make a firm jam. However, the loose consistency is perfect for swirling into the ice cream. If you are not into goat cheese ice cream, just make the jam. Spread it on toast, top some vanilla ice cream with it, or eat it straight out of the jar. It's that good.

Wild Hibiscus and Strawberry Jam

by Tonda
Adapted from Love & Olive Oil's Strawberry Hibiscus Jam
Yields 3 half pint jars

1 pound fresh strawberries, hulled and quartered
1 1/2 cups granulated sugar, divided
3 Tablespoons Wild Hibiscus Flower Extract
1 teaspoon butter
2 Tablespoons fresh lemon juice

Wash, hull and quarter the strawberries. Add the strawberries to a medium-sized bowl and toss with 3/4 cup of sugar. Cover and chill overnight to bring out the strawberry juices. Pour the berries, scraping out all of the yummy syrup and sugar from the bottom of the bowl, into a medium sized saucepan and add the remaining 3/4 cup sugar, Wild Hibiscus Flower Extract, and butter. Bring the mixture to a boil over medium-high heat, stirring often. Turn the heat down to medium or medium-low to simmer until the jam reaches 220°F. Once the jam reaches 220°F, add the lemon juice and cook for an additional 10 minutes.

Goat Cheese Ice Cream with Wild Hibiscus and Strawberry Swirl
by Tonda
Adapted from David Lebovitz's The Perfect Scoop

8 ounces fresh goat cheese (I used the fresh Chèvre from The Pure Luck Farm)
6 large egg yolks
1 1/2 cups whole milk
2/3 cup sugar
1/2 teaspoon Bourbon vanilla

Crumble the goat cheese into a bowl (that will eventually sit in an ice bath) and allow to come to room temperature. Add the egg yolks to a separate bowl and whisk. Prepare an ice bath. Set aside.

Warm the milk and sugar in a medium saucepan over medium to medium-high heat. While stirring, warm until it just starts to bubble around the edges of the pan. Turn the heat down to low. Temper the eggs by slowly adding five tablespoons of the warmed milk/sugar mixture to the bowl. Whisk after each tablespoon addition. Slowly mix the egg mixture into the saucepan with the milk and sugar. Turn the heat up to medium-low to medium heat and constantly stir the mixture until it starts to thicken, approximately 5-7 minutes. It will just start to coat the back of your spatula.

Remove the mixture from the heat and pour it through a mesh strainer (to catch any bits of egg that started to cook) into the goat cheese. Add the vanilla to the goat cheese/milk/egg mixture. Stir until the goat cheese completely melts and is nice and smooth. Place the bowl over and ice bath and continue to stir until the mixture is cool. Cover the mixture, making sure that the plastic wrap touches the surface of the custard to avoid a film from forming. Place it in the refrigerator and chill for 4 hours, up to overnight.

Churn the custard in your ice cream machine according to the manufacture's specifications. Once done, add a few tablespoons of the jam to the container that you will store the ice cream in, and then add a layer of the ice cream. Continue to alternate the jam and ice cream while swirling the jam into the layer of ice cream below. Freeze until firm.

Enjoy!

Wednesday, December 2, 2015

Ti' Punch


This challenge led us to taking our chances and rolling some dice...Cocktail Dice! What a fun idea from Leafcutter Designs!

Each year, my husband and I host a Bottle Exchange party. It's similar to a White Elephant, but with wrapped bottles of wine and spirits. We typically have a signature drink for the party, however, this year we will be changing it up thanks to Leafcutter Designs. Ingredients will be available and a roll of the Cocktail Dice will determine each individual's drink. I love adding this twist to an already amusing evening.

For this drink, my husband and I each took half of the dice and gave them a roll. We ended up with a roll that was perfect to make an islander drink from Martinique called the Ti' Punch, meaning little punch. It's a very simple drink, but it packs a flavorful punch.

This recipe calls for simple syrup, which is very easy to make. I recommend using an unrefined pure cane sugar to make a darker syrup. Trust me, the taste is so much better.

Ti' Punch
By Tonda

Juice of one lime
2 ounces dark rum, we used Neisson Rhum Agricole
1 ounce pure cane simple syrup (start with 1/2 ounce and add more if you need the sweetness) (recipe below)
Maraschino Cherry to garnish
Ice

Simple Syrup

1 Cup water
1 Cup unrefined, pure cane sugar

Add water and sugar to a small saucepan and bring to a boil, stirring until the sugar crystals dissolve. Remove from heat and allow to cool. *This will keep in your refrigerator for about a week.

Squeeze the lime into a double old fashioned glass. Add rum, simple syrup, and a couple of cubes of ice. Stir to combine. Garnish with a lime wedge and maraschino cherry.

Tchin-tchin!

Friday, September 25, 2015

Pumpkin Patch Green Chile Chicken

We have a local Tex-Mex restaurant that has an annual green chile festival when the green chiles from Hatch, NM are in season. Each year the chefs get so creative with new green chile drinks and dishes. One dish that I had many years ago was so tasty and had a catchy name, the Charlie Brown Chicken. The chicken was pan fried and topped with their famous green chile sauce and a dusting of pumpkin seeds. The combination is amazing. When I received the Blackened Pumpkin Seeds from Truly Good Foods, I immediately wanted to reproduce the Charlie Brown Chicken at home and my hunt for this green chile sauce commenced. I'm so excited to share this recipe with you.

Pumpkin Patch Green Chile Chicken
by Tonda
Adapted from Chuy's Green Chile Sauce on KPLCtv.com

Roux:
6 Tablespoons butter
8 Tablespoons all-purpose flour

Melt the butter in a small sauce pan over medium heat. While whisking, slowly add the flour. When the flour is completely mixed in and the roux is smooth, reduce the heat to low. Cook for approximately 20 minutes, while stirring frequently. The roux will be the color of peanut butter when it is done. Remove the pan from heat and keep warm.

Chuy's Green Chile Sauce:
4 10-ounce cans roasted whole green chiles
1 Tablespoon butter
1/2 cup sweet onion, diced
4 cups chicken stock
1 1/2 Tablespoons chili powder
2 teaspoons ground cumin
1/2 to 1 teaspoon cayenne pepper (I backed down the heat to 1/2 teaspoon for my family)
Roux (from above)
1 14.5-ounce can petite diced tomatoes, no salt added

Drain the cans of whole green chiles and chop them finely in a food processor. Set aside. Melt the butter in a large sauce pan over medium-high heat. Add the onions and sauté until they are transparent and light brown. Add the chicken stock and all of the spices. Bring to a boil over medium-high heat and then reduce the heat to bring the sauce to a light simmer. Once it has reached the light simmer stage, slowly whisk in the roux. Simmer for 15 minutes to thicken the roux, stirring frequently. Drain the diced tomatoes and add them with the green chiles to the sauce. Continue to simmer for 15 minutes, stirring frequently.

Baked Chicken:
4 boneless, skinless chicken breasts
1 Tablespoon olive oil
Shredded Monterrey Jack cheese

Preheat the oven to 350°F. Season the chicken with your favorite seasoning. Heat the olive oil over high heat in an ovenproof sauce pan. Sear the chicken on both sides, approximately 2 minutes per side. Finish baking the chicken for 25 minutes in the oven. Top the chicken with shredded Monterrey jack cheese and cook just until melted.

 Plate the chicken breast with a big spoonful (or two) of green chile sauce and a dusting of Truly Good Foods Blackened Pumpkin Seeds. Enjoy!

Tuesday, September 22, 2015

Summer Fruit Crumble with Truly Good Foods Pecan Praline Streusel

I love having fruit in desserts. The combinations of fruit that you can add to a crumble are endless and can transform to what is in season. For this crumble, I combined stone fruits with berries. The Praline Pecans from Truly Good Foods added the perfect sweet crunch to the streusel topping. Served warm and topped with a cold, creamy scoop of vanilla ice cream, I haven't found anyone that disagrees that it's the best sweet ending to a meal!

Summer Fruit Crumble with Truly Good Foods Pecan Praline Streusel
by Tonda

Streusel:
1 1/2 cups all-purpose flour
1/3 cup brown sugar
1/2 cup salted butter, melted
1 cup Truly Good Foods Praline Pecans, chopped

Stir the flour and brown sugar together until combined. Add the butter and pecans and continue to stir until blended. Set aside for approximately twenty to thirty minutes to allow the mixture to firm up enough to crumble.

Filling:
3 pounds peaches, blanched, peeled, and sliced
1/2 cup granulated sugar
4 Tablespoons all-purpose flour
2 cups Ranier cherries, pitted
1 cup blackberries

Preheat the oven to 375°F. Add the peaches, sugar and flour to a saucepan and stir to combine. Cook over medium-high heat to bring to a boil. Reduce the heat to medium and continue to boil for approximately 5 minutes, while stirring constantly. It may take a couple more minutes of boiling and stirring to get the juices of the peaches to thicken up. Remove the peach mixture from the heat and mix in the cherries and blackberries. Pour the mixture into a 10-inch round baking dish. Crumble the streusel over the fruit mixture and put it in the oven for 30 to 35 minutes, until it's golden and bubbly.

Serve warm with a scoop of your favorite vanilla ice cream.

Friday, July 10, 2015

Cluck 'n Moo Caprese Burger Stuffed Portabella Mushrooms

Sometimes I want the taste of a burger, but don't want the heaviness of 80/20 ground beef. The folks over at Cluck 'n Moo have created a very tasty product that is a blend of chicken and grass-fed beef, ground into a product with a whopping 52% less fat and 34% fewer calories than traditional grain-fed beef burgers. Give this product a try, you will not know that you are eating a beef and chicken mix and will certainly not be disappointed in the flavor of the blend. After trying it myself, I am hooked on Cluck 'n Moo!

Cluck 'n Moo Caprese Burger Stuffed Portabella Mushrooms
by Tonda

1 pound Cluck 'n Moo Ground
2 Tablespoons chopped fresh basil
3 Tablespoons grated Parmesan cheese
1 clove garlic, minced
1/4 teaspoon ground pepper
3 large portabella mushroom caps
Drizzle olive oil
1 large tomato, sliced
Drizzle balsamic vinegar
6 slices fresh mozzarella cheese
3 Tablespoons pesto

Preheat grill to medium-high heat. Add basil, Parmesan cheese, garlic and ground pepper to the Cluck 'n Moo mix. Mix well to evenly distribute the spices and cheese. Clean out the gills from the portabella mushrooms. Add a drizzle of olive oil to the outside of the mushroom caps and rub to cover the mushrooms. Flip over and stuff the meat mix in the mushrooms, patting down to form a patty inside. Grill for approximately 15 minutes, or until you reach an internal temperature of 165°F. Add a slice of tomato and drizzle with Balsamic vinegar. Cover with two slices of mozzarella cheese. Grill for an additional 5 minutes to melt the cheese. Top with pesto and serve with a fresh side salad.

Wednesday, June 17, 2015

Pizza Savoyarde

My husband was born in the Alps. Raclette cheese melted over potatoes and smoked ham was a staple in the cold winter. He has fond memories of his family and friends gathering for raclette parties next to the fire. Fast forward many years, we traveled back to his old village to visit. We stopped in a small pizzeria for lunch and ordered his favorite winter dish topped on a pizza. One bite and we were hooked! Now we can enjoy this typical winter dish any time of the year topped on a pizza.

Mrs. Anderson's Non-Stick Silicone Bread Crisping Mat was a delight to work with. Once rolled out, the pizza dough caught onto the grooves of the mat which helped it to keep it's form. After being baked, the pizza slid off of the mat with ease. The crust was crisp on the outside and chewy inside. This mat will be my go-to for all of my future bread and pizza baking ventures!

Pizza Savoyarde
by Tonda

4 medium Yukon Gold potatoes
1 Tablespoon olive oil
1 medium yellow onion, sliced
2 cloves garlic, minced
5 thick slices of bacon, cut vertically into 1/2-inch slices
1 Tablespoon chives, chopped
6 Tablespoons crème fraîche
14 ounces of your favorite pizza dough
1/2 pound raclette cheese, thinly sliced
16 cherry tomatoes

Boil the potatoes in a large pot of water until they are cooked through, approximately 20 minutes. Drain and set aside to cool. Once cool enough to handle, slice into 1/4-inch rounds. 

Preheat the oven to 400°F. Sauté the onions and garlic in olive oil until the onions are transparent and soft. Remove the mixture from the pan and set aside. Add the bacon to the pan and fry until cooked through, but still soft. Drain and set aside. 

Mix the chives into the crème fraîche. 

Roll out the pizza crust into an 8 x 15 rectangle. Lay the non-stick silicone bread crisping mat in an 11 x 17 baking sheet. Add the pizza crust. Spread the crème fraîche mixture over the crust. Sprinkle the onions and bacon evenly over crème fraîche mixture. Add the potato slices and then cover with the raclette cheese. Dot the pizza with cherry tomatoes. 

Bake until the cheese is nice and bubbly, approximately 15-20 minutes. Enjoy with a fresh salad and a glass of dry white wine such as, Apremont or Vouvray. Bon Appétit!

Monday, June 15, 2015

Cluck 'n Moo Smokey Black and Bloo Burger


I love the long days of summer. Even though we live in Texas where the winters are very mild, it always seems that we fire up the grill more often in summer. Good burgers made at home always please a crowd and blow restaurant burgers out of the water. Who doesn't love a grilled burger? The folks over at Cluck 'n Moo understand the desire to eat healthy while still enjoying a good burger. They created a delicious blend of chicken and grass-fed beef, ground together into a product that has 52% less fat and 34% fewer calories than traditional grain-fed beef burgers. The blend is very flavorful and juicy when cooked. Give this product a try. I can guarantee that you will love it.

The black and blue burger is my husband's favorite. When we received Cluck 'n Moo to test, he immediately requested that I make his favorite. We made this burger on our Kamado Joe with apple wood to give it a smokey flavor. If you don't have an egg-shaped grill, you could also grill the burgers over medium-high heat (350-375°F) for an equally delicious burger. Because there is chicken in the blend, make sure that you cook the burgers to an internal temperature of 165°F.

Cluck 'n Moo Smokey Black and Bloo Burger
by Tonda

1 pound Cluck 'n Moo Ground
1 Tablespoon Italian parsley, chopped fine
1 teaspoon garlic powder
1/2 teaspoon ground black pepper
1/2 teaspoon salt
Blue cheese crumbles
4 slices apple wood smoked bacon, cooked until almost crisp

For the onions:
2 Tablespoons butter
1 red onion, sliced approximately 1/4-inch thick
2 Tablespoons brown sugar

Light the charcoal and preheat the egg to 250°F. Once it's up to heat, add some apple wood chunks to start the smoke.

Mix parsley, garlic powder, black pepper and salt in the Cluck 'n Moo blend. Shape into two 1/2 pound patties and then cover and refrigerate while starting the onions.

Melt butter over medium-low heat, add onions and brown sugar. Toss to cover the onions with the brown sugar. Cook until the onions are soft and caramelized, tossing occasionally. They should be done in approximately 20 minutes.

Smoke the burgers over indirect heat to in internal temperature of 150°F to get a nice smokey flavor. Remove the burgers to bring the egg temperature up to 450°F. Add the burgers back to the grill and sear over direct heat, approximately 2-3 minutes per side, until they reach an internal temperature of 165°F. *Do not press the burgers when flipping. That will press out the natural moisture of the meat and create a dry burger. Top the burgers with blue cheese and continue to cook until melted. Top the burgers with bacon and caramelized onions. Enjoy!

Tuesday, April 21, 2015

Texas Ruby Red Martini

Boutique distilleries are popping up all over Austin area and are adding a taste of Texas to the spirits map. Local restaurants and bars are sourcing from these distilleries and crafting amazing concoctions. I'm lucky to live in the area to be able to get a taste of what's new.

Have you ever had a drink at a restaurant and thought, "I've got to try to reproduce this at home?" This was the case for me with this grapefruit drink that I had at a local restaurant. The combination of Republic Spirit Blends Prickly Pear Mixer with fresh ruby red grapefruit juice gives the perfect balance of sweet and tart. Layering Deep Eddy Ruby Red Vodka with the juices makes the grapefruit shine in this drink.

Texas Ruby Red Martini
by Tonda

1 ounce St-Germain
6 ounces Deep Eddy Ruby Red Vodka
6 ounces Republic Spirit Blends Prickly Pear Mixer
6 ounces freshly squeezed Ruby Red grapefruit juice
1 ounce simple syrup

Add ice to a martini shaker and add all of the ingredients. Shake until well mixed. Serve in a martini glass.

Tuesday, March 3, 2015

Kale Balsamic Chicken Sausage with Shrimp, Peppers and Caramelized Onions over Creamy Polenta

The Bilinski's sausage challenge presented a few firsts for me. This was the first time that I tried Bilinski Sausage Company's sausage, the first time that I caramelized onions and the first time that I made polenta. Have I been missing out! After this challenge, I will be seeking out other Bilinski's sausages to try. All of their sausages are antibiotic-free, soy-free, gluten-free, wheat-free, casing-free, and preservative-free. Yet, they are full of flavor and packed with healthy chicken and organic herbs and spices. What a perfect product to add to my family's meals.

We were challenged to create a dish to pair with the Bilinski's Kale Balsamic Chicken Sausage. The sausage was delicious on it's own, with a hint of sweetness from the balsamic vinegar. I knew that it would pair well with shrimp, peppers and caramelized onions.

Kale Balsamic Chicken Sausage with Shrimp, Peppers and Caramelized Onions over Creamy Polenta
by Tonda

For the onions:
3 teaspoons butter
Olive oil to coat the pan
3 large yellow sweet onions, sliced

For the polenta:
2 cups milk
2 cups water
1 teaspoon salt
1 cup polenta
1 cup shredded Italian 4 cheese blend

For the sausage and shrimp mixture:
1 pound large shrimp, peeled and deveined
1/4 teaspoon Slap Ya Mama Original Blend Cajun Seasoning
Cooking spray for grill pan
1 green pepper, sliced
1 red pepper, sliced
1 orange pepper, sliced
6 Bilinski's Kale Balsamic Chicken Sausages
Italian flat leaf parsley, minced

Let's start by caramelizing the onions as they need to cook low and slow. Coat the bottom of the saute pan with olive oil and butter. Heat the pan on medium-high until the oil starts to shimmer. Add the onions and toss to coat them with oil. Saute the onions until golden, stirring occasionally. After 10 minutes, reduce the heat to medium-low to prevent the onions from burning and/or drying out. If they do start to dry, add a little bit of water to the pan. Let the onions cook for approximately 30 minutes, stirring every few minutes. Keep the onions evenly spread over the pan. As you get closer to the 30 minute mark, you may need to turn the heat down a little and stir more often. The end result is sweet and bursting with flavor. Set the onions aside.

Next let's preheat the grill to a medium-high temperature before we start the polenta.

Now, for the polenta...Add the milk, water and salt to the top of a double boiler. Heat the mixture to a boil. Gradually add the polenta, stirring constantly until thickened. Cook, stirring frequently, for approximately 25 minutes. Blend in the cheese when the polenta is cooked and tender.

Back to the grill...Sprinkle the shrimp with the seasoning. Spray the grill pan with cooking spray and let it heat up on the grill. Turn the heat down to medium and add the peppers. Cook for approximately 10 minutes. The skin will start to blister. Add the sausage to the grill halfway through the cook time of the peppers. Grill the sausage 4 minutes per side. After 10 minutes, add the shrimp to the peppers in the grill pan and cook for approximately 5 minutes, until done.

Assemble the plate with polenta, caramelized onions, peppers, shrimp and one link of sausage, sliced. Sprinkle with parsley.

Enjoy!

Monday, December 8, 2014

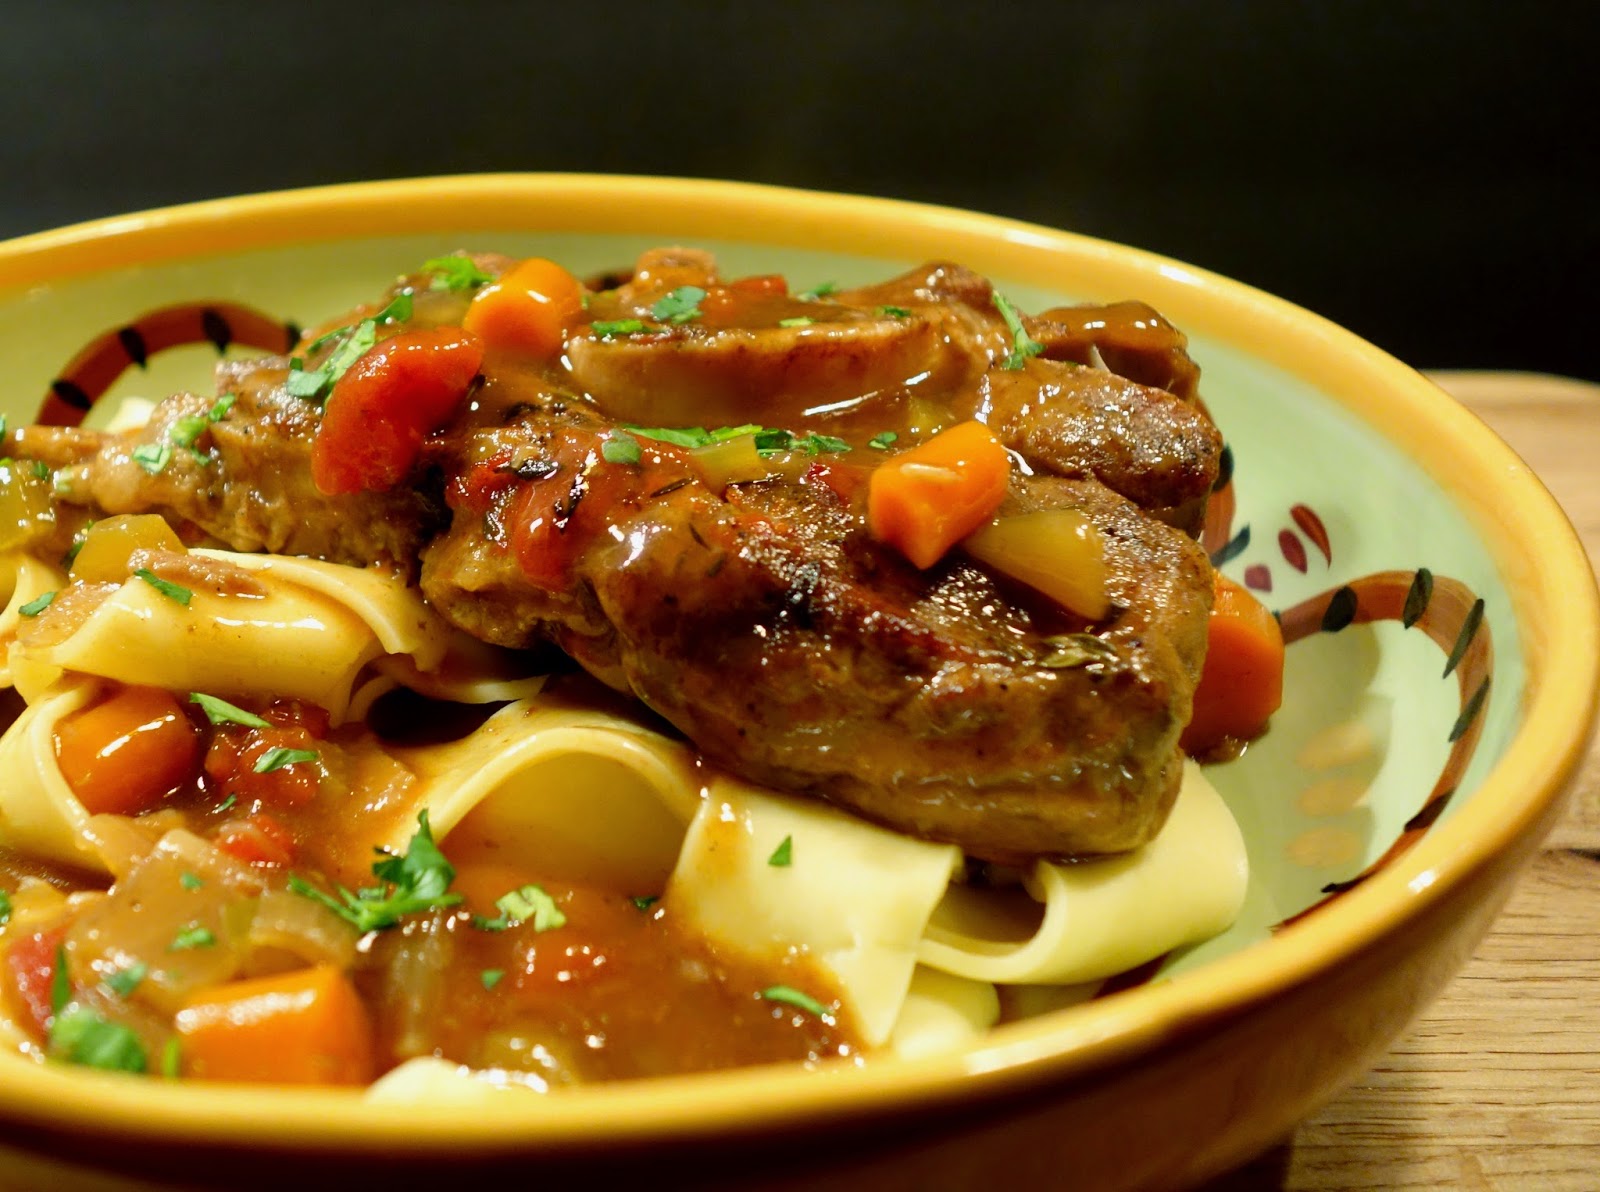
Slow Cooked Osso Bucco


The holiday season can be so busy and stressful. Shopping, holiday parties and gatherings seem to multiply and you feel pressed for time. That doesn't mean that you have to cater or pick up take-out to feed your family or guests. You can cook an incredible guest-worthy meal without slaving over the stove thanks to the Hamilton Beach Set & Forget 6 Quart Programmable Slow Cooker. The rich flavors that result from searing and then slow cooking the veal shanks in this dish will have your guests thinking that you have been in the kitchen all day!

I love this slow cooker! It's programmable timer allows you to set the cook time, and when it reaches that time, it automatically changes it's temperature to warm. You don't have to make a mad dash home to switch the temperature in fears that your dinner will be over-cooked. What a bonus!

Slow Cooked Osso Bucco
by Tonda
Adapted from Williams Sonoma's Osso Buco

1 Hamilton Beach Set & Forget 6 Quart Programmable Slow Cooker
1 medium yellow onion, coarsely chopped
2 large carrots, peeled and diced
2 medium celery stalks, diced
3 garlic cloves, minced
6 veal shanks, approximately 1 1/2 inches thick
Salt and pepper to taste
3/4 cup all-purpose flour
1/4 cup extra virgin olive oil
1 cup dry red wine
2 Tablespoons tomato paste
1 14-ounce can diced tomatoes, drained
3 cups beef stock
2 Tablespoons chopped fresh thyme
1 bay leaf
Chopped fresh flat leaf parsley for garnish
Papparedelle pasta or polenta for serving

Add the onion, carrots, celery and garlic to the bottom of the slow cooker.

Season the veal shanks with salt and pepper. Add flour to a wide, shallow bowl. Dredge the veal shanks in the flour, coating evenly. Shake off the excess flour. Heat the olive oil over medium-high heat in a large saute pan. Brown the shanks in batches, approximately 4 minutes per side. Transfer to the slow cooker. Reduce the heat to medium, and add the wine to the pan. Stir to scrape up all of the browned bits stuck to the bottom of the pan. Add the tomato paste and mix well. Pour the mixture over the veal shanks in the slow cooker. Add the diced tomatoes, beef stock, thyme and bay leaf. Program the slow cooker to cook for 8 hours on low. Cover and let the slow cooker perform it's magic. When it's done, the veal will be so tender that it will fall off of the bone.

Remove the liquid from the slow cooker and add it to a sauce pan. Simmer over medium-high heat until it thickens to your desired consistency. Season to taste.

Serve over pappardelle pasta or polenta.

Pour yourself a nice glass of red wine and give yourself a pat on the back for making an impressive Italian classic with such little effort! Buon appetito!