Wednesday, September 30, 2015

Peanut Butter and Chocolate Cupcakes with Butter Toffee Peanuts

Peanut Butter and Chocolate Cupcakes with Butter Toffee Peanuts
by Sarah Kwan of The Garden of Earthly Delights

Chocolate Cupcakes:
3/4 cup cake flour
1/2 cup cocoa powder
3/4 cup granulated sugar
1/2 teaspoon baking soda
1/2 teaspoon baking powder
1/2 teaspoon salt
1 large egg
3/4 cup vegetable oil
1/2 cup milk
12 mini peanut butter cups (plus more for decorating cupcakes)

Line a 12-piece muffin tin with cupcake liners.

Preheat oven to 350°F.

Sift together cake flour, cocoa powder, sugar, baking soda, baking powder, and salt.

In a large bowl, whisk together egg, vegetable oil, and milk.

Add dry ingredients to egg mixture, whisking lightly until combined.

Divide the cupcake batter evenly into the muffin tin.

Add a mini peanut butter cup into the center of each cupcake.

Bake for 18 minutes, then let cool thoroughly before icing.

Peanut Butter Icing:
4 large egg whites, room temperature
1/4 teaspoon cream of tartar
1 cup sugar
Pinch of salt
1/4 cup water
1 cup butter, slightly softened
1/2 cup smooth peanut butter

Whip the egg whites in a large bowl on low speed until foamy, with even small bubbles.

Add the cream of tartar and continue whipping, until the egg whites form glossy peaks.

In a pot, heat sugar, salt, and water over medium-high heat, until it reaches 238°F.

Pour the sugar syrup into the egg whites in a slow steady stream while mixing on high. Continue to mix until the bowl is cool to the touch (approximately 5 minutes).

Add the butter in small chunks, beating continuously.

Add the peanut butter and continue whipping. If the mixture turns lumpy, not to worry - keep beating until it pulls together again and becomes smooth.

To assemble:
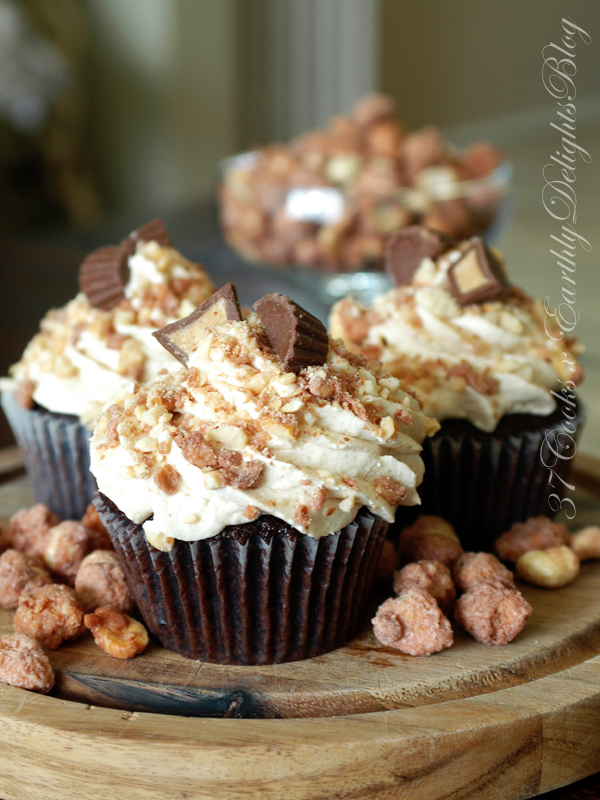
1/2 cup butter toffee peanuts
12 mini peanut butter cups

Spoon the icing into a pastry bag fitted with a large tip and frost fully cooled cupcakes.

Lightly chop 1/2 cup of butter toffee peanuts in a food processor, and sprinkle over each cupcake..

Top each cupcake with a halved mini peanut butter cup.

Tuesday, September 29, 2015

Butter Toffee Peanut Crusted Pork Tenderloin

Butter Toffee Peanuts and pork? Um, yes please! I had my choice of several varieties of Truly Good Foods premium snacks, but landed on their Butter Toffee Peanuts as a crust for pork tenderloin. I thought the sweet/savory mix might work well, and it did. These medallions of pork are crunchy around the edges, tender and juicy in the middle, and have a surprise hint of sweet butter toffee and peanuts. This recipe is delicious and, despite my twelve year old son’s protestations that 8 ingredients in a recipe is too complicated, they really are super easy to make. Trust me!

Butter Toffee Peanut Crusted Pork Tenderloin
by Maryjo

1 pork tenderloin
1 cup Truly Good Foods Butter Toffee Peanuts
1/2 cup panko bread crumbs
1 teaspoon salt
1/2 teaspoon black pepper
1 cup all-purpose flour (dredge)
2 eggs, beaten (egg wash)
2 to 4 Tablespoons olive oil

Pork tenderloin usually comes packaged with two tenderloins. I used only one of the tenderloins for this recipe. Trim the tenderloin of excess fat and remove the silver skin, if it has not already been removed by the butcher. I also cut the tenderloin in half cross ways so that it would fit into my skillet.

Set your oven rack to the upper middle position and preheat to 375°F. In a food processor, pulse the Truly Good Foods Butter Toffee Peanuts, panko bread crumbs, salt, and pepper until coarsely ground.

Dry off the tenderloin halves to remove excess moisture. Dredge each tenderloin half in the all-purpose flour, shaking off any excess. Quickly dip each tenderloin half into the egg wash, and then roll each in the ground Butter Toffee Peanut and Panko mixture. 

Working with one tenderloin half at a time, heat 2 Tablespoons of oil in a large skillet over high heat until shimmering. Reduce the heat to medium-high and brown the first tenderloin half on all sides until dark golden brown and transfer to a baking sheet. If needed, add another Tablespoon or two of oil to the skillet and brown the second tenderloin half. Place it next to (but not touching) the first tenderloin and bake in the oven for 25 to 30 minutes. Check for doneness with an instant read meat thermometer. 145°F for medium rare, 160°F for medium. Let the tenderloin rest for 10 minutes, uncovered. Slice into medallions and serve. This dish goes well with mashed potatoes, steamed rice, or even with a fresh green salad.

Monday, September 28, 2015

Nut-Crusted Buffalo Tofu (Vegan)

Why should wings have all the fun? Take your favorite buffalo flavors vegan with this quick and easy recipe, seen here with maple carrots and red beans and rice.

Nut-Crusted Buffalo Tofu (Vegan)
by Kate Jonuska

1 (16-ounce) package extra-firm tofu
1/2 cup all-purpose flour
Salt and pepper
1/2 cup vegan egg substitute (such as Ener-G Egg Replacement or Neat Egg)
1 cup panko breadcrumbs
Vegetable oil for frying
Hot sauce (optional)
Special equipment: food processor

Drain the tofu. Place the brick between two paper-towel-lined plates to press out excess moisture for at least 15 minutes and up to an hour.
Slice the tofu in half lengthwise, then slice each rectangle into bite-sized squares.

Season the flour with salt and pepper. Finely chop the nuts in food processor. Set up an assembly line with 1) flour, 2) egg mixture and 3) chopped nuts combined with panko breadcrumbs.

Toss each piece of tofu in the seasoned flour, then dredge it in the egg. Shake off excess egg, then drop the tofu into the nut mixture. Press into all six sides. Set aside.

Place a frying pan over medium-high heat. Add vegetable oil. Fry off the tofu in batches, making sure to brown all six sides. Remove to a paper-towel-lined plate.

Serve sprinkled with hot sauce. Seen here with red beans and rice, and maple carrots.

Sweet Potato Praline Wontons

These baked wontons are perfect for the winter holidays, and could work as an appetizer (served plain, they are only slightly sweet) or pile on the powdered sugar (or cinnamon sugar, or maybe serve with a marshmallow crème dipping sauce?) and serve as a dessert. If sweet potatoes are a fixture in your holiday meals, as they are for many, reserve 1 1/2 cups of mashed, seasoned sweet potatoes to use in place of cooking and seasoning the raw potatoes, and you can throw these together in a snap! Best of all, they’re baked, so you can prepare a whole tray, pop them in the oven and they’ll all be done at once!

Sweet Potato Praline Wontons
by Jennifer Scantlin

1 medium-large sweet potato (about 1 pound), peeled and cut into 1” pieces
2 Tablespoons unsalted butter
1/2 teaspoon kosher salt
1/2 cup Truly Good Foods Praline Pecans, chopped fine
About 30 wonton wrappers (found in refrigerator section)
Vegetable oil
Powdered sugar for dusting (optional)

Place sweet potato in a medium saucepan. Cover with cold water and place over high heat. When water starts to boil, lower heat to medium low and cook potato until soft, about 15 minutes. Drain potatoes and return to pan. Add butter and salt and mash potatoes until no lumps remain. Stir in praline pecans and set mixture aside.

To make wontons: Place one wonton wrapper on a dry workspace. Moisten the edges of the wrapper. Place 2 teaspoons of filling in the middle of wrapper. Fold wrapper into a triangle, matching two opposite corners of the square first, then seal edges, keeping filling away from edges. Place finished wonton on a cutting board or piece of parchment paper and continue with remaining wrappers and filling.


Before baking, brush or spray both sides of wontons with vegetable oil. Heat oven to 400°F. Bake for 7 minutes, flipping halfway through cooking time, if desired (this will give more even browning to both sides, but is not necessary!)

Dust with powdered sugar, if desired, and serve.

Friday, September 25, 2015

Pumpkin Patch Green Chile Chicken

We have a local Tex-Mex restaurant that has an annual green chile festival when the green chiles from Hatch, NM are in season. Each year the chefs get so creative with new green chile drinks and dishes. One dish that I had many years ago was so tasty and had a catchy name, the Charlie Brown Chicken. The chicken was pan fried and topped with their famous green chile sauce and a dusting of pumpkin seeds. The combination is amazing. When I received the Blackened Pumpkin Seeds from Truly Good Foods, I immediately wanted to reproduce the Charlie Brown Chicken at home and my hunt for this green chile sauce commenced. I'm so excited to share this recipe with you.

Pumpkin Patch Green Chile Chicken
by Tonda
Adapted from Chuy's Green Chile Sauce on KPLCtv.com

Roux:
6 Tablespoons butter
8 Tablespoons all-purpose flour

Melt the butter in a small sauce pan over medium heat. While whisking, slowly add the flour. When the flour is completely mixed in and the roux is smooth, reduce the heat to low. Cook for approximately 20 minutes, while stirring frequently. The roux will be the color of peanut butter when it is done. Remove the pan from heat and keep warm.

Chuy's Green Chile Sauce:
4 10-ounce cans roasted whole green chiles
1 Tablespoon butter
1/2 cup sweet onion, diced
4 cups chicken stock
1 1/2 Tablespoons chili powder
2 teaspoons ground cumin
1/2 to 1 teaspoon cayenne pepper (I backed down the heat to 1/2 teaspoon for my family)
Roux (from above)
1 14.5-ounce can petite diced tomatoes, no salt added

Drain the cans of whole green chiles and chop them finely in a food processor. Set aside. Melt the butter in a large sauce pan over medium-high heat. Add the onions and sauté until they are transparent and light brown. Add the chicken stock and all of the spices. Bring to a boil over medium-high heat and then reduce the heat to bring the sauce to a light simmer. Once it has reached the light simmer stage, slowly whisk in the roux. Simmer for 15 minutes to thicken the roux, stirring frequently. Drain the diced tomatoes and add them with the green chiles to the sauce. Continue to simmer for 15 minutes, stirring frequently.

Baked Chicken:
4 boneless, skinless chicken breasts
1 Tablespoon olive oil
Shredded Monterrey Jack cheese

Preheat the oven to 350°F. Season the chicken with your favorite seasoning. Heat the olive oil over high heat in an ovenproof sauce pan. Sear the chicken on both sides, approximately 2 minutes per side. Finish baking the chicken for 25 minutes in the oven. Top the chicken with shredded Monterrey jack cheese and cook just until melted.

 Plate the chicken breast with a big spoonful (or two) of green chile sauce and a dusting of Truly Good Foods Blackened Pumpkin Seeds. Enjoy!

Thursday, September 24, 2015

Blueberry Bran Loaf with Praline Pecans

Truly Good Foods sent a wonderful box of products to work with! I don't usually put nuts in muffins or quick breads - but these Praline Pecans were so well-seasoned that they made a perfect crunchy topping for a crunchy-topped loaf bursting with fresh blueberries.

Blueberry Bran Loaf with Praline Pecans
by Maurita Plouff, Good Stuff Recipes
Makes 3 small loaves

2 eggs
1 1/2 cups buttermilk
1/2 cup coconut oil, melted and slightly cooled
1 1/2 teaspoons kosher salt
2 teaspoons baking soda
2 teaspoons vanilla extract
3/4 cup sugar
2 cups bran cereal (like All-Bran)
3 1/4 cups flour
2 cups fresh blueberries
1 1/2 cups Praline Pecans
Butter to grease the pans

Preheat oven to 350°F. Grease 3 small (3 x 5 x 2-inch) loaf pans.

Whisk together the eggs, buttermilk, coconut oil, salt, baking soda, vanilla extract, and sugar. Stir in the bran cereal and flour and mix well to combine thoroughly. The batter should be fairly stiff at this point. Gently fold in the blueberries.

Fill each loaf pan nearly to the top. Scatter Praline Pecans over the tops, pressing them in slightly. Bake 35-45 minutes, until the tops are firm and slightly browned, and a toothpick carefully inserted and removed shows no streaks of uncooked batter.

Let cool in the pans on a rack for 20 minutes, then carefully turn the loaves out and cool completely.

Wednesday, September 23, 2015

Puff Pastry Pinwheels - Easy to Make, Hard to Resist!

With the holiday season sneaking up on us, it's always a good idea to have a few quick entertaining ideas up our sleeves. I love to host parties at my house and I also enjoy impromptu get-togethers, when my friends decide to just "stop by" for a bit either to exchange gifts or because they "happen to be in the neighborhood". It doesn't matter to me WHY they are at my house, I always like to treat them well and offer up some food and beverages. The pinwheels that I'm about to share with you are something that I've been making for years. They are super versatile, can be made with whatever you have in the house, and can be ready in about 30 minutes. I like to prepare a few different types in advance, stick them in the freezer and then, when needed, just pull them out, slice and bake. In the time that it takes to chill some wine or make a round of cocktails, you can have a nice warm nibble ready to go! They also work well for larger gatherings, as they are inexpensive and can be enjoyed at room temperature or warm. This is basically a method rather than a recipe, but I experimented with some nuts from Truly Good Foods and they really made a difference in the outcome. The sweetness of the nuts (I used both the Praline Pecans and the Butter Toffee Peanuts) really kicked the flavors up from good to great. This is definitely an idea to keep in mind when you are short on time, but want to impress!

I like to make a large batch of these all at once, freeze, and have on hand for when I need them. I usually use 4 sheets of puff pastry (2 boxes with 2 sheets each) and mix and match the fillings. You will get approximately 12 pinwheels out of each sheet of pastry, so 48 in total if you use 4 sheets. It is a great way to use up leftovers that you might have hiding in your fridge or pantry. Just make each sheet a little (or a lot) different, and you will have something to please everyone! You can go savory or sweet. I prefer to walk the line and mix preserves/jams, meats, cheeses, and nuts. You could also use veggies, spices, seasonings, or whatever else inspires you. Three tips: If using veggies or diced fruits (or leftover meats), be sure and get as much moisture out of them as possible before adding to the rolls. Also, make sure that any fruits, vegetables, or meats are cut into a finer dice, not left in large chunks (they won't roll up correctly). Lastly, do NOT overfill the rolls. I know that you want maximum flavor, but if you overfill, all you will get is burnt, icky overflowing fillings. Not a good look or a good taste. Just trust me on this one. This is how to make ONE pinwheel roll. It will make 12 appetizers. More details are included below on how to alter or expand on the recipe.

Puff Pastry Pinwheels
by Chris
Adapted from a much-used old "family" recipe

1 sheet of frozen puff pastry (such as Pepperidge Farms), defrosted according to package directions
1/2 cup of fruit preserves or jam, your choice
1/2 cup meat or veggies of your choice, either finely diced or thinly sliced (crumbled bacon, sliced turkey/ham, diced sun dried tomatoes, etc. If using sliced meat, it should be very thin and just enough to cover - less than 1/2 a pound) - OPTIONAL
Any additional spices or herbs, such as dried mustard, rosemary, basil, cumin, cinnamon, salt and pepper, etc. - OPTIONAL
1/2 cup of cheese (if something spreadable, such as cream cheese, goat cheese or Brie, soften it enough to dollop over the fruit and spread gently. If shredded, temperature doesn't matter)
1/4 cup Truly Good Foods Nuts (I used both the Praline Pecans and the Butter Toffee Peanuts), individually, crushed (I placed each in a separate zip lock bag and hit with a meat mallet until I had a course grind)

Once the sheet of puff pastry is defrosted, lightly flour your working surface and roll into a thin rectangular shape. As you place your toppings onto the pastry, be sure and leave about a 1/2-inch border on all sides that you do NOT put anything on. For the first layer of filling, use the fruit preserve/jam of your choice. Spread a thin layer evenly over the pastry sheet, using at least 1/4 cup, up to 1/2 cup, but no more. For the next layer, add your meat or vegetable IF USING, (which has been dried as well as possible), again thinly, as to make rolling the pinwheels easy (and again, no more than the recommended amount. Less is okay as well.) If you'd like to add additional spices or seasonings, gently sprinkle them over the top now (to taste). Top this layer with the cheese of your choice, either sprinkled lightly or dolloped evenly over the other toppings. And finally, lightly sprinkle the Truly Good Foods nuts of your choice over it all!

Now that the pastry is ready, take one of the long edges and tightly roll it towards the other long edge, creating a "log" of pastry which resembles a tube of cinnamon rolls or store bought biscuits. Seal the ending edge well, pinching to close completely. Also pinch together both of the short ends, so that no filling is visible at all. Cut a piece of plastic cling wrap and gently put the log in the center of the plastic. Wrap the roll tightly so that it will hold its shape. If you are going to bake the pinwheels soon, place the wrapped log in the refrigerator for at least an hour in order for it to firm up. If you are saving the roll to use at a later time, tightly wrap the plastic-wrapped roll in aluminum foil, label it, and place it in the freezer.

When ready to bake, remove the roll from the refrigerator or freezer, unwrap it, and slice into 12-14 rounds using a large, sharp knife. Preheat your oven to 325°F (use the convection setting if you have one - if not, you may need to add a few minutes to your cooking time, but just watch them closely). I usually slice off and discard the very ends of the roll, which are mainly dough and not very attractive. Line a baking sheet with parchment paper and place the rolls near to one another, but not touching. When the oven is heated, put the pinwheels in to bake for about 20 minutes (time will vary depending on the ingredients used and whether or not you use the convection setting - watch them closely after about 12 minutes). When the pastry is cooked through and the filling is bubbling/melted, remove the pinwheels from the oven and allow to cool for a few minutes. When cool to the touch, use a spatula to place on a platter and serve immediately if possible. If you are taking them to another location, let them cool completely and gently stack them in a container that will allow a bit of air. This will allow them to remain crispy (if you put into a zip-top bag, they will get mushy). Now, here are the combinations of flavors that I chose for my Truly Good Foods Nutty Pinwheels:

Pastry Sheet 1:
Fig Preserves, Brie cheese, crumbled bacon, Truly Good Foods Praline Pecans (crushed)

Pastry Sheet 2:
Mixed Berry Spread, Gouda cheese, Truly Good Foods Praline Pecans (crushed)

Pastry Sheet 3:
Apricot Preserves, Monterey jack cheese, shredded grilled pork, Truly Good Foods Butter Toffee Peanuts (crushed)

Pastry Sheet 4:
Peach Preserves, Manchego cheese, crumbled bacon, Truly Good Foods Butter Toffee Peanuts (crushed)

They all got rave reviews and I didn't even get to bring any home! This is definitely a recipe that you should try. Always a crowd pleaser, but the Truly Good Foods Nuts were the icing on the cake!

Aji de Mani (aka Spicy Peanut Sauce) - A Colombian Kick in the Pants!

Well, I've told y'all before that I spent some time in South America, and I'm a sucker for all things dips and sauces. So it was just natural that I gravitated towards this Colombian Peanut Sauce. In its original form, it called for both peanuts and fresh peppers. But, I had some Buffalo Nuts from Truly Good Foods and I wanted to streamline the process and just use the spicy nuts. It was indeed a wise choice! This sauce is best made the day before, then let it sit in the fridge overnight. After the resting period it is SO versatile. We used it on a pork tenderloin that needed some TLC, it was fantastic! We tried mixing some into cream cheese...yum! Same thing with hummus...double yum! You can really go in 20 different directions with this one. Give it a shot! It's unique, versatile, and delish! Before making the sauce, you will need to roast the nuts. Not a big deal, but once they are roasted, you are good to go! And now, the sauce!

Aji de Mani (aka Spicy Peanut Sauce)
by Chris
Adapted from "Aji de Mani" (Peanut Hot Sauce), from mycolumbianrecipes.com

1 cup Truly Good Foods Buffalo Nuts, roasted (see below)
1 teaspoon olive oil
2 Tablespoons vegetable oil
2 scallions/green onions, chopped (green parts only)
1/4 cup fresh cilantro, lightly packed
1 heaping teaspoon minced garlic (jarred)
1/4 teaspoon Sazon seasoning
1/2 - 3/4 teaspoon cumin, depending on taste
1/8 teaspoon salt
1/4 teaspoon black pepper
1 1/2 teaspoons Sriracha hot sauce, divided
1 Tablespoon water
1 Tablespoon corn starch
Salt to taste (1/2 - 1 teaspoon, depending on your preference)

First, roast the nuts. Preheat your oven to 325°F. In a medium bowl gently mix the 1 cup of Truly Good Foods Buffalo Nuts with the olive oil. Stir to coat the nuts completely. When the oven is heated, spread the nuts on a foil-lined baking sheet and bake for 7-8 minutes, shaking/stirring once during the cooking time. Remove the nuts from the oven at 8 minutes, even if you think they are not fully done. They will continue to cook as they rest, and if they burn they will become bitter. Allow them to cool completely, at least 20-30 minutes. 

Heat the vegetable oil in a medium skillet over medium-high heat for 1-2 minutes (until it begins to pop). Reduce heat to medium-low and add the scallions/green onions and cilantro. Cook for about 2 minutes, stirring frequently. When the mixture is reduced and fragrant, remove from heat, set aside, and allow to cool for about 10 minutes. 

After allowing the cooked ingredients to cool, add the nuts, the cilantro/scallion mixture, the garlic, Sazon, cumin, salt, pepper, and 1 teaspoon of Sriracha to a blender. Process for about 20-30 seconds (maybe more, depending on your blender) until a fine paste is formed. There will be small "dots" of peanuts in the sauce, but overall it should have an even consistency. Pour the mixture into a small sauce pot and heat over medium-low for about 15 minutes to allow flavors to meld. Remove from heat, set aside, and let cool (this is also a good stopping point if you want to pre-make the sauce for another time...just store it in the fridge). 

While the sauce is cooling, Mix the one Tablespoon of water with the corn starch to form a slurry. Add extra Sriracha, to taste, if you would like just a little more kick. When sauce is cool, add the slurry mixture and gently reheat over low heat. Taste and adjust seasoning (add more salt, pepper, Sriracha to your liking). As sauce heats with the slurry mix, it will gradually thicken. When thick enough for your use, remove from heat and carefully use an immersion blender to break up any remaining pieces of peanuts or other lumps that might be in the sauce (you could also return the sauce to the blender and give it one more round of blending if you prefer). 

At this point, you can use the sauce as a topping for various meats or vegetables. You can also add it to dips or other appetizers for a unique flavor. Honestly, just get creative! It will last in the fridge for at least 2 weeks, so take your time and experiment. I do hope that you enjoy it as much as my family did!

Tuesday, September 22, 2015

Summer Fruit Crumble with Truly Good Foods Pecan Praline Streusel

I love having fruit in desserts. The combinations of fruit that you can add to a crumble are endless and can transform to what is in season. For this crumble, I combined stone fruits with berries. The Praline Pecans from Truly Good Foods added the perfect sweet crunch to the streusel topping. Served warm and topped with a cold, creamy scoop of vanilla ice cream, I haven't found anyone that disagrees that it's the best sweet ending to a meal!

Summer Fruit Crumble with Truly Good Foods Pecan Praline Streusel
by Tonda

Streusel:
1 1/2 cups all-purpose flour
1/3 cup brown sugar
1/2 cup salted butter, melted
1 cup Truly Good Foods Praline Pecans, chopped

Stir the flour and brown sugar together until combined. Add the butter and pecans and continue to stir until blended. Set aside for approximately twenty to thirty minutes to allow the mixture to firm up enough to crumble.

Filling:
3 pounds peaches, blanched, peeled, and sliced
1/2 cup granulated sugar
4 Tablespoons all-purpose flour
2 cups Ranier cherries, pitted
1 cup blackberries

Preheat the oven to 375°F. Add the peaches, sugar and flour to a saucepan and stir to combine. Cook over medium-high heat to bring to a boil. Reduce the heat to medium and continue to boil for approximately 5 minutes, while stirring constantly. It may take a couple more minutes of boiling and stirring to get the juices of the peaches to thicken up. Remove the peach mixture from the heat and mix in the cherries and blackberries. Pour the mixture into a 10-inch round baking dish. Crumble the streusel over the fruit mixture and put it in the oven for 30 to 35 minutes, until it's golden and bubbly.

Serve warm with a scoop of your favorite vanilla ice cream.

No-Bake Peanut Butter Granola Bites

This is such a quick and easy recipe! Protein-packed and delicious - it's a great snack to grab when you're on-the-go. Enjoy!

No-Bake Peanut Butter Granola Bites
by Rachael

3 cups quick oats
1/4 teaspoon cinnamon
2 teaspoons flax seed
1/4 cup brown sugar
1/4 cup dried cranberries
1/2 cup Truly Good Foods Blackened Pumpkin Seeds
1/2 cup Truly Good Foods Butter Toffee Peanuts, crushed
1/2 cup Truly Good Foods Praline Pecans, crushed
1/4 cup white chocolate chips
1/4 cup honey
2.5 cups peanut butter

1. Thoroughly combine all dry ingredients.

2. Fold in honey and peanut butter. You will probably have to use your hands to mix it all together well enough. Add more peanut butter if it is still too dry.

3. With your hands, form into small balls. Place on cookie sheet lined with wax or parchment paper and refrigerate for 6-8 hours.

Monday, September 21, 2015

Pecan Praline Almond Cookies

If you're looking for a cookie that's not the usual - here it is.

There's nothing wrong with the standard chocolate chip cookies, or traditional peanut butter cookies, but if you bring these to a party or potluck or cookie exchange, you won't find another one like it.

These cookies have a buttery flavor with a hint of almond, and the praline pecan adds a second nutty sweet crunch to the cookie.

The cookies themselves are light and a little crumbly, but with some chew. Make them once, and you'll make them again. I promise.

The Praline Pecans I used were from Truly Good Foods, supplied for this challenge.

Pecan Praline Almond Cookies
By Donna Currie, Cookistry

2 cups all purpose flour
1 teaspoon baking soda
1/2 teaspoon salt
1 1/2 sticks unsalted butter at room temperature
1 1/4 cups sugar
1 teaspoon vanilla extract
1/4 teaspoon almond extract
2 Tablespoons vegetable oil
Praline Pecans (one to top each cookie)

Preheat the oven to 350°F and line 2 baking sheets with parchment paper.

Combine the flour, baking soda, and salt in a small bowl and set aside.

Beat the butter, sugar, vanilla extract, and almond at medium speed in a medium bowl with an electric mixer or a stand mixer fitted with the paddle attachment. Beat for a few minutes, until the mixture is fluffy.

Drizzle the oil in while continuing to beat the butter mixer at low speed.

Add the flour mixture in several additions, beating just enough to blend it well.

Use a small scoop to form balls of dough (try for about 24 cookies, but more or less is fine - it just depends on how many cookies you want), and place them on the baking sheets, leaving room between them to spread. Flatten the cookies with the palm of your hand, then place one praline pecan on top of each cookie. The cookies will puff up as they bake.

Bake at 350°F until the cookies are lightly browned, 13-17 minutes, depending on the size of the cookies. If you're baking 2 sheets of cookies at a time, you'll probably want to swap them around after about 10 minutes of baking.

Remove the cookies from the sheets and let them cool completely on a rack. Continue forming and baking cookies until all the dough is used.

The Truly Good Foods Challenge

The current challenge had the cooks all going a little but nutty. Not crazy, but truly nutty, as they worked with praline pecans, butter toffee peanuts, blackened pumpkin seeds and buffalo nuts provided by Truly Good Foods.

The company is woman-owned and was founded in 1977. They specialize in snack mixes, raw and freshly-roasted nut and seeds, dried fruits, candies, spiced, grains, and specialty foods.

If you're looking for something for cooking or baking or snacking or munching, there's a good chance you'll find it at Truly Good Foods.

The cooks had a lot of fun with this challenge - who wouldn't? We hope you enjoy the recipes they created!

If you want to know more about Truly Good Foods, you can find them on Facebook, Twitter, Pinterest, and Instagram.

Saturday, September 19, 2015

Happy Birthday, Chris

Chris Hughes, Sept, 2014. Photo courtesy of Sharyl
Today would have been Chris Hughes' birthday, but sadly, we're celebrating without her this year. She passed away suddenly at the end of July, while on a mini-vacation. She was a very active member of 37 Cooks, both on the blog and in our group where we chat about everything from food to...more food. And other things.

Here's how Chris introduced herself way back in 2013, when she first joined our 37 Cooks.

And here are more thoughts about Chris from some of the people who knew her best:

Sharyl said:
"We called her Chris. Her family, Sean, friends outside Facebook and coworkers, called her Christy. She was one of a kind. She was loving, kind, funny and giving.

She loved working on her recipes for 37 Cooks. We would go back and forth on messenger, throwing out ideas and changing our recipes midstream. She was much better at food pics than I was. Often, I would send her mine and she would send them back to me, improved!


Frito pie, made by Sharyl as a tribute to Chris
This month, September, she would have been 40. She had so much life left to live. On her 39th birthday, Sean and a couple of other friends rented a limo for her and the two of us made a day of it.

We took a Mexican breakfast cooking class at Sylvia’s Enchilada Kitchen in Houston. We learned how to make Huevos Rancheros, flour tortillas, corn tortillas, gorditas, chilaquiles, and refried beans.

Then we took off in our limo and made stops at all the fun foodie places on our list. It was the perfect day. One of my favorite photos of her is the one here. I took it at this wonderful chocolate boutique we found. We bought lots of chocolate, of course. Since it was September and hot in Houston, we had ice chests in the back of our limo. We were prepared for food and fun!"

Louise said:
"The outpouring of love for Chris Hughes speaks volumes about how she affected us. I will personally feel her absence because Chris brought positivity, optimism and love to a medium where negative sentiments are bandied about on an hourly basis. Whether she was sharing a recipe, restaurant experience or simply recapping a wonderful "date night".

I always anticipated her posts with a smile. There are so few people who are drama-free and don’t get sucked into the vortex of gossip, and it breaks my heart to lose one. In Chris’ honor, this Yankee made Frito Pie, a favorite of Texans, a badge she wore proudly. She inspired me to make the best chili I have ever made.  I’m grateful for having been in Chris’ circle of friends – and amongst those who will miss her terribly.
Will miss you, kiddo, rest in peace."

Chris loved to travel. She took this photo
while on a trip to Panama.
Linda said:
"Chris and I first met at a Foodie Group meet-up at the Rainbow Lodge in Houston. It was such a fun time for all and since I set right across from Chris, I really learned about her passion for cooking.

Shortly thereafter, I contacted her about becoming a member of 37 Cooks. I wanted to submit her name for consideration. She was very excited, but wanted all the information I could give her regarding the group because she wanted to make sure she could meet any and all expectations.  On April 13th, 2013, our founder, Sandra, officially asked her to join.

Chris went on to be one of our most dedicated members. She worked hard on all the challenges and came up with some amazing, delicious recipes.  She was always willing to help and support others in the group. I am so happy she became a 37 Cook, but more importantly, I am so happy to have had the opportunity to really get to know her and her kind, helpful spirit. The bonus was having her here in Houston, because we were able to get together several other times with other local 37 Cooks. She will be greatly missed."

Tonda said:
Tonda and Chris, 1998
"Sweet, young friendships hardly stand the test of time. People grow and interests change. Oftentimes, distance weakens the bonds that friends make. Sometimes, however, a true gem will come into your life and no matter the distance or time, you pick up where you left off.

Christy and I were college roommates. As it often happens, we lost touch after we graduated and moved. However, we reconnected 10 years later. She was the same genuine gal that I lived with and our friendship didn't skip a beat. As she put it, 'You just don't spend YEARS of your life w/someone, 24-7, & not have a connection of some sort. So, yeah, you're kinda rooked into being my friend. Like forever. But in a good way.'

Her words were always so gentle. She was always genuinely interested and supportive. She was a true friend. A true friend formed from a sisterhood of being college roommates. Perhaps distance still separated us, but our bond reformed.

Our "forever" was cut way too short. I will miss our chats, my dear friend. Your loss is devastating to so many. All we can do is cherish our fond memories of you, your smile, your kindness, and your friendship."

In another group where many of us belonged with Chris, many of us made Frito Pie in Chris's honor. Here's recipe from Louise:

Yankee Frito Pie Chili In Memory of Chris Hughes
By Louise Chiffonade Brescia

1 teaspoon neutral oil
1 red onion, diced (reserve a few dice for garnish)
1 poblano, diced (reserve a few dice for garnish)
5 cloves garlic, smashed
3 roasted Hatch chiles (seeds discarded), diced
Salt and pepper to taste
Big splash wine (white or red will work)
1.5 pounds chopmeat (80-85% lean)
1/3 cup tomato paste
2 Tablespoons medium chili powder
1 teaspoon cumin
1 teaspoon New Mexico chile powder
1 teaspoon unsweetened cocoa powder
1 Tablespoon ground green chile
12 ounces water
(Cayenne pepper can be added for heat)

In a medium sauté pan, heat the oil over medium heat. Add the onion, poblano, and garlic and cook (stirring occasionally) until translucent, about 8 minutes. Stir in salt and pepper and deglaze the pan with the wine. Cook until nearly all the moisture is evaporated. Remove the aromatics to a plate.

Crumble the chopmeat into the sauté pan and cook it until browned, around 5-6 minutes. Drain off most of the fat. Mix in the tomato paste with a rubber spatula until combined. Add the next 5 ingredients (spices and cocoa) and combine well.

Pour in 12 ounces water and stir again to combine. Simmer covered on low heat about 45 minutes, stirring occasionally. Taste for seasonings and adjust if necessary.

Many of us knew Chris through her food. We still have a few of her recipes that are yet to be published (which will be appearing in the next few days). Meanwhile, here is the complete list of the posts that Chris wrote for us.

Lemon Basil Hummus
Roasted Potato and Green Bean Salad
Herbed Goat Cheese Rounds
Gummy Worm Day
Daiquiri Day
Hot Fudge Sundae Day
Sweet Potato Tamales
Carne Guisada Enchiladas
Grilled Meatloaf
Key Lime Parfait
Pumpkin Pie Crunch
Creamy Baharat Vegetable Soup
Beans with Chorizo and Bacon
Conch Fritters
Tropical Traditions Roundup
Duck Quesadillas
Rice Pudding
Cajun Patacones
Adventures in Panama, Part 1
Adventures in Panama, Part 2
Slow-Cooked Chickpeas
When Was the First Time You Had This?
Onion Twists
Jamaican Cheese Muffins
Chocolate and Nutella Squares
Vin Brule
Slow Cooker Chilaquiles
Candied Jalapeno Pineapple Cream Cheese Swirl Buns
Kale Balsamic Chicken Rangoons
Peach Tart
Green Chile Tortilla Stacks
Chocolate Cayenne Ice Cream Sandwiches
Long Boy Burgers
Gyrosa

Friday, September 18, 2015

Crisp Broccoli and Cauliflower Salad with Bacon and a Creamy Honey Balsamic Dressing - Easy to Make Ahead and Sure to Please a Crowd!

There's really nothing more fun than a simple, easy night of grilling with your friends or family on a lazy summer weekend. As I live in the Houston area, we BBQ and grill pretty much year-round. Which means that I am constantly on the lookout for new side dishes to serve with whatever tasty items that my husband manages to invent himself (I'm not gonna lie - he's a grill master. I work hard sometimes to keep up or stay ahead of him on the weekends!). So, when I'm served a new dish at someone else's house and the hubs asks me to get the recipe, I know that it's a keeper.

That's what happened recently at a friend's house. Another friend brought a broccoli and cauliflower salad as her contribution to the meal, and I HAD to grab it for us to use (I'll agree on this one, it was good!) Her salad was awesome, but, of course, I am never known to follow a recipe exactly as written. So off I went, adding, subtracting and modifying just a bit. My results were fabulous and we have a new family favorite side dish. I would love nothing more than to give credit to the original source, but I'm not really sure where it came from. From a friend of a friend and who knows where else? But, I will say that the Honey Ridge Farms Balsamic Honey Vinegar added a nice sweet tang to the sauce and everyone who ate my version loved it! The sweetness was noticed and appreciated, but it didn't overwhelm any other part of the dish. So, if you're tired of the same old slaw and potato salad, give this a shot. I'm pretty sure you'll love it!

Crisp Broccoli and Cauliflower Salad with Bacon and a Creamy Honey Balsamic Dressing
by Chris
Adapted from a recipe given to me by the lovely Miss Katy P.

1 1/2 cups raw broccoli, cut into thumbnail-sized dice
1/2 cup raw cauliflower, cut into thumbnail-sized dice
1/2 cup raw celery (about 2 stalks), cut into thumbnail-sized dice
1 cup of peas (frozen or canned - if frozen, no need to defrost)
1/2 cup white sugar
2 cups mayonnaise (I used one cup of regular Duke's and one cup of Hellman's Light)
1 teaspoon apple cider vinegar
1 Tablespoon Honey Ridge Honey Farms Balsamic Honey Vinegar
1/4 cup chopped sweet/yellow onion
1/3 cup (heaping - almost a 1/2 a cup) Parmesan cheese, shredded
Pinch of salt, to taste
1 12-ounce package of original bacon (not thick cut), diced/ cubed, cooked, and cooled (l cut my bacon with kitchen shears while raw and baked on an aluminum foil-lined cookie sheet at 400°F for about 20-30 minutes. I drained the grease and also stirred/mixed the bacon 2-3 times during cooking. Drain on paper towels until cool.)

In a large bowl, mix the broccoli, cauliflower, celery and peas. In a separate, medium-sized bowl, mix the sugar, mayonnaise, apple cider vinegar, Honey Ridge Balsamic Honey Vinegar, onion, cheese and salt. Reserve the bacon to be added just before serving. Stir the dressing (in the medium bowl every 10 minutes for 30-40 minutes, total. After 30-40 minutes (when the dressing has had a chance to mingle/come together), add to the vegetable mixture in the large bowl. Stir gently to combine well. Continue stirring the vegetable and dressing mix at room temperature for another 30-40 minutes, every 10 minutes (you want the dressing to really soak in to the veggies). Place the salad, covered, in the refrigerator for at least a couple of hours, overnight is best. Refrigerate the bacon separately in a zip-top bag or a well-sealed container if using the next day. Remove the salad about an hour before serving time, and stir a couple of times more to reincorporate all ingredients (there may be a bit of extra liquid in the salad, but it will be absorbed when you add the bacon). Combine the bacon into the salad mixture any time within the hour before serving, mixing 1-2 times again. This is a really simple recipe and totally worth your time. Hope that you enjoy!