Thursday, August 28, 2014

Spicy Polenta Basil Biscuits with Honey Butter and Strawberry Jam

The Surprise Food Exchange Challenge has been fun. Holly, my fellow 37 Cook from the great state of Colorado, choose the ingredients for me to work with. The first thing I saw in her box was instant polenta. I have never cooked with polenta. Down South and in Texas we use grits or ground yellow cornmeal. Polenta is very close to those favorites. I would say that it has been ground a little finer than the cornmeal I am accustomed to using. The next thing I pulled out of the box was pure honey from Colorado's western slope. Donna, who is also a 37 Cook from Colorado, said it was great because it's made from "mountain wildflowers"! Then there was homemade strawberry jam, one of my husband's favorites. Last, there was Modenacrem balsamic glaze. I have
used everything but the balsamic glaze in my recipe today and look forward to making something with it at a later time.

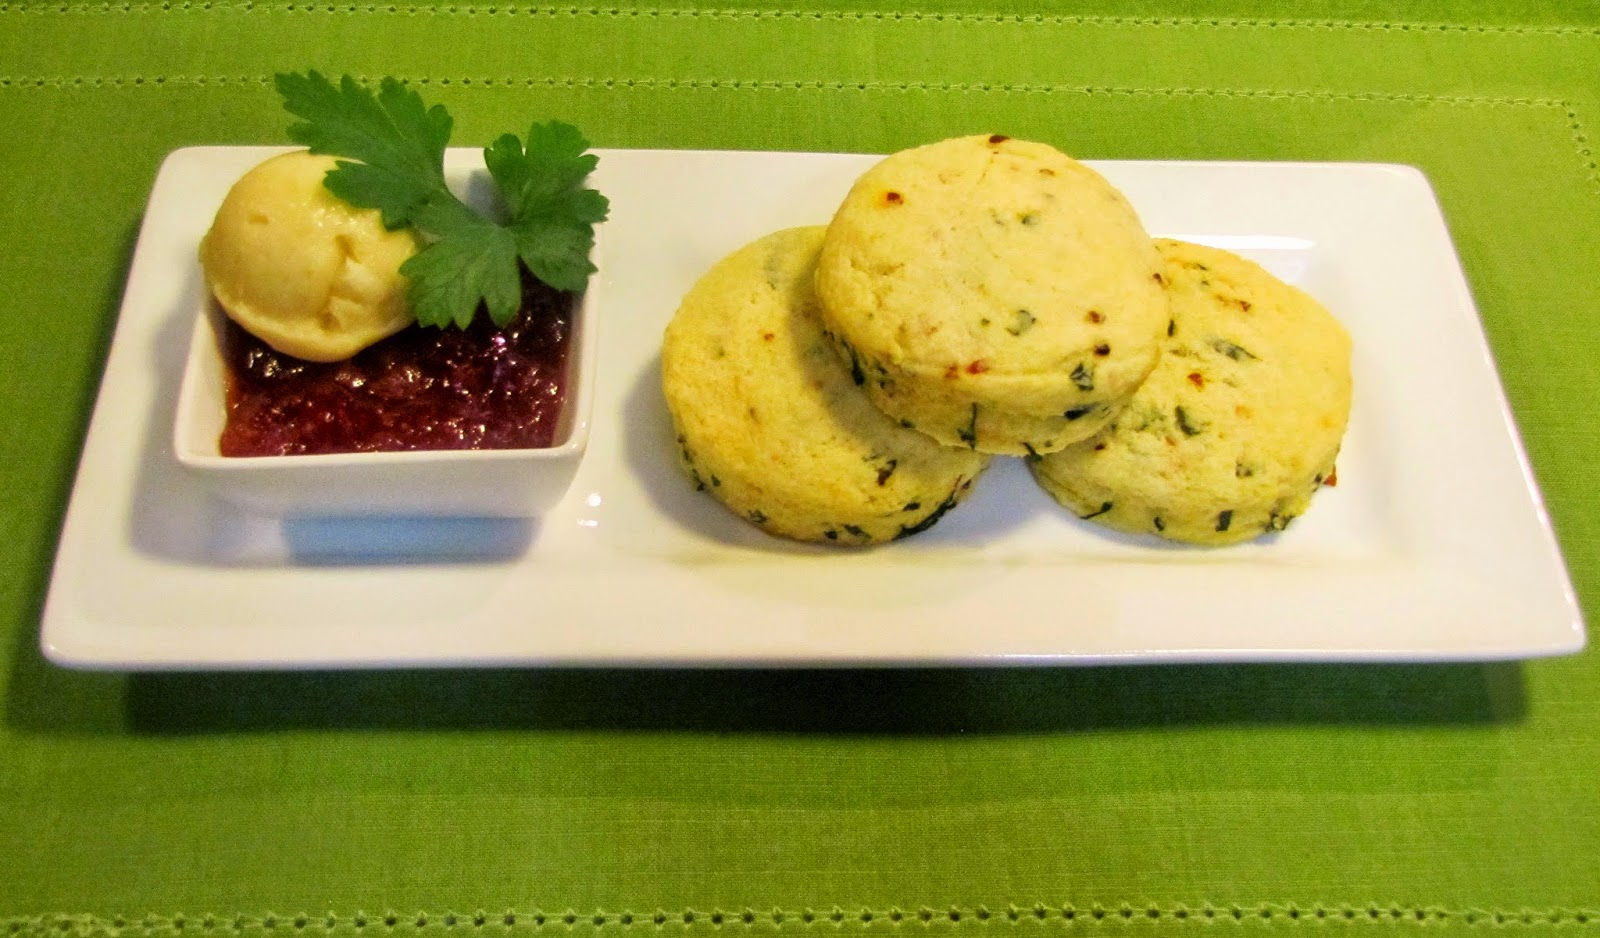
Holly was very generous and she gave me a product (polenta) that I had never worked with. My research began! I wanted to do something different and ran across Chef Ripert's cornmeal biscuits recipe on the Kitchen Joy Blog, that I could easily transform to polenta biscuits. It was even more perfect when I saw that he paired them with honey butter! I decided to add fresh basil and red chili pepper flakes to mine. It is summer and I have an abundance of fresh basil in my herb garden. The spicy red pepper flakes would give them a nice, spicy kick that would pair well with the sweet honey butter and strawberry jam. I can definitely see myself making these again and again. I hope you enjoy them and thank you, Holly, for the wonderful surprises!

Spicy Polenta Basil Biscuits with Honey Butter and Strawberry Jam
by Linda
Inspired by Cornmeal Biscuits with Honey Butter by Eric Ripert and Kitchen Joy Blog

For the biscuits:
3/4 cups instant polenta
1 1/2 cups all-purpose flour
1 Tablespoon sugar
2 teaspoons baking powder
1/2 teaspoon fine sea salt
8 Tablespoons very cold unsalted butter, sliced into small cubes
1/2 Tablespoon red chili pepper flakes
1/4 cup fresh basil, finely chopped
3/4 cup cold buttermilk
1/4 cup unsalted butter, melted

1) Preheat oven to 425°F.

2) Line cookie sheet with parchment paper.

3) Place polenta in large mixing bowl.

4) Sift the flour, sugar, baking powder and salt into mixing bowl with polenta.

5) Using a pastry cutter or two forks, combine cold, cubed butter to dry ingredients. Make sure all the dry ingredients are evenly combined with butter. You will have some small crumbs of butter throughout that look like little pebbles. That is okay, don't try and smooth it out.

6) Add red chili pepper flakes and basil to mixture.

7) Slowly add the buttermilk, stirring gently until the dough comes together.

8) Roll dough out on a well-floured surface. I use a pastry mat.

9) Pat the dough into a rectangle about 1/2 inches thick.

10) Take a floured rolling pin and gently smooth the top out. Don't press down.

11) Using a 1 1/2-inch cookie cutter, cut your biscuits out. You should be able to get 12 biscuits. Do not twist the cutter or press the dough down.

12) Place cut biscuits on cookie sheet. Place them close together (almost touching) for a nice soft biscuit.

13) Brush the top of the biscuits with melted butter.

14) Bake 10-12 minutes, until lightly brown.

For the honey butter:
2 sticks soft unsalted butter, cut into cubes
3 Tablespoons honey
1/2 teaspoon fine sea salt

1. Make the honey butter while your biscuits are in the oven, so it will spread easily.

2. Place butter, honey and sea salt into a small food processor.

3. Pulse until well mixed.

Serve the honey butter and your favorite strawberry jam with the biscuits, when they come right out of oven. Enjoy!

Notes from a novice biscuit maker:

1) Make sure your polenta, flour and baking powder is fresh! I don't bake a lot, so I wasn't surprised to find that my flour and baking powder were past their expiration dates.

2) When making the biscuits, keep the butter and buttermilk in the refrigerator until you are ready to add them to dry ingredients! My friends who are bakers have drilled this into me.

3) Use real butter, no margarine, no diet. You have to have the real stuff.

4) Decide what changes you might want to make to the original recipe. Chef Ripert and Kitchen Joy rolled their dough out to 1/2 inch thick and used a 3-inch biscuit cutter. My preference was to have a little thicker and smaller biscuit. I did some research on the internet to see how this would affect my finished product and the one important note I found was that my cooking time would vary, depending on the size and thickness.

5) Be organized! Take your time and practice. I tested one batch, tweaked them and then made a second batch before writing my recipe up. I had to ask my friends why my biscuits weren't browning on the tops and what could I do about it. They helped me and the consensus was to brush the tops lightly with butter, to assist in the browning.

6) Last, but not least, enjoy the experience AND, of course, the biscuits!

Wednesday, August 27, 2014

Antipasto Pasta Salad

I joked that one of my recipes for this challenge was going to be the eggplant, peppers, and mushrooms that Sarah sent me along with a fork. I could eat them all as-is, they’re so good!

However, I had to try to be a LITTLE creative, so instead I made a version of antipasto pasta salad. I added pasta, salami, provolone, and a garlicky dressing to the veggies, and the result was amazing. I could eat this stuff every day! Thanks again, Sarah!

Antipasto pasta salad
by Jennifer
Adapted from KCET Weekend Recipe: Antipasto Pasta Salad

8 ounces rotini pasta
8 ounces salami, sliced into matchsticks
8 ounces provolone cheese, diced into 1/4-inch cubes
1 jar Cosmo’s marinated mushrooms, drained
1/2 jar Cosmo’s marinated eggplant, drained
1/2 jar Cosmo’s Italian-style antipasto peppers, drained
5 Tablespoons red wine vinegar
4 Tablespoons olive oil, plus more for drizzling over pasta
3 Tablespoons mayonnaise
2 cloves garlic, pressed through garlic press
1/4 teaspoon crushed red pepper flakes
1/2 teaspoon salt
1/2 teaspoon ground black pepper
2 Tablespoons fresh chopped parsley
6 fresh basil leaves, chopped

Cook rotini to your liking, then drain and rinse with cold water. Place in a large bowl and drizzle with olive oil then stir in salami, cheese, mushrooms, eggplant, and peppers. In a separate bowl, whisk together vinegar, 4 Tablespoons olive oil, mayonnaise, garlic, red pepper flakes, salt, and pepper. Pour dressing over pasta mixture and refrigerate, stirring a few times to coat evenly with dressing until ready to serve. Gently mix in herbs right before serving.

Tuesday, August 26, 2014

Honey Vanilla Ice Cream

I was inspired to make a second recipe from the box of goodies I got from Jenny, who blogs at Creative Cooking Gluten Free, as part of a 37 Cooks challenge. One of the items she sent me was a jar of Run Dog Farm Pure & Raw Honey.

Mmmm...honey.

I sort of forgot about it when I was thinking about what recipe I could make, but then the lightbulb lit. Why not make honey ice cream?

Yeah, that's what I said.

It was pretty simple, really. I used honey instead of sugar - and not as much honey since it tastes sweeter than sugar - and the rest was a pretty basic recipe.

You can really taste the honey in this, and the vanilla adds a nice richness. As I was mixing it up, I was trying to think of a third flower-related flavor to add, but then I decided I didn't want to muddle the honey and vanilla, and I let it be.

Honey Vanilla Ice Cream
by Donna

2 cups heavy cream
1/2 cup raw honey
1/2 teaspoon salt
1 Tablespoon vanilla extract
3/4 cup whole milk

Mix the honey into the cream until it dissolves. If it doesn't want to dissolve, you can heat the cream gently to encourage the honey to melt. You won't need to get it more than lukewarm, so don't get carried away

Add the salt, vanilla, and whole milk and stir until it's all combined.

If your ice cream maker has its own compressor, you can start churning right away. Otherwise, refrigerate the mixture until it's fully chilled before churning.

Churn the ice cream according to the manufacturer's instructions. Transfer to a storage container and freeze until firm.

I wouldn't tell anyone if you decided to drizzle a little extra honey on top when you serve.

Monday, August 25, 2014

You've Never Had a Crouton Made with These!

Jennifer sent me some fresh grits from Georgia. She bought them at her local Farmer’s Market. I thought this salad would be a nice way to showcase those amazing grits. Make this for a potluck or serve as a main course. It goes a long way.

Southern Caesar Salad with Fried Grit Croutons
by Tracy
Adapted from Texas Caesar Salad on epicurious.com

Croutons:
2 1/2 cups milk
1 Tablespoon hot sauce
2 garlic cloves, minced
1 teaspoon cayenne
1 teaspoon salt
1 stick butter
1 cup grits
1/4 cup Parmesan cheese, grated
Nonstick cooking spray
Vegetable oil for frying

Bring, milk, hot sauce, garlic, cayenne, salt and butter to a boil over medium high heat. Whisk in the grits and bring back to a boil. Reduce heat and simmer on low, uncovered, for 30 minutes. Do no stir. Remove from the heat and stir in the Parmesan cheese. Spray an 8 x 8-inch baking pan with nonstick cooking spray. Spread the grits in an even layer on the bottom of the pan. Cool the grits and then chill them in the refrigerator until ready to use. When ready, cut the grits into 1/2-inch cubes. Pour vegetable oil into a frying pan until it reaches about 1/2 inch high. Heat oil to 350°F. Fry the croutons in batches until they are golden. Set on a paper towel to drain.

Spicy Pecans:
1 cup pecan halves
1 Tablespoon butter, melted
1 teaspoon cayenne pepper
1 teaspoon hot sauce
1 teaspoon salt
1/2 Tablespoon Ancho Chili Powder

Preheat oven to 300°F.

Toss pecan halves with melted butter, cayenne, hot sauce and salt. Sprinkle on the chili powder and toss to coat again. Lay out pecans on a baking sheet and bake for 30 minutes. Stir the pecans every 10 minutes to prevent burning. Remove from oven and let cool. Can be stored in an airtight container for several days.

Dressing:
1 cup cilantro leaves, loosely packed
1/4 cup plain Greek yogurt
1/4 cup red wine vinegar
1/4 cup Parmesan cheese, grated
2 Tablespoons anchovy paste
2 teaspoons dried tarragon
2 teaspoons red pepper flakes
1 jalapeno, seeds and veins removed
1 Tablespoon fresh lime juice
1/2 cup olive oil
Salt

Pulse all ingredients in a blender until smooth. Salt to taste. Store in the refrigerator until ready to use.

Salad:
1 cup grape tomatoes, quartered
3 heads romaine lettuce, cored and torn into pieces
2 cups frozen white corn, thawed
1 jar (8.5 ounce) sun-dried tomatoes packed in oil., drained and sliced
1/2 cup cilantro leaves
6 slices thick bacon, cooked crisp and crumbled.
Parmesan cheese for serving

When ready to serve, fry up the croutons. Toss the salad ingredients and spicy pecans with about 1/2 of the dressing. Portion onto individual plates and top with the croutons. Sprinkle more Parmesan and serve.

Thursday, August 21, 2014

Chile Nachos

This was such a fun challenge for me. I was paired with my fellow 37 cook Gary Gee and he sent such a fabulous Texas selection for me to try. To be honest, I almost ate everything, I couldn't stop sampling! One of my favorite things in the world is nachos and when I saw my surprise, I just had to make them.

Chile Nachos
by Christine

Oil for frying
4 corn tortillas
1 1/2 cups cheddar jack cheese, shredded
1/2 cup Parmesan cheese, shredded
1 4 ounce can Hatch chiles, chopped, save juice
2 Tablespoons cilantro 
Hot sauce
2 limes, cut into quarters
Guacamole
Black bean dip
Preheat oven to 350°F. Heat 1/2 inch oil in a frying pan. Place a tortilla in the oil for about 20 seconds to lightly brown. Flip tortilla and using a pair of tongs, start to bend sides up to make a bowl shape.

Fry until golden brown and crisp, about a minute. Drain on paper towels while the remaining tortillas are being made. Place fried tortillas on a baking sheet and divide the cheddar jack, Parmesan and chiles between each tortilla. Bake until cheese is melted to your liking. Sprinkle with the cilantro, 4 or 5 shakes of hot sauce, a drizzle of the reserved chile juice and a squirt of lime. Serve with a lime slice, guacamole and black bean dip on the side.

Wednesday, August 20, 2014

Do You Try New Recipes on Guests or a Personal Standby Like this One?

My surprise box came with three great items. One's a must-have in my kitchen, and the other two are things that are very new to me and I expect I'll have a lot of fun with them this summer. My box contained extra-virgin olive oil, Adobo seasoning, and a mojo criollo marinade.

It was a hectic week here, and rather than try something brand new on guests, I went with a personal standby: an olive oil, preserves, and vinegar marinade. I've used this in different variations for a long time. If you don't have apricot preserves, orange marmalade works well. No wine vinegar either? Try just lemon juice and olive oil. Add herbs if you want them in there. Use up the end of a jam jar - see what you come up with!

Apricot and Orange-Glazed Chicken
by Maurita

Serves 4

3 Tablespoons apricot preserves
1 Tablespoon orange juice
1 Tablespoon red wine vinegar
2 Tablespoons olive oil, divided
1 clove garlic, minced fine
1 chicken, cut up
Salt and fresh pepper to taste

Preheat oven to 350˚F. Season both sides of the chicken pieces with salt and pepper.

Combine apricot preserves, orange juice, red wine vinegar, 1 1/2 tablespoons olive oil, and minced garlic. Mix with a whisk until well combined, and set aside.

Heat an oven-proof skillet over medium-high heat. Heat the remaining 1/2 tablespoon oil, then when the oil is shimmering hot, add the seasoned chicken parts. Cook until golden brown on the first side, about 4 minutes.

Turn the pieces over, then pour the apricot sauce evenly over top. Transfer the skillet to the preheated oven and cook 10-15 min more, until the chicken is cooked through. Check often, different parts cook at different rates!

Serve the chicken with sauce drizzled on top.

Tuesday, August 19, 2014

Pecan Pineapple Cheese Balls

A big thank you to Maryjo Bentley-Hibbert for sending the wonderful box of TJ Texas pecans, a wonderful container of pecans with 4 different flavours (honey roasted, praline, orange and cinnamon) from Treasure Journeys in Roanoke, TX. 

Pecan Pineapple Cheese Balls 
by Nancy

1 package cream cheese, room temperature
2 Tablespoon green onions, chopped
1/4 cup fresh pineapple, finely chopped
1/2 teaspoon Worcestershire sauce
1/2 teaspoon garlic powder
1/4 teaspoon salt
1/2 cup honey roasted pecans from Treasure Journeys, finely chopped
1/2 cup cinnamon roasted pecans from Treasure Journeys, finely chopped
24 pretzel sticks

Mix the cream cheese in a medium sized bowl until soft. Stir in the green onions, pineapple, Worcestershire sauce, garlic powder, salt and combine. Place in the fridge till it is firm and will hold together to form small round balls. Use small melon baller and roll the cheese mixture into the combined pecans and place a pretzel stick in the centre. Makes approximately 24.

Can be made two days ahead, but do not add the pretzel stick until day of party.

Monday, August 18, 2014

New England Crawfish Rolls

Who doesn't like to get food gift from someone? Especially when it's from a fellow 37 Cook! You know it's going to be good, and you know it's going to be something original. I was paired up with Christine and I'll tell you something, she came through like a trooper. I have had a fascination for a very long time with lobster rolls and well, obviously she couldn't send me those, but she did send me the rolls themselves. I was also lucky enough to receive a famous Rhode Island clam cakes batter mix. Let me tell you, the wheels started going then. I thought a little mix of North and South was in order. It is crawfish season and what better for a light lunch? A Crawfish Roll! First let me disclose...I went to a Crawfest hosted by our local Saafe House and was lucky enough to score some freshly boiled crawfish. It was a win for me, one for the recipe event. I could have purchased some frozen ones, but I don't think I could have gotten the same consistency with the product. Let's get started!

New England Crawfish Rolls
by Traci
Remoulade Sauce adapted from Elise Bauer at Simply Recipes 

Remoulade Sauce:
1/4 cup mayo
1/8 cup cracked pepper mustard
1/8 teaspoon paprika
1/8 teaspoon Slap Ya Mama Original Blend Cajun Seasoning
1/8 teaspoon horseradish
1/4 teaspoon minced garlic

Crawfish Rolls:
6 ounces cooked crawfish tails
1 egg, beaten
2 Tablespoons milk
4 top-split rolls
1 cup seasoned breading mix
Oil for frying
1 cup shredded lettuce
1 Roma tomato, sliced

Prepare the remoulade beforehand, because the longer it melds together the better it gets. Combine all ingredients and cover. Refrigerate until you need it.

In a small bowl add the beaten egg and milk to your crawfish. Let that sit for a few minutes while you put the rolls into the oven. At 300°F, just warm your rolls through. They will get a great crunch on the outside, but will be so light and airy on the inside. Pull them out and set aside.

Heat oil in a medium frying pan.

Add the breading mixture into a zip lock bag. Add in cooked crawfish and mix until they are coated. Add to heated oil. Cook only until you get a great golden brown on the breading. Let drain well when finished.

To assemble, add a swipe of the remoulade sauce to each side of the roll. Layer tomato slices on each side. Place cooked crawfish into the rolls and top with some shredded lettuce. I also added some remoulade on the side.

Serve and watch the smiles. A great combo of the crunch of the crawfish with the extreme tender of the roll. North and South Collide!!!

Thanks to Christine!

Thursday, August 14, 2014

Umami Onion Rings and Spicy Sriracha Mushroom Dipping Sauce

Who’d have thought this challenge would be so…well…challenging? The fabulous, creative Ms. Donna sent to me some ingredients from her home state. When I say “some” I mean four. There was a bag of Fanciful Fruit Blend Pappardelle’s from Pappardelle's Pasta, a jar of “Cherriyaki” sauce from Gilberto's Gourmet Goodness, a bag of NederCheddar popcorn from Tungsten Toffee, and a jar of Hazel Dell Mushroom Seasoning Rub from Hazel Dell Mushrooms. All of these products/companies are in Colorado, the state where you will also find Ms. Donna.

Let me start by thanking Donna for the all of the fabulous ingredients! As soon as I unpacked the box my boys (the big one and the little one) were on the popcorn like they hadn't seen food in a week. So, with the popcorn gone, I moved on to the fruit flavored pasta and the Cherriyaki Sauce. I made a beautiful fruit flavored pasta salad with fresh tomatoes, fire roasted corn, and a really nice citrus vinaigrette. But you won’t see that recipe here because we ate it all so fast I didn't get to take a photograph. Moving on to the Cherriyaki sauce, I marinated and then grilled a beautiful skirt steak and made a nice Cherriyaki dipping sauce for it, but again, it was gobbled up before I could take the darned picture for the recipe!

All that was left was the Hazel Dell Mushroom Seasoning Rub. What to do? I decided to make onion rings. I set up a barrier between the boys and the kitchen and started cooking. They say mushrooms are one of those umami flavors that enhance the taste of your food, like soy sauce, or tomatoes, or even sweet potatoes. I made mushroom-seasoned onion rings and then threw together a Sriracha/Mushroom Seasoning Rub dipping sauce with the leftover seasoning salt. If only I had some of that Cherriyaki glazed skirt steak to eat with the onion rings! Doh!

Umami Onion Rings
by Maryjo
Adapted from this YouTube video: "Steve Cooks Fish & Chips"

1/2 cup cold water
1/2 cup beer (any beer will do, but I’d stay away from the super dark, bitter beers)
2 teaspoons active dry yeast
3/4 cup all-purpose flour
1/2 teaspoon turmeric
Peanut oil
1 large sweet yellow onion (cut in 1/2-inch thick rings)
1/2 cup all purpose flour (for dredging)
4 teaspoons Hazel Dell Mushroom Seasoning Rub
1 teaspoon salt

Pour the water and beer into a large bowl. Add the yeast and whisk together. Gradually add 3/4 cup all-purpose flour. Whisk in the turmeric and let it stand in a warm location for about 30 to 45 minutes, until the yeast has a chance to bloom and the batter has a frothy, foamy top. 

Heat 1 gallon of peanut oil in a deep fryer (or about 1/2 gallon in a Dutch oven) to 375°F. Dredge 4 or 5 of the sliced onions really well in 1/2 cup all-purpose flour and then dip them in the batter, coating them completely. Let the excess batter drip off and then carefully drop them into the hot oil, one at a time. Fry them for two minutes (flipping the onion rings over after one minute.) Remove them from the fryer when they are golden brown and drain on paper towels to soak up the excess oil. Depending on the size of your fryer or Dutch oven, you’ll need to cook these in several batches. The important thing to remember is to not crowd your fryer. 

Next, combine 4 teaspoons of the Hazel Dell Mushroom Seasoning Rub and 1 teaspoon of salt in a mortar and pestle or spice grinder and grind into a fine powder. Sprinkle the hot, fried onion rings with the Mushroom Seasoning Salt right after you take them out of the fryer and serve with the dipping sauce.

Spicy Sriracha Mushroom Dipping Sauce
by Maryjo

3 Tablespoons prepared mayonnaise
2 teaspoons Sriracha sauce
1 teaspoon Hazel Dell Mushroom Seasoning Rub

Combine the mayo, Sriracha, and mushroom seasoning rub. Let it sit for 10 minutes. Serve.

Wednesday, August 13, 2014

Albondigas with Hot Chimichurri Dipping Sauce

Albondigas is Spanish for meatballs. I used ground pork for mine, but you can certainly use beef or chicken. I find that I get juicier meatballs when I use ground pork. I was very happy with the ingredients that Traci mailed to me. From her package I used Goya Sazon with Cilantro and Tomato, Knorr MiniCube Cilantro, and the Gaucho Ranch Chimichurri Hot Sauce.

Albondigas with Hot Chimichurri Dipping Sauce
by Carlos

1 pound ground meat of choice
1 egg
4 slices white bread, crust removed, soaked in milk
4 Tablespoons plain bread crumbs
1 1/2 Tablespoons of Goya Adobo
1 packet Goya Sazon with Cilantro and Tomato
1 crumbled cube Knorr MiniCube Cilantro
Hefty handful flat parsley (Italian), finely chopped
Goya extra virgin olive oil to cover the bottom of a fry pan
Gaucho Ranch Chimichurri Hot for dipping

Mix meat, egg, bread, bread crumbs, Goya Adobo, Goya Sazon, Knorr Minicube Cilantro, and parsley in a bowl. Form the meat into little balls. This recipe yields about 12 -14 meatballs. Heat olive oil in a frying pan over medium heat. Add about half of the meatballs to the pan, do not over-crowd. Brown evenly on all sides. Remove the meatballs from pan, and fry the remainder. When they are all fried, place the meatballs in a pan and finish cooking in a 350°F oven for 10 minutes. Place the meatballs on your serving plate with a bowl of Chimichurri sauce in the center for dipping.

Tuesday, August 12, 2014

Okinawan Purple Sweet Potato Chips

Up until now, I've hated sweet potatoes. Or so I thought. Their inherent sweetness and general mushiness are just not my thing. When I received my surprise food box from my fellow 37 Cook, I cringed when I saw the misshapen, straw-colored root vegetable. Nancy, who lives in Hawaii, had no idea I didn't like sweet potatoes until after she’d sent the box. Faced with preparing these terrible tubers in some palatable manner, I turned to a method that I found somewhat edible: Potato chips. Usually deep fried, I found that oven roasting with plenty of olive oil yields just as good a result. Slicing the potato reveals a lovely,
variegated purple interior, and crisping in the oven with high heat adds a lovely brown tone. The dense texture of the flesh is perfect for chips, and the savory seasonings are balanced by just a hint of sweetness. This classic sweet/savory combination makes these chips irresistible. And bonus: These are really healthy for you, too!

Okinawan Purple Sweet Potato Chips
by Gary

Serves 4

2 medium Okinawan Sweet Potatoes, scrubbed, sliced 1/6” thick on a mandolin
3 Tablespoons olive oil
1 teaspoon coarse salt, plus more to taste
1 teaspoon freshly ground black pepper, plus more to taste
1 teaspoon grill seasoning, or to taste

Preheat oven to 450°F. Prepare two baking sheets by lining with foil and spraying with nonstick cooking spray. Set aside.

Soak potato slices in cold, salted water for 10 minutes. Drain, rinse, and soak in fresh cold water for five minutes. Drain well in colander. Lay potato slices out on paper towels; blot as
dry as possible. Place potato slices in a large, shallow casserole or wide pan. Drizzle with olive oil, sprinkle with salt, pepper, and grill seasoning. Rub potato slices well, evenly distributing oil and seasonings.

Arrange potato slices in a single layer on baking sheets. Place one sheet in oven and bake for six minutes. Turn slices over. Rotate pan and continue baking for five minutes more, or until edges are brown and centers are crisp-tender, taking care to not burn. Move chips to paper towels to drain. Check seasonings and correct with more salt, pepper, and grill seasoning, if desired. Repeat with second pan. (Reuse first pan, if necessary, to cook all the chips)

Serve warm or at room temperature.


Monday, August 11, 2014

The Surprise Food Exchange Challenge

Do you love getting surprises in the mail? Have you ever gotten a surprise in the mail and then been told you have to cook something with it? If you had to send food in the mail that someone would have to cook with, what would you send?

Our cooks had to ponder those very questions for their challenge, The 37 Cooks Surprise Food Exchange. Those who took up this challenge were paired up and they both sent and received a food surprise. The only parameter given were to spend at least $10, but no more $20.

Well, ponder we did! Should we send something unique from our state? Should we send something homemade? Should we send something we love to eat? Should we be devilish and send something wild and bold?

Our recipes for this challenge are a mixture of all of the above. Great things to eat using great products hand picked or made by our cooks. It was a fun challenge that really surprised us all! We hope you will enjoy it too! - Linda at 37 Cooks

Thursday, August 7, 2014

This Will Have You Lickin' the Pot!

The folks at Slap Ya Mama really know how to make seasonings. All of their various seasoning mixes and blends combine to make the ultimate Cajun eating experience! For this recipe, Slap Ya Mama Gumbo mix and a confetti blend of peppers create a meatloaf just bursting with the fun flavors and colors of Mardi Gras. Slap Ya Mama Etouffee Sauce brings a rich, smooth base to a sauce that will have you lickin' the pot!

Tuesday, August 5, 2014

Zucchini and Goat Cheese Flan

I love appetizers and desserts that are individually proportioned. When added to a buffet of party food, they always look more appealing and are easier to serve than something that people have to cut into. When served at a dinner party, I always feel that thought was put into the presentation of the dish. I was so excited when I got the chance to use one of my favorite appetizer recipes with the Good Cook Dessert Bar Pan. I love the square shape of the cups and the pan makes 12 appetizer servings. Add a side salad for a light lunch. This recipe is quick to put together and can be served at room temperature.

Monday, August 4, 2014

When Was the First Time You Had This?

Baklava is something that I did not grow up eating. I think that the first time I sampled a piece was at Disney World's Epcot park, in the Moroccan section of the World Showcase. I was probably 20-something years old at the time, so, yeah, I was a little late to the party!

But, once I discovered this little gem I was hooked. I read many recipes and was intimidated by the process. I finally mastered the "real" way to make Baklava, but it is a very time-consuming process. A special occasion dish, for sure! I looked for an easier method and stumbled upon a recipe that uses refrigerated crescent rolls. My family was happy with it as a quick, sweet treat. For this challenge, I decided to substitute puff pastry for the crescent rolls and I used pecans, as that's what I had in my pantry. It's not a traditional baklava, but it's pretty tasty and very simple. We love it - I hope you do as well!

Friday, August 1, 2014

The New Comfort Food: Buffalo Baby Bella Meatloaf

Growing up in the 1970's, I had A LOT of meatloaf. Whether at school or at home, it was always ground beef with ketchup on top. Now, there's nothing wrong with that but, I always have to mix things up a bit and make it my own.

So, a few years ago I started working with different combinations of meats (and some really horrible ones, too.) Then I found the winning one and voilá: Ground buffalo and ground turkey! Who would've thought that beef and poultry would play so nicely together?!

And not being a huge fan of ketchup (since I had to douse everything from liver to french fries with it) I came up with BBQ sauce which has just enough zing to make this loaf happy.

I serve mine with blanched green beans and a Drunken Baked Sweet Potato (recipe below.)

ENJOY!!