Showing posts with label Sharyl. Show all posts

Friday, January 13, 2017

Pressure Cooker Chunky Applesauce


Our past sponsor, Instant Pot, gave us the opportunity to play and revel in this fantastic new electric pressure cooker. This beauty does it all: 7-in-1 Multi-Functional Cooker: Pressure cooker, Slow cooker, Rice Cooker/Porridge Maker, Steamer, Sauté/Browning, Yogurt Maker & Warmer. For our Past Sponsor Challenge, I decided to make something I hadn’t made before. I decided on applesauce, since its fall. I gave some of this batch to my MIL, and she raved about it. She warmed it, and put in on top of vanilla ice cream, and topped it with crumbled lemon cookies. The next morning she put it on pancakes. She and her friend were in applesauce heaven! I don't think I'm going overboard to call the Instant Pot, the Magic Pot. I have made cheesecake in the Instant Pot. It may have been the best cheesecake I have ever made. I have cooked rice at the snap of my fingers. I could go on forever about the eggs that practically peel themselves, and the “poached” eggs I have made. Give the Instant Pot a try, and join the rest of us who continue to be amazed by it’s capabilities.

Pressure Cooker Chunky Applesauce
by Sharyl W.

8 medium to large apples (I used an assortment of Granny Smith, Honeycrisp and Gala)
1 cup of water
1 tablespoon fresh lemon juice
1/4 teaspoon nutmeg
1 teaspoon cinnamon
1/4 cup of sugar (I used white, but one could also use brown sugar)

Add the water and lemon juice to the Instant Pot liner pot. Peel, core and slice, or chop the apples. Add the apples, nutmeg, cinnamon and sugar, to the pot. Set high pressure manual for 6 minutes and then NPR (natural pressure release) until pressure drops and lid can be removed. For smoother applesauce, blend with an immersion blender or mixer. I like ours to be chunky, so I didn't do this step. 

Note: I discovered later that most don't peel their apples. Peeling apples is a step I detest, so I will never again peel my apples, for applesauce! I didn't want real sweet applesauce, so I didn't use much sugar. Adjust to personal taste.

Tuesday, November 22, 2016

Chicken with Dressing

I just couldn't make up my mind on what retro dish I wanted to redo. To be honest, I never had this back in the 1960's-1980's, so I'm not really sure how it was made. I suspect that maybe there was canned soup and canned chicken involved.

Whenever I make something, I have to ask myself, will Mark eat this? I don't want to waste time or money on something he won't eat for dinner. He is pretty much a meat and potatoes guy, which is somewhat limiting! I was mulling over options in my head, and Chicken and Dressing came to mind. 
For about a year, we had a local woman who had a storefront. She sold oh so good, down home comfort food in single and family portions. She had so many wonderful options. To my dismay, there was a landlord dispute, and she was gone. One of my favorites was her Chicken and Dressing. I never thought she put in enough chicken, but I loved it anyway.

Growing up, my mom always used Pepperidge Farm Herb Seasoned Cubed Stuffing when she cooked our Thanksgiving meal. To this day, I also use it as my base when I make dressing. Mark prefers cornbread dressing, so that’s what I used here. We both loved this. I commented that it was a quick Thanksgiving knock-off meal. When Mark saw the chopped parsley on the top, he said, “Do I have to eat the leaves?” Seriously? 

Mark LOVES gravy, like it’s the sixth food group. I had some chicken gravy in the fridge from another dinner, so that made this just perfect. I'm making a double batch next time. We mowed through this like I was feeding an army.

Chicken with Dressing
by Sharyl W.

4 pounds chicken tenders
8 Tablespoons of butter, divided
4 Tablespoons of olive oil 
1 medium white onion, chopped
1 14-ounce bag of Pepperidge Farm Cornbread Stuffing
1 teaspoon poultry seasoning
3 cups of chicken broth, divided
Salt
Black pepper
3 Tablespoons fresh chopped, flat leaf parsley

Preheat oven to 350°F. 

Salt and pepper the chicken tenders. Heat 4 tablespoons of the butter, and olive oil, in a skillet, over medium high heat. When the oil/butter is hot, cook the chicken tenders until brown, and then turn over to cook the other side. They don't need to be cooked 100%, since they will finish cooking in the oven. Cook the chicken in several batches, so that the chicken isn't overcrowded. 

After all the chicken is cooked, add the chopped onions, and sauté until translucent. 

In a large bowl, add the package of Cornbread Stuffing Mix, poultry seasoning, 4 tablespoons of melted butter, 2 1/2 cups of chicken broth and the sautéed onions. Mix to combine. Chop the chicken into bite-sized pieces. Add the chicken to the dressing mix and combine. 

Brush the bottom and sides of a casserole dish, with melted butter. Spoon the chicken/dressing mix into the casserole dish. Pour the remaining 1/2 cup of chicken broth over the casserole. 

Bake, covered, for 30 minutes. Remove the foil, and bake for another 10 minutes, or until it’s hot. Garnish with fresh chopped parsley. Top individual servings with gravy, for an even moister dressing.

When reheating for leftovers, add more chicken broth to keep the casserole moist. 

Wednesday, September 28, 2016

Maple Pecan Muffins

This is the second time The Spice House has sponsored 37 Cooks. They have been supplying those in the know with spices, herbs and seasonings since 1957. I was born in 1957, so they have been perfecting their craft for a very long time!

The only request The Spice House had for our challenge was that we focus on baked goods and desserts. Luckily for me, that’s where my mind usually goes. I already had a great assortment of their herbs and spices for baking and cooking. I wanted to use spices or flavorings I hadn't used before. I started scrolling through their spices online. There were so many to choose from. I kept looking and the maple flavoring and maple sugar, caught my eye. The maple sugar is made from pure Wisconsin maple sap. I love making muffins for breakfast and Mark likes pecans in everything possible, so that’s how I decided on Maple Pecan Muffins.

If you enjoy cooking and baking like I do, check out their wonderful items. It will change your culinary world. Don't blame me when you become addicted to their superior products, ha ha! I used my favorite basic muffin recipe. Feel free to use yours if you prefer, and just add the natural maple flavor blend and maple sugar. Our house smelled so good as these were baking!

Maple Pecan Muffins
by Sharyl W.
Makes 12 muffins

2 cups white flour
1 Tablespoon baking powder
1/2 teaspoon salt
1/2 cup of white sugar
1 cup milk (I prefer whole, but one can use 2%)
1/4 cup vegetable or canola oil
1 egg, slightly beaten
1 teaspoon of The Spice House Natural Maple Flavor Blend
1/2 cup chopped pecans
2 Tablespoons of The Spice House Maple Sugar - for topping

Preheat oven to 375°F. Combine the first 4 ingredients in a large bowl. Add the milk, oil, egg, and maple flavor. Mix just to combine. Batter will be lumpy. Over mixing will make dry muffins. Add the nuts to the batter.

Lightly grease muffin tins – or use paper cups – and fill about 2/3 full with the batter. Sprinkle maple sugar on top of the muffin batter. Bake for 20 - 25 minutes, until lightly brown. Keep an eye on them. No one wants a dry muffin! I like to brush the tops of my muffins, with melted butter, as soon as they come out of the oven. I think it keeps the muffins moister.

Monday, August 8, 2016

Roasted Carrots with Molasses Mustard Glaze

I was so excited to find out our latest sponsor was Jay Ducote! I watched every episode of the Food Network show “Next Food Network Star”, and rooted for him to win. Jay finished in the top 3 of season 11 last year. I started following Jay on Facebook, so I could keep up with his future plans. Finding out 37 Cooks was partnering with Jay was a nice surprise. I wavered on what to make. I thought about baked wings, because I think I have a wing addiction. Then I thought about fried wings. See the theme? I love chicken.

As I sat in my chair one evening, carrots popped in to my head. That’s rather odd, because as a general rule, I don't care for cooked vegetables. I do enjoy the grilled squash and zucchini that come with my favorite dish at our local Mexican restaurant. That made me think that maybe I would like roasted carrots. I decided to try roasted carrots with the molasses mustard as a glaze. I wanted some firmness to my carrots. Mushy carrots would be a turn off to me. I settled on 25 minute initial cook time and they were perfect. My plan was always to share most of the carrots with someone who would really enjoy them, but I had to try them too. What a pleasant surprise. I liked them! I can see this dish being a favorite at future family get-togethers.

Roasted Carrots with Molasses Mustard Glaze
by Sharyl W.

2 bunches of whole, unpeeled carrots, with trimmed tops
1/2 white onion cut into large slices (or red or yellow)
3 Tablespoons of lemon olive oil (or unflavored olive oil or canola oil)
2 teaspoons kosher salt
1 teaspoon freshly ground coarse black pepper
4 Tablespoons of Jay D's Louisiana Molasses Mustard – use more or less to suit your taste
3 Tablespoons fresh chopped parsley

Preheat oven to 400°F.

Wash the carrots and trim the tops. Place the carrots on a cookie sheet and add the olive oil, salt, pepper and onion. Toss well, and then spread out the carrots and onions. Bake for about 25 minutes, until some browning is seen. Remove tray from oven and brush carrots and onions with the Louisiana Molasses Mustard. Return to oven for a few more minutes. Garnish with fresh parsley and serve warm.

Tuesday, May 3, 2016

Pressure Cooker Flan


Our sponsor, Instant Pot, gave us the opportunity to play and revel in this fantastic new electric pressure cooker. This beauty does it all: 7-in-1 Multi-Functional Cooker: Pressure cooker, slow cooker, rice cooker/porridge maker, steamer, sauté/browning, yogurt maker and warmer. I had been researching and seriously considering buying one around the holidays. I had been following their Instant Pot Community on Facebook, and amazing things were happening in kitchens around the world. I have made a cheesecake in the Instant Pot. It may have been the best cheesecake I have ever made. I have cooked rice at the snap of my fingers. I could go on forever about the eggs that practically peel themselves and the “poached” eggs I have made in this life-changing electric pressure cooker. I cooked a fork-tender brisket in about 1.5 hours. It takes over 4 hours in the oven.

Ha! I saw that eyeroll!! You're thinking "She said this Instant Pot is life-changing". I think you will agree, once you see the fantastic recipes on our 37 Cooks blog. I'm back! I just jumped up to put some eggs in to make deviled eggs for lunch. Like many, I worried initially that this pressure cooker would blow up all over my kitchen and damage me in the process. It didn't take me long to realize that was not going to happen. The Instant Pot is very user friendly. It comes with clear instructions and sample recipes to try. I glean most of my info and recipes from the IP Community on Facebook. With over 52,000 members, there is a wealth of information, people ready to help and more recipes available than I will ever be able to make in one lifetime.

I decided on flan because I have never made it before. I made one as a test dish and the caramel was a tiny bit burnt so this time I kept the burner heat a little lower. My test subjects loved the trial run, burnt caramel and all. They couldn't believe that I made it in the Instant Pot! My second flan, for this challenge, was spot on. Smooth, extra hit of vanilla and a perfect caramel sauce. Give the Instant Pot a try and join the rest of us who continue to be amazed by it’s capabilities.

Pressure Cooker Flan
by Sharyl W.
Adapted from Key Ingredient's Creme Caramel (or Caramel Flan), Pressure Cooker Style

Caramel:
1 cup sugar

Cream base:
5 eggs – 4 whole eggs and 1 yolk
2/3 cup sugar
2 cups whole milk
1 Tablespoon pure vanilla extract (I used 1.5 tablespoons, because I love vanilla)

I used a 7” soufflé container. Make sure whatever you choose, has a solid bottom.

To make the custard, add the eggs to a bowl and whisk. Add the sugar and mix well. Add the milk and vanilla and whisk together. This will be poured over the caramel when it is ready.


Make the caramel in your widest sauté pan. Add the sugar and turn the heat to medium-high and wait (I have an electric stove. The first time I made the caramel I burned it because the heat was too high. What works best for me is a burner setting of 7, sometimes lowering to 6). One rule for making caramel is don't stir it. Don't pick up that spoon! If you must, and I did, swirl the sugar around the pan. Once almost all of the sugar has melted and caramelized, remove pan from the heat. Pour the caramel into the flan dish.

Pour the egg milk mixture over the caramel. Don't overfill - leave at least 1” from the top of the container.

Add 1 cup of water into the liner pot of the pressure cooker. Lay trivet in bottom of liner and place flan container on trivet. It is important that the flan dish be on a trivet (the Instant Pot comes with a trivet). Cover flan dish lightly with foil. Lock the lid into place and make sure the vent is in sealed position. Set the manual pressure to high and set time for 10 minutes. After 10 minutes, the Instant Pot will beep several times. Don't do anything yet. Allow the pressure to release naturally. After 10 minutes, open the pressure valve to release any remaining pressure. Remove the lid and carefully remove the flan container.

Cool for 1 hour and then cover with plastic and refrigerate for at least 3 hours. When ready to serve, set the bottom of the flan dish, in a dish of very warm water, for about 1 minute. Use a knife to go around the sides of the flan to release from the side of the container. Place your serving dish on top of the container and flip it over and voila! You're a pro! You just made tasty flan in the Instant Pot electric pressure cooker.

Friday, March 11, 2016

Trix White Chocolate Fudge


How lucky and honored I am, to be part of a group that is sponsored by General Mills! General Mills sent each of us 3 boxes of their updated cereals, which contain no artificial flavors or colors from artificial sources. I had the opportunity to try and play with these updated cereals before they were available in stores. I'm willing to bet that all ages like cereal. As a child, I had it often with milk. As an adult, I eat cereal as a crunchy snack. Cheerios have always been a favorite of mine. Chocolate Cheerios?! Oh, yes! I had a mug of Chocolate Cheerios last night. I chose Trix for my recipe because I love all the colors and the resounding crunch. Plus, they make me think of spring, which is finally here again. So, if you haven't had cereal in awhile, run to the store and buy a box or two of Chocolate Cheerios, Trix or Golden Grahams and feel like a kid again!

Trix White Chocolate Fudge
by Sharyl
Adapted from allrecipes White Chocolate Fudge

1 8-ounce cream cheese - softened
4 cups powdered sugar
1 1/2 teaspoons vanilla extract
12 ounces white chocolate (I used Ghirardelli white chocolate bars)
1 1/4 cups Trix cereal – split

Spray an 8-inch square baking dish with Baker’s Joy baking spray, or similar. In a medium bowl, combine the softened cream cheese and powdered sugar. Mix until almost combined. Add the vanilla extract and mix until smooth. Place the chopped white chocolate in the top bowl of a double boiler. Melt the chocolate over lightly simmering water. Don't allow the water to boil. Stir the chocolate until completely melted and smooth. Fold the melted chocolate into the cream cheese mix. Add 3/4 cup of Trix cereal and lightly mix in. Pour mixture into prepared pan and smooth top. Add about 1/2 cup of Trix cereal to the top and lightly press into the fudge. Chill for an hour. Cut into 1-inch squares for serving.

Note: I suggest using white chocolate and not white baking chips. Best served the same day.

Wednesday, December 30, 2015

Butterfly Kiss


The Wild Hibiscus Flower Company makes all their products by hand, in Australia. Their website says, “The butterfly pea flower is a native from Thailand where it is called Dok Anchan (Latin name is clitoria ternatia). It grows on a vine producing bountiful crops of delicate blue and purple flowers which are typically dried.” I chose this extract for my recipe because I am in the garden industry and we sell this exact plant at our garden center. It was kismet! I love citrus-based drinks and I am a lover of all things bubbly. “But then if a squeeze of lemon or lime is added, it then changes to royal purple and almost pink in some instances due to the change in acidity.” Because of the lemon juice, the drink hue is lavender-pink. I had some help with this recipe. We lost a special friend in 37 Cooks. Chris and I used to bounce ideas and recipe photos back and forth. Her husband, Sean, was her taste tester and part-time sous chef. I decided to ask Sean if he would partner with me on this challenge. We both loved Butterfly Kiss and we hope you do too. 'Clink!'

Butterfly Kiss
by Sharyl

1 ounce dry gin
1/2 ounce fresh lemon juice
1/2 ounce simple syrup
15 drops of Wild Hibiscus b'Lure Butterfly Pea Flower Extract
2 ounces chilled champagne or Prosecco
1 lemon twist

Combine the gin, lemon juice, simple syrup and b’Lure Butterfly Pea extract, in an ice-filled shaker. Shake vigorously. Strain into a chilled coupe. Top with the champagne and lemon twist garnish. Enjoy!

Note: simple syrup is a 1:1 ratio of water to white sugar, heated to a boil and stirred until mixed. Cool. Store in the refrigerator.

Friday, October 2, 2015

Banana, Oatmeal and Pumpkin Seed Breakfast Cookies


Nuts, nuts and more nuts! Who doesn't like nuts? They are so versatile. Our sponsor, Truly Good Foods, supplied us with four different kinds of nuts. The hardest part of this challenge was figuring out which to choose to bake with. I certainly enjoyed trying them all so I could come to a recipe decision. This is a very simple recipe. Children would love to help make these. If these are for children, one may want to use semi-sweet chocolate chips instead of the dark chocolate chips. I decided to call these breakfast cookies so that I could have cookies for breakfast. After all, it’s like having oatmeal and banana for breakfast, right? These are great for an on-the-go breakfast, which is how I eat breakfast during the week.

Banana, Oatmeal and Pumpkin Seed Breakfast Cookies
by Sharyl
Adapted from Taste of Home's Banana Oatmeal Cookies

1 1/2 cups all-purpose flour
1/2 cup granulated sugar
1/2 cup light brown sugar – lightly packed
1 teaspoon salt
1/2 teaspoon baking soda
1/2 teaspoon ground cinnamon
1/4 teaspoon ground nutmeg
3/4 cup butter, softened
1 egg
1 teaspoon vanilla extract
1 cup mashed ripe bananas (buy 3 large to be sure)
1 3/4 cups quick-cooking oats
1 cup dark chocolate chips
1/2 cup chopped or whole Truly Good Foods Blackened Pumpkin Seeds

In a bowl, combine the first seven ingredients. Add butter and lightly mix. Add egg, vanilla extract, bananas, oats and mix well. Stir in chips and pumpkin seeds. Refrigerate for about one hour before baking. I actually kept the cookie dough refrigerated in a Tupperware for about a week and baked them as I wanted them.

Drop by tablespoonfuls, or use a scoop, onto greased baking sheets. I used my Zeroll Medium Scoop (the red one). Bake for 13-15 minutes at 375°F. Cool on wire racks. These cookies are actually moister after a day or two.

Monday, September 7, 2015

Marshmallow Fluff with Swirled Honey Crème Clover and Fresh Fruit

This challenge from our sponsor, Honey Ridge Farms, set my taste buds in motion.


I love honey. I like baking with it and using it in drinks in place of sugar. I also love the ooey gooey goodness of marshmallow fluff. A match made in food heaven! This is a fast and easy dessert for adults or kids. Use any varieties of fruits you like. I used nectarines, plums, blackberries, red grapes and apples. If kids are involved, add some plain animal crackers to the fruit plate. This dessert/snack is almost embarrassingly easy, but sometimes simple is best. I also have a jar of Strawberry Fluff. Decisions, decisions. Dip or dunk. I'll never tell what I did!

Marshmallow Fluff with Swirled Clover Honey Creme and Fresh Fruit
by Sharyl

1 7.5-ounce Marshmallow Fluff
1/3 cup Honey Ridge Farms Clover Honey Creme
Fruits of your choice – banana, peaches, berries, grapes, apples, pears, strawberries, etc.

Swirl the Clover Honey Creme into the marshmallow fluff. For a quick and somewhat healthy dessert, it doesn't get much easier than this!

Wednesday, August 12, 2015

Texas Potato Salad with Balsamic Honey Vinegar

I love honey. I like baking with it and using it in drinks in place of sugar. I've never tried honey vinegar though, so I was anxious to try the Balsamic Honey Vinegar from Honey Ridge Farms. “Award-winning Balsamic Honey Vinegar is truly unique and delicious aged balsamic-style vinegar made entirely from honey.” I feel a kinship with Honey Ridge Farms since they are from my home state of Washington. I work in the garden center industry and bees are essential to our industry.

There are so many versions of potato salad roaming around, but I've never made one like this. With all the fresh ingredients, I was sure it would be a winner, and it was. Serve warm in the fall or cold in summer. Enjoy!

Texas Potato Salad with Balsamic Honey Vinegar
by Sharyl
Adapted from She Wears Many Hats Texas Style New Potato Salad

3 pounds red potatoes
3 slices bacon
1 large red onion, sliced
2 Serrano peppers, seeded and minced
1 teaspoon salt
1/2 teaspoon freshly ground black pepper
1/2 to 1 bunch fresh cilantro, chopped (my favorite way is to put a bunch of leaves into a mug and then use scissors to cut the cilantro. Also works well with parsley. For those who aren't fans of cilantro, fresh parsley may be substituted.)
1/8 cup olive oil
1/4 cup of Honey Ridge Farms Balsamic Honey Vinegar

Cut potatoes in half, long ways, and add to boiling salted water. Cook until tender, about 20 minutes. They should be fork tender, but somewhat firm. Drain and cool. Cut potatoes into chunks and set aside. Cook bacon until crispy. Chop into pieces when cool. Grill sliced onions in the bacon fat, over high heat, until they are caramelized. In a large bowl, add the cooled potatoes, salt, pepper, minced Serrano peppers, bacon and chopped cilantro. Combine olive oil and Balsamic Honey Vinegar in a measuring cup and stir. (I started with 1/4 cup of Balsamic and 1/8 cup of olive oil because Mark’s taste buds are not too adventuresome!) Taste and add more salt, pepper or Balsamic Honey Vinegar/olive oil, as needed. Stir well to combine.

Monday, June 1, 2015

Blueberry and Lemon Scones

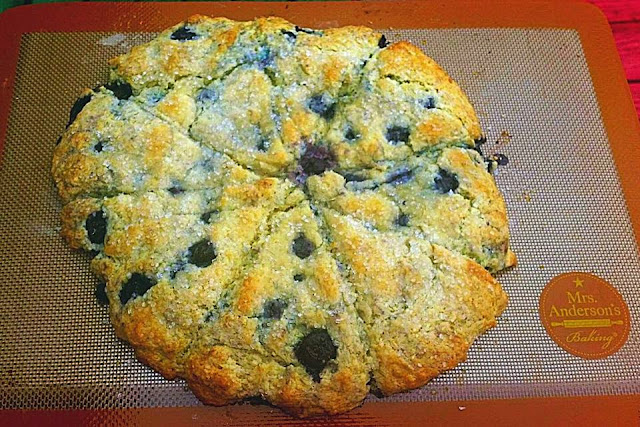
As soon as the Harold Import Company challenge was presented, I was ready. I have used silicone baking mats before and loved the results. I wanted to see how Mrs. Anderson's Non-Stick Silicone Baking Mat would compare. These scones may be made with your favorite berry - raspberry, mixed berries or blackberries. Blueberries and lemons are my favorite, so I chose this combination. These are the perfect springtime pastry. Enjoy them for breakfast, a weekend brunch or with an afternoon cup of coffee. Any time is scone time! The sour cream in this recipe keeps the scones moist. I have had scones that were dry, but this is my new go-to recipe. Enjoy!

Blueberry and Lemon Scones
by Sharyl
Adapted from Averie Cooks: The Best Glazed Mixed Berry Scones

2 cups all-purpose flour, plus 3 - 4 Tablespoons for work surface
1/2 cup granulated sugar
1 Tablespoon baking powder
1/4 teaspoon salt
1/2 cup unsalted butter, cold (1 stick)
1 large egg
1/2 cup sour cream
1 teaspoon vanilla extract
1 Tablespoon lemon zest
1 heaping cup of frozen blueberries - do not defrost
Coarse sugar for sprinkling before baking

Preheat oven to 400°F.

Line a baking sheet with Mrs Anderson's Silicone Baking Mat.

In a large bowl, add flour, sugar, baking powder and salt. Mix to combine.

Cut the cold butter into pieces and add to flour mix. Use a pastry cutter to cut butter into flour mix. In a separate bowl, whisk the egg, sour cream, vanilla and zest of 1 lemon. Add egg mixture to flour mix and stir until just combined. I used my hand to bring it together quickly. Too much mixing may make scones dry. Fold blueberries into the mix.

Sprinkle a dusting of flour onto a clean cutting board and place dough on top. Mold dough into a ball and then shape into an 8” circle. Use a knife or a pizza cutter to cut circle into 8 even pieces. Using a large spatula, transfer pieces to the baking mat. Leave a little space between pieces as they will spread during baking. Sprinkle with a coarse baking sugar before baking. Bake for about 18 minutes, until lightly golden brown. Do not over bake or they will be dry. Enjoy!

Tuesday, May 5, 2015

Jalapeno Pineapple Daiquiri

When the "It's Five O'Clock Somewhere" challenge was presented, the ideas started flowing. Thinking back, I remembered making Jalapeno Pineapple Daiquiris at a family beach vacation in 2013. I heard about this recipe when a Facebook friend on a cooking board posted about it. So, cheers to Kenny G.! Since I’m the only one in the house drinking these, I had enough extra to fill 2 pint mason jars for later. I put them in the freezer for another day and since there is alcohol, they won’t freeze solid. Cheers to me!


Jalapeno Pineapple Daiquiri
by Sharyl
Adapted from Food Network's Pineapple-Jalapeno Daiquiris

1/4 to 1/2 of a fresh jalapeno pepper
2 12-ounce bags frozen pineapple
3/4 cup rum
2-3 Tablespoons sugar (I used 2)
Juice of 1 lime
1 1/2 cups ice

Slice and seed the jalapeno. I used 1/2 of the jalapeno. Add all ingredients, except the ice, to the blender and mix. Add the ice and blend smooth. If it is too thick, add a little water or a little more rum. Makes 4 servings. Garnish with lime or jalapeno. This recipe can easily be doubled and then divided into mason jars and put in the freezer for enjoying later. Freeze for up to 1 month.

Monday, April 6, 2015

Thin Mint & Godiva Chocolate Liqueur Milkshake

When the "It's 5:00 Somewhere" challenge was presented, the ideas started flowing. Originally I thought of a boozy banana chocolate milkshake. After some research, I decided I wanted to use Godiva’s Chocolate Liqueur. While I was shopping for this challenge, I saw the Girl Scouts selling cookies so I bought my favorite, Thin Mints. Driving home, I had an epiphany! I changed the bananas to Thin Mints. If you don't have, or can't find, Girl Scout Thin Mints, use the closest substitute.

Thin Mint & Godiva Chocolate Liqueur Milkshake
by Sharyl

1/2 cup of whole milk
2 - 3 Tablespoons of Godiva’s Chocolate Liqueur
4 scoops of vanilla ice cream (in Texas, our preferred is Blue Bell and I used the French Vanilla)
10 Girl Scout Thin Mint cookies

Add the milk and Godiva liqueur to the blender and then add 1/2 the ice cream. Blend. Add the rest of the ice cream and the Thin Mint cookies. Blend to mix. Pour into a frosty mug and top with whipped cream and a Thin Mint cookie. Makes 2 servings. Enjoy!

Monday, March 2, 2015

Chicken Sausage and Cheddar Biscuits – breakfast to go!

I love breakfast. During the week, if I don't have something ready to grab as I go out the door, I will stop on the way to work and pick up something. It’s definitely healthier to make something myself. I especially like sausage and cheese biscuits. The Bilinski's Kale Balsamic Chicken Sausage are a perfect substitute for my regular sausage. I can heat one in the microwave and hit the road, breakfast in hand. On the off chance I have a few extra minutes, a fried egg would make this a great breakfast sandwich.

Chicken Sausage and Cheddar Biscuits - breakfast to go!
by Sharyl
Adapted from Brown Eyed Baker Sausage-Cheddar Biscuits

3 cups all-purpose flour
1 Tablespoon baking powder
1/2 teaspoon baking soda
1 teaspoon salt
1/2 cup unsalted butter, cut into cubes (1 stick)
8 ounces shredded sharp cheddar cheese
1 pound Bilinski's Kale Balsamic Chicken Sausage, chopped
1 cup buttermilk
2 Tablespoons unsalted butter, melted - to brush top of biscuits

Preheat oven to 425°F.

In a large bowl, add the flour, baking powder, baking soda and salt and mix. Add the cubed butter and use a pastry cutter to work the butter into the flour mix. Add the cheese and sausage to the bowl and mix to combine. Add the buttermilk and use your hands to bring dough to a ball. If mixture is a little dry, add a little more buttermilk (I added about 1/4 cup more to my dough.) Roll out dough on flour covered cutting board. Roll so that dough is about 3/4-inch thick. Using a biscuit cutter, cut out the biscuits and move to a parchment-covered cookie sheet for baking. Space about 2 inches apart and brush tops with melted butter. Bake for about 20 minutes, until golden brown. Enjoy your breakfast for the road!

Tuesday, January 20, 2015

Hatch Chile and Cheddar Bread – Takes Your Sandwich to the Next Level

This challenge was very exciting because I got a sneak look at Donna Currie's cookbook, Make Ahead Bread, which will be released on November 4, 2014. Donna is a member of 37 Cooks, so it was fun to change up one of her recipes in her new book. I pre-ordered my copy months ago and I am anxiously awaiting its arrival. You, too, can order Make Ahead Bread: 100 Recipes for Melt-in-Your-Mouth Fresh Bread Every Day, available on Amazon. This would make a great gift for anyone who loves to bake, so you need at least two! There was substance to the texture of this bread. It was slightly chewy; it made me wish I had sandwich makings. Instead, Mark and I had to make do with two buttered slices each! My dough was so “alive” it came out of the pan in the refrigerator so be sure and use the correct size loaf pan. I could have trimmed the dough on the side, but I opted not to. It’s homemade and it has character!

Wednesday, December 3, 2014

Banana Upside Down Cake

I love all things banana. Banana cream pie, banana bread, banana pudding - you get my point! As soon as I heard about the Hamilton Beach Slow Cooker Challenge, I knew one of my recipes would include bananas. What to make? Hmmm. Banana cake is good any time, of course, but it also makes me think of fall and cooler temperatures. I have a single oven, so space is at a premium during the holidays. This slow cooker banana cake doesn't need oven space, so it is a win-win. This Set & Forget 6 Quart Programmable Slow Cooker from Hamilton Beach, is making my life much easier.

Banana Upside Down Cake
by Sharyl
Adapted from Food Network's Slow Cooker Banana Upside Down Cake

Banana:
4 Tablespoons unsalted butter, cut into small pieces
3/4 cup dark brown sugar, firmly packed
3 Tablespoons dark rum
4 bananas, peeled and cut in half lengthwise

Cake:
4 Tablespoons unsalted butter, softened
2/3 cups white sugar
1 large egg, at room temperature
1 large egg yolk, at room temperature
3/4 cups cake flour
3/4 teaspoon baking powder
1/2 teaspoon cinnamon
1/4 teaspoon nutmeg
1/4 teaspoon fine salt
2 Tablespoons whole milk, room temperature

Butter the inside of the slow cooker. Lay buttered parchment paper in bottom of slow cooker. I used two pieces - 1 long ways and 1 cross wise. Sprinkle brown sugar over parchment paper and then drizzle the rum over the sugar. Add cut pieces of butter. Lay bananas, cut side down, on top of the sugar and press into sugar. Overlap the bananas for good coverage. Turn slow cooker on high.

Using an electric mixer, beat the 4 Tablespoons of butter and the white sugar until blended. Increase speed to high and beat for about 8 minutes, until light and fluffy. Add the whole egg and beat and then add the yolk and beat until combined.

In a separate bowl, sift the cake flour, baking powder, cinnamon, nutmeg and salt.

With the mixer on low, add 1/2 of the flour mix to the butter and mix. Add the milk, mix and then add the rest of the flour mix. Mix at medium speed until combined.

Spoon the batter over the bananas and smooth to cover the bananas. To keep moisture from dripping on the cake, lay a double layer of paper towel over top of slow cooker and then put the lid on. Do not clamp the lid down. The clamps are for transportation purposes only. Cook, on high, until cake starts to turn lightly brown on edges and cake is done in the middle. Test with a toothpick if you aren't sure. In this slow cooker, it took about 3 hours. When cake is done, turn off slow cooker and let cake sit for 20 - 30 minutes before removing. Using the parchment paper, carefully remove the cake from cooker and set on flat surface to cool. After 30 minutes, lay parchment paper on a cookie sheet or serving plate and lay that over top of the cake. Carefully flip so that the bottom of the cake is now on top. Remove parchment paper from bananas. 

Slice or spoon cake and serve with whipped cream or ice cream or eat as is. This is best eaten the same day. Enjoy!

Monday, November 24, 2014

Slow Cooker Dressing

Like so many of us, I am gone for many hours each day. With our lovely Houston drive time, I am gone about 11 hours, door to door. When I get home, I am not in the mood to cook dinner. This Set & Forget 6 Quart Programmable-Slow Cooker from Hamilton Beach is making my life so much easier! I do the prep work the night before and put it in the slow cooker before I leave for work. We also have a single oven. I have fond memories of my double oven at another house. This slow cooker is going be invaluable to me during the holidays. I will be able to make desserts (bread pudding which Mark loves), sides, hot drinks and, of course, more dressing and leave the oven for the big turkey. For this challenge, I roasted a whole fresh chicken and it accompanied the dressing, which was incredible.

Slow Cooker Dressing
by Sharyl
Adapted from this recipe for slow cooker stuffing

1 cup butter (2 sticks)
2 cups chopped onion
2 cups chopped celery
1/4 cup chopped fresh parsley
1 teaspoon poultry seasoning
1 1/2 teaspoons dried sage
1 teaspoon dried thyme
1/2 teaspoon dried marjoram
1 1/2 teaspoons salt
1/2 teaspoon black pepper
12 cups dry bread cubes (I used white bread and dried mine on trays in the oven – 170 degrees, for about an hour)
2 cups chicken broth (or as needed)
2 beaten eggs

Over medium heat, melt butter in a large pot. Add onion and celery and cook until onions are translucent. Stir occasionally. Add the parsley and cook for a few more minutes. Add the poultry seasoning, sage, thyme, marjoram, salt and pepper and stir. Add 1/2 the bread cubes and 2 cups of chicken broth and the beaten eggs and mix to combine. Add rest of bread cubes and mix. Depending on what kind of bread you use and how dry it is, more chicken broth may be required to moisten the dressing. Transfer dressing to slow cooker and cook on high for 45 minutes and low for an additional 4 to 8 hours. Do not clamp the lid in place. The clamps are for transport only. Stir occasionally and add more chicken broth if needed. Heat the chicken broth before adding more. I did not need to add more broth. I wanted the dressing to be moist, but not wet. Enjoy!

Wednesday, October 15, 2014

Chocolate Babka

When I heard about the Bob’s Red Mill challenge, I knew I was in because I love working with yeast; and flour and yeast go hand in hand. I have made this Chocolate Babka once before and it was wonderful. I didn't even know what babka was until it was discussed in a Facebook cooking group I'm in. Someone reminded me of the Seinfeld episode where Jerry and Elaine miss out on the last babka at a bakery on the way to their dinner party. Oh, so that’s babka! It is easy to change up the filling for babka. One could add pecans to the chocolate version or experiment with different kinds of jam. Raspberry is my favorite and I think I need to make it soon.

 While not difficult to make, one must allow time for chilling and rising, so allow about 8 hours from start to finish. It will be well worth it! Serious Eats describes babka as “...pastry pretending to be bread, a classification it owes largely to the loaf pan in which it's baked. It's made from flour, water, yeast, salt, sugar, eggs, milk, butter, and more butter. Inside, you find a spiral of chocolate, cinnamon, or almond filling, and there's often a little streusel on top. Eat it with coffee for breakfast or dessert, and prepare to add a notch to your belt.”

If you live in New York, I'm jealous that you can try the different babka at these bakeries here and here. In the meantime, I will keep making and experimenting with babka.

Chocolate Babka
by Sharyl
Adapted from this Chocolate Babka

Dough: 
(makes two 8 1/2” x 4 1/2” loaf pans)
3/4 cup warm milk (105-115°F)
1/2 cup plus 2 teaspoons sugar
3 teaspoons active dry yeast
3 1/4 cups Bob's Red Mill Organic Unbleached White Flour
2 whole large eggs
1 large egg yolk
1 teaspoon pure vanilla extract
3/4 teaspoon salt
1 1/4 sticks of unsalted butter (10 Tablespoons) - cut into pieces and allow to soften

Chocolate Filling:
5 Tablespoons melted unsalted butter
8 - 10 ounces of fine quality bittersweet chocolate, finely chopped (60% cacao or less)
1/4 cup sugar

Egg Wash:
1 large egg yolk
1 Tablespoon heavy cream or whole milk

Add warm milk and the 2 teaspoons of sugar to the stand mixer bowl. Sprinkle yeast over milk and let sit for about 5 minutes, until foamy. Add 1/2 cup of the flour to bowl and beat at medium speed. Add 2 whole eggs, 1 egg yolk, vanilla, salt, 1/2 cup of sugar and mix until combined. With mixer on low, add remaining 2 3/4 cups of flour, 1/2 cup at a time. With mixer on medium, add the butter, a few pieces at a time, and beat until dough is shiny, about 4 minutes. Dough will be soft and sticky. If you've made bread before, this is a different texture. Don't keep adding flour to make it feel like other bread dough. Transfer dough to an oiled bowl and cover with oiled plastic wrap. Set dough aside, to rise, until doubled in bulk, 1 1/2 - 2 hours.


Line 2 loaf pans with parchment paper or spray with baking spray. Punch dough down and then split dough in half and cover one with plastic wrap to keep it from drying out. I found it easier to flour parchment paper and roll the dough out on that. Sprinkle rolling pin with flour. Roll out the first piece of dough into a 10" x 18” rectangle. Transfer the rolled dough on the parchment paper to a cookie sheet, cover and put in the refrigerator. Repeat for 2nd piece of dough. Cover and chill both for 1 - 2 hours. This will make the dough much easier to twist later. 

When chilled, brush 2 1/2 Tablespoons of melted butter over the dough, leaving a 1/2” border. Prepare the egg wash by mixing the 1 egg yolk and 1 Tablespoon milk or heavy cream. Brush 1 short side of the dough with the egg wash. Sprinkle half of the chocolate and half of the sugar, saving the rest for 2nd piece of dough. Starting with the short side, (farthest from you), that doesn't have the egg wash, roll the dough tightly, similar to a jelly roll. Seal with egg wash side. Seal the ends of dough and twist the dough several times. Fold dough in half and twist again. Place dough in loaf pan and repeat steps for second loaf. There are many different ways online to prepare and twist the dough before putting it in the pan. This worked best for me, but I would encourage you to find the way that you like the best. 

Lay buttered plastic wrap over the loaf pans for 1 – 2 hours, until dough rises to just above top of pans. This is the time to save one for the freezer if you so choose (see note below.) Brush tops of dough with egg wash and bake on the middle rack in a 350°F preheated oven. Bake for about 40 minutes, until tops are golden brown. Remove from oven, let it sit in pan for 10 minutes or so and then remove bread from pan and cool on rack. Slice and enjoy!

Note: The 2nd loaf may be frozen for up to a month after it has been filled, rolled and laid in loaf pan. When the craving overtakes you, remove from freezer and allow to defrost and rise for about 5 hours. Brush with egg wash and bake as directed above.

Friday, October 3, 2014

A Trip to Guatemala

It's been a while since we've had a guest blogger! Well, here ya go! Sharyl, one of our amazing cooks, had the opportunity to go on a missions trip to Guatemala earlier this year! How cool is that?! Read and enjoy as she shares her experience! ~ Susan

*********************************************************************

At the end of June, I had a wonderful opportunity to go on my third mission trip. I have been twice, to the Dominican Republic, but this would be our first mission trip to Guatemala. I went with a Christian-based sports mission organization my boss started in 2009, Athletic International Missions. My sister and brother-in-law went with me. This was their first mission trip and they were somewhat apprehensive, but they needn't have been. They both took to the kids from the get go and since my brother-in-law is bilingual, he was invaluable. The rest of us got by on our limited Spanish and hand signals!

There were 31 of us, all from the Houston area, Tennessee and Virginia. After a direct flight from Houston to Guatemala City, we met up with the rest of our group. We loaded two vans with people and the sports equipment that we had brought with us and headed to our destination. After a somewhat hairy ride of partially collapsed roads and pounding rain, we arrived at our destination in the rain forest mountains of Purulha, Guatemala. The style of driving in Guatemala is wild. They take unbelievable chances in passing, but our driver, as well as our contact pastor in Purulha, took no chances and delivered us to our hotel, safe and sound.

We stayed at Posada Montaña del Quetzal, which was the only hotel in the area that could accommodate our large group. The rooms were very basic - no TV, phone, radio or clock. What was really amusing was that the walls were so thin, you could actually carry on a conversation with your neighbor. My neighbors were my sister and brother-in-law and we did just that!

We got up bright and early Wednesday, excited to meet the kids in the sports camp, who were anxiously awaiting our arrival. We had equipment and volunteers for soccer, volleyball and basketball, which are the big Guatemalan sports. If you know me, you know that I am not very sporty, but you don't have to be! There is a place for everyone to help. There were seven of us who worked with the kids in the Vacation Bible School. That was fun and games - songs, games, coloring and more. The first day, we had about 90 kids and they were a little shy. By the second day, they were hugging us and giving us these little butterfly kisses on the cheek. So sweet! Before leaving each day, we served them lunch of hot dogs with cabbage, mustard, mayo and ketchup on a bolillo, a variation of the baguette. They love their dogs this way. Us Americans? Not so much!

Meals at our hotel were always served buffet-style. A few
A Guatemalan breakfast
things that stood out were that the tables had salt and cayenne pepper only. No black pepper, salsa or jalapenos, which we missed. I have them on my packing list for the trip next year. Breakfast was usually scrambled eggs, but we had sausage once, pancakes once, hash browns twice and corn tortillas at every meal. Lunch was chicken in some kind of sauce, spaghetti or meatloaf with mixed Guatemalan vegetables and soup. Dinner was very similar to lunch. Plantains were served at most meals, as were black beans. Plantains are similar to bananas, but they differ in that they must be cooked before eaten. One would not peel and eat like a banana.


From our hotel restaurant, we could see the hummingbird feeder outside. These hummingbirds were huge. Nothing at all like we see in Texas. I suppose because they stay in Guatemala year-round, they don't expend energy migrating. It was fun to watch these giant hummingbirds. They were so big, we could actually see them.

We went out two nights for dinner. One night we went to Montebello. I had the pollo asado, roasted chicken which 
Tamales
came with rice, salad and soup. To drink, I had the limonada con soda, lime juice with sparkling water or soda. I had several of those on our trip...they were crisp and refreshing and I was so glad to see ice in my glass! We were never served ice at our hotel. A couple of the locals had a soup that came with tamales and I tried one. They were different from what I

am used to because they weren't filled with anything.

Saturday was our last day of camp with the kids. They had gotten to know us and we had gotten to know them. We had over 200 kids and 30 Moms our last day there, which was a little overwhelming, but so worth it. There are always a few kids that really tug at your heart and this trip was no different. There were two little girls that I always looked for and they usually found me first.

On Sunday, we split our group between two churches. My brother-in-law is an Episcopalian priest, so he was asked to give the sermon at the church for our VBS group. It was in a combination of English and Spanish, with someone translating as needed. Before and after church, we handed out suckers and hard candies to the kids. That was a hit for sure!

After lunch at our hotel, we packed up and boarded the bus to our two-night stay in the Portola Antigua Hotel. This was the day and a half of relaxation at the end of our trip before we flew home.

For the most part, our meals at the Antigua hotel were also buffet-style, but there were lots of entree items to choose from, as well as dessert, fruit and bread bars. My sister and brother-in-law ordered this wonderful concoction, Tangerine and Mango Parfait. It looked wonderful and tasted the same.

We walked the cobblestone roads to the street market. The
Colorful street market
variety of textiles, jewelry, clothing and Mayan crafts (they are known for their jade, which comes in colors other than green - who knew?) was overwhelming, but fun. We all did our part to support the market!

I told my sister that if we hadn't had this mini respite in Antigua before flying home, a few of us might not have made it. I was being facetious. We were exhausted, but it was a good tired. A few key words define this trip for me - joyful, exhausted and pensive.

My sister was keeping our family in the loop about our experiences. It seems her phone knew where she was. One email she typed “take care” and just after she hit send, she saw that auto correct changed it to “tamale care.” Makes sense to me! Hasta la vista.

Friday, July 25, 2014

King Ranch Chicken Casserole

This recipe, adapted from a recipe on the Homesick Texan blog, is one of our favorite casseroles and I usually have the needed ingredients on hand. When the Good Cook Potluck Pantry Panic Challenge was presented, I knew immediately this was my pantry panic go-to recipe. Before discovering this recipe, I made King Ranch Casserole the old way, with the two different kinds of soup. It was good. It’s what I was used to. Once I found this recipe, though, I have never made it any other way. This is a spicy dish. The freshness of the peppers, cilantro and fresh lime juice, make this dish pop with flavor. Save yourself the regrets and double this recipe so you have plenty for leftovers and to freeze.