Showing posts with label Vegetarian Entrees. Show all posts

Tuesday, November 29, 2016

Cheese Fondue

When this challenge was posted, my husband and I started talking about what "retro" recipes meant to each of us. For me, I think of Jello salads, bologna, and other American dishes that I am happy to never encounter again. For him, it's all about the classics...sauces, pâté, stuffed meats and veggies, and delectable desserts.

Francoise Bernard is a classic French cookbook author that my husband's Mamie would cook from all the time. We have her oldest copy of Les Recettes Faciles (Easy Recipes) from 1965 that is packed with his Mamie's newspaper and magazine clippings. I pulled this book from our shelf and flipped through it to see what classical French fare was. This book is filled with drool worthy recipes. Although, I did not choose a recipe from this book, it did give me an idea of what to make. Cheese fondue. My husband has perfected his recipe through the years and we always look forward to the weather getting cooler so he can make it. This is a recipe that he typically eyeballs amounts, which means that it turns out a little differently each time, but this time I followed him around for measurements!

Cheese Fondue
by Franck and Tonda
Serves 6

1 pound 12 month aged Gruyere cheese
1 pound Jarlsberg cheese
1 pound Comté cheese
6 cloves garlic
2 Tablespoons butter
1/2 to 3/4 bottle dry white wine such as Apremont from Savoie or Entre Deux Mers (Dry White Bordeaux)
1 1/2 Tablespoons Kirsh
Dash of paprika
1/4 teaspoon white pepper
1/8 teaspoon freshly grated nutmeg
Juice from 1/8 of a large lemon

Cut the cheese into 1/4 to 1/2-inch cubes. Do not shred the cheese. It will turn into a ball when melting it. Cut one clove of garlic in half and rub it on the inside of the cooking pot and fondue pot. Slice one clove of garlic in very thin and place it into the fondue pot. Melt 2 Tablespoons of butter, add four cloves of chopped garlic and sauté. Remove half of the garlic and add approximately 1/4 cup of wine to deglaze the pot. Add about 4 handfuls of cheese. It is important to stir the cheese in an 8 pattern until it melts. Otherwise, it will turn into a big ball in the pan. Alternate adding more wine (approximately 1/4 to 1/2 cup at a time) and cheese (3 to 4 handfuls) and continue until all of the cheese is melted to the consistency that you prefer. Make sure to continuously stir in the 8 pattern. You will use 1/2 to 3/4 bottle of wine. Add 1 1/2 Tablespoons Kirsh and a dash of paprika and stir. Stir in 1/4 teaspoon white pepper along with 1/8 teaspoon freshly grated nutmeg. Finally, stir in the juice from 1/8 of a large lemon. Transfer to the fondue pot.

Enjoy with cubes of baguette. An old French rule is whomever loses their baguette while dipping in the caquelon of cheese has to run around the block naked! Thankfully, it has not been enforced in my years of enjoying this meal.

Tuesday, November 15, 2016

Butternut Squash Ravioli with Brown Butter Sage Sauce

Please meet another one of our amazing new cooks, Brandie!

******************************************************************************

I was born and raised in Oklahoma. And ever since I was little, my dad had me doing prep-work for him in the kitchen. I was always the vegetable chopper and the taster. He just worked at a manufacturing plant, but cooking was his passion, and his hero was Emeril Lagasse. Every single day, he had his smoker going, even on holidays. Everyone in the neighborhood hated it, because you would smell like bar-b-que if you walked out of your house if you lived on our street, or even a few streets over.

My dad was always trying new things. Jalapeno jelly rub on a rock salt roast, or chili dog burritos (I did mention it was Oklahoma, right?). I remember once we dug a hole in the back yard to put hot coals in. We wrapped beef, mushrooms, bell peppers and onions in aluminum foil, put it on the coals and buried it for hours. When it was dinner time, we dug it up. I remember not being too impressed with the flavor, but getting to experiment with new ways of cooking was one of the ways I felt most free growing up.

When I was just in elementary school, my veggie of choice was not a vegetable at all, it was mushrooms. I'd take out the stem and stuff the mushroom with different things, cut them up and made a "floating mushroom soup" which was probably just chicken broth and other chopped vegetables with mushrooms floating on top. My dad had wanton wrappers and my sister and I would stuff mushrooms in those too.

As I got older, I was still trying to mature as a cook, though I believe I was using Cajun seasoning on nearly everything. In high school, my sister and I would prepare (what we imagined) were grand lunches for our friends. Some of the dishes were fairly ambitious for only having 40 minutes or so after driving to and from the school. Our biggest success was taco salad, I think. Cooking the shells, meat, heating the beans, chopping the lettuce, tomatoes, and making guacamole was a big feat to us two teens.

In college, I finally created my first really good recipe (that I still use to this day) at 24 years old; almond-crusted brown sugar chicken. I'm probably not the first person to combine these ingredients, but I was very proud of myself for putting a delicious dish together on my own rather than using a recipe. At that point, I was still using lots of frozen and canned ingredients.

Then, 5 and a half years ago, I moved to Portland. I couldn't believe how good even the bar food was here. I realized then the importance of fresh ingredients, and started buying more and more fresh veggies and locally raised meats. Now, the only frozen items I use are peas, and the meat I've purchased or helped my friends process on their farm.

About 3 years ago, I believe, is when I started becoming the home cook I am today. I put a picture of the dinner I made on Facebook, and my cousin (a chef in Oklahoma) told me I needed to work on my plating. "What? Why? I'm just going to eat it". But then, I started looking into plating, and realized what an incredible world I'd been missing out on. I find that when I do a search for whatever dish I'm trying to make and the word "plating", I find re-imagined dishes that inspire me even further. I come across recipes I'd never heard of before like "potatoes pave", and "Veloute".

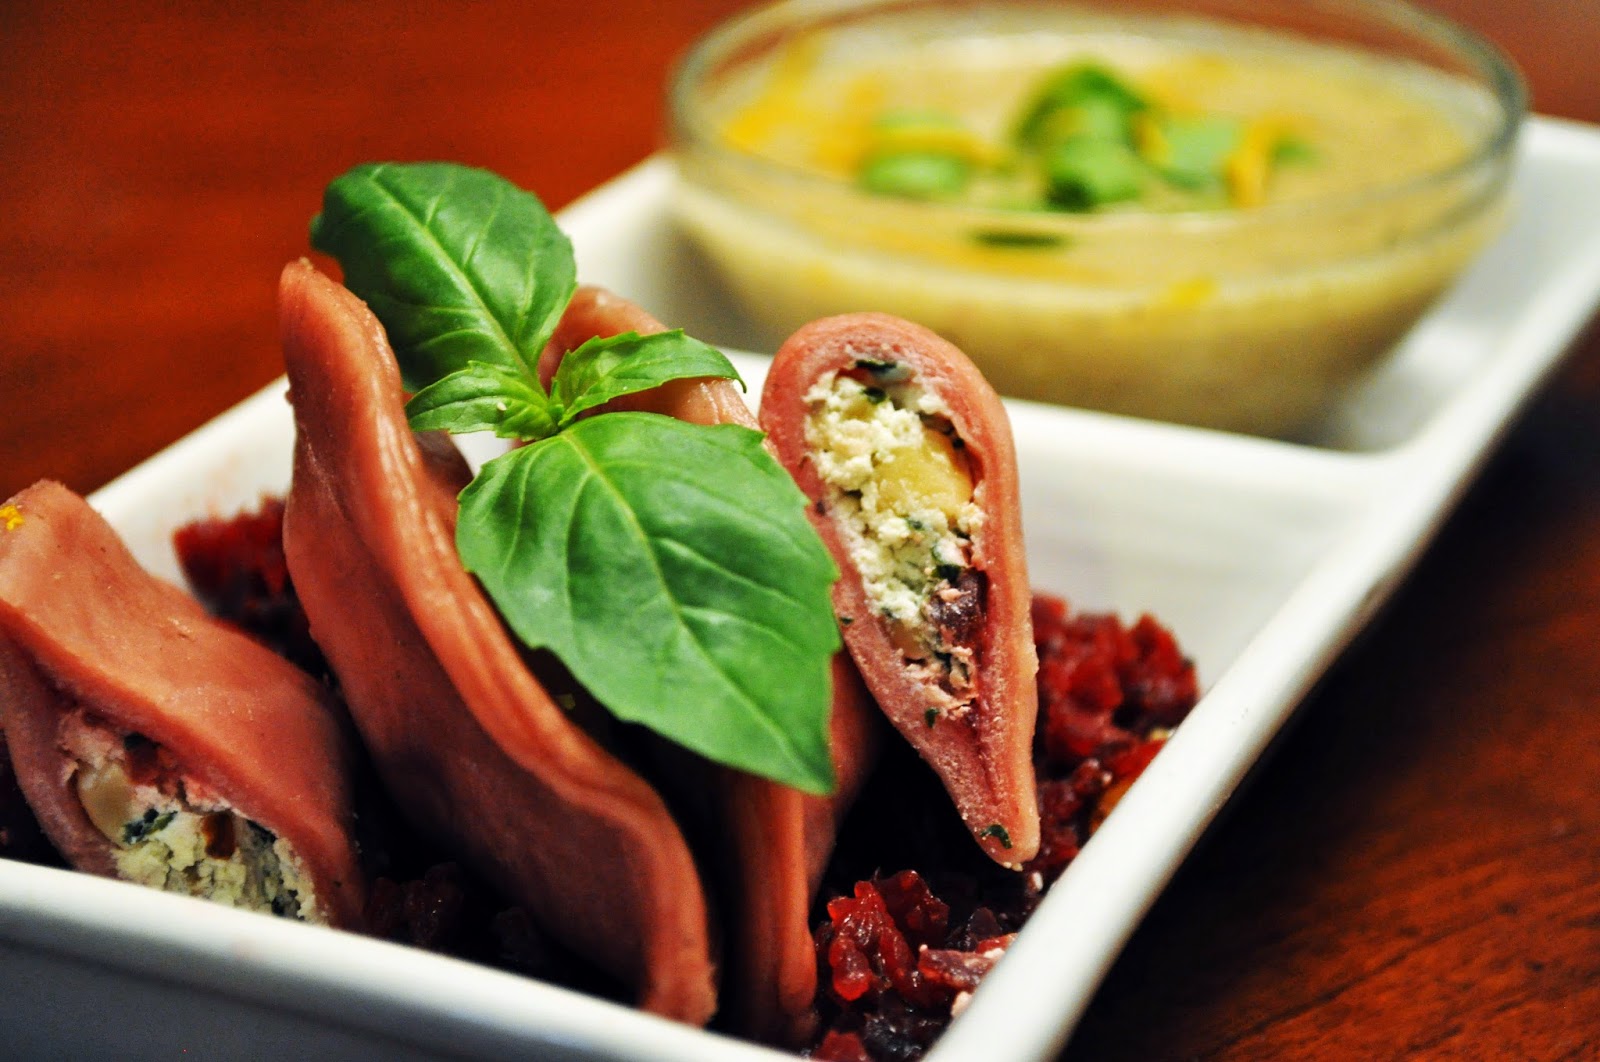
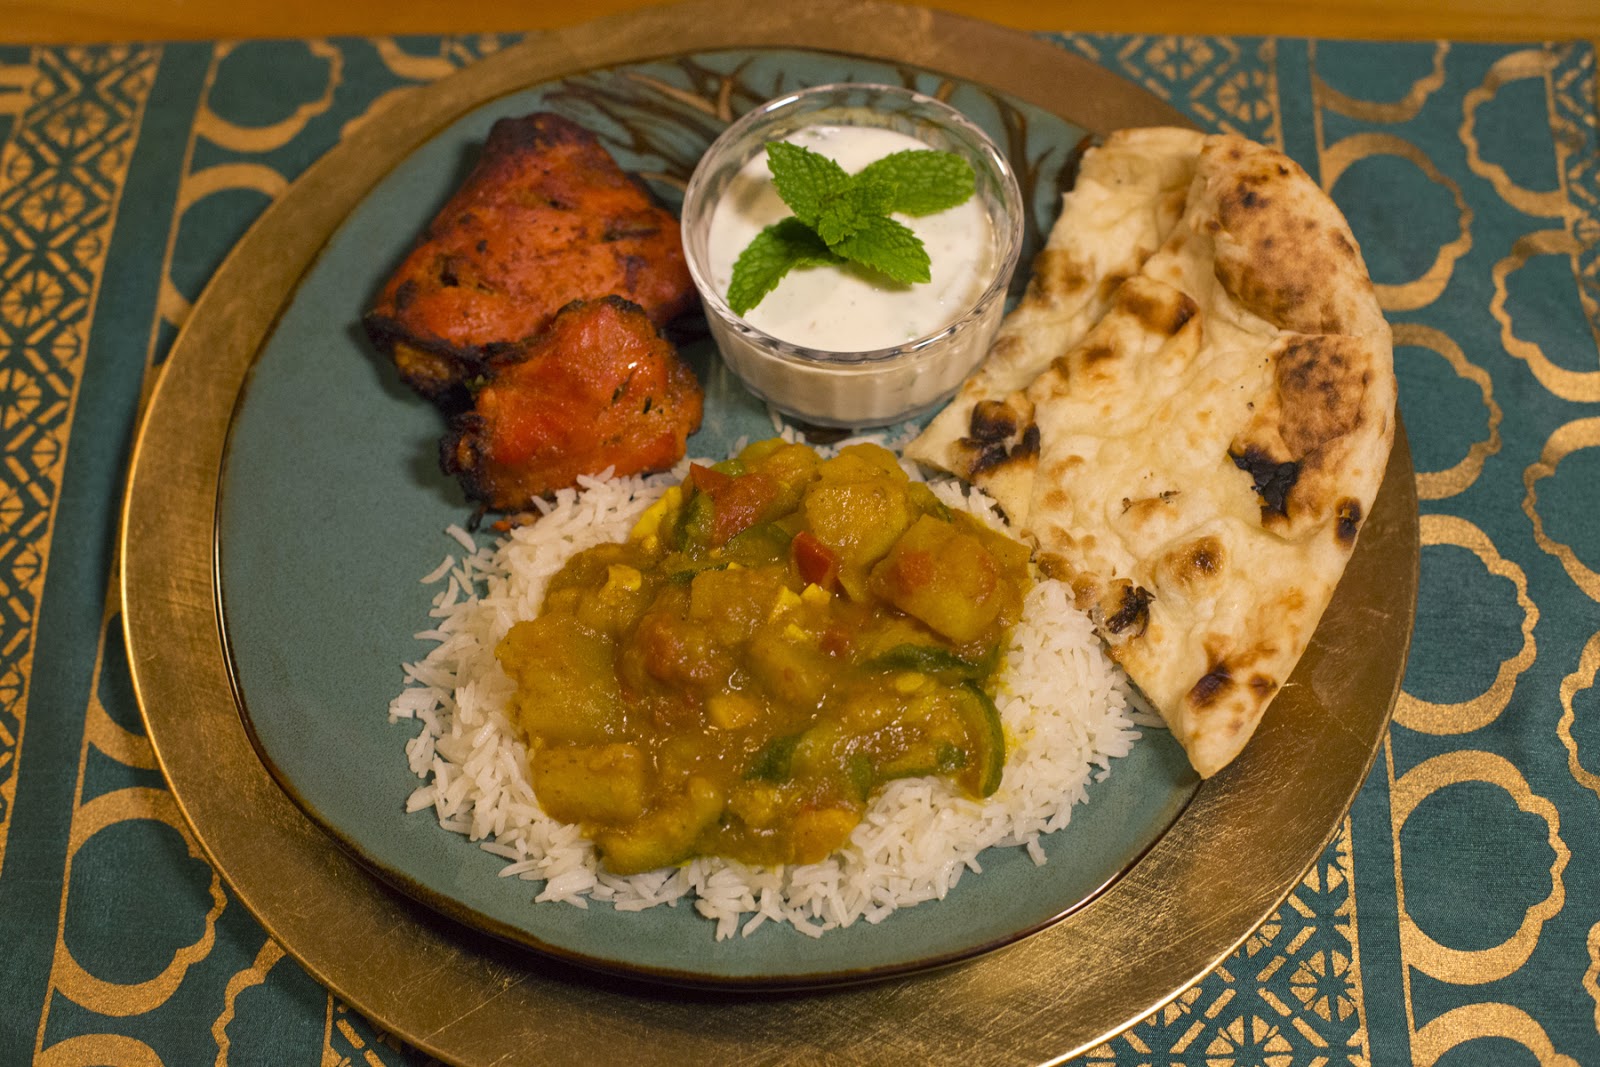
Here are a few dishes I've made since learning to plate better
My cooking these days is part experimentation, part quilting recipes together. I'm still very much in the learning phase, but I think we should always be in this phase. When I see a dish somewhere, or my husband brings home a new vegetable I haven't cooked with much, I start researching. I look up a variety of things that can be made with whatever the ingredient is. Then, when I decide on a dish I want to make, I look up many variations of the dish. I look for commonalities among the recipes and weave them together, and either pick and choose alternate ingredients from the other recipes, or come up with something on my own.


Butternut Squash Ravioli with Brown Butter Sage Sauce
by Brandie Gaudette
Recipe adapted from Food Network's Roasted Butternut Squash Ravioli with a Sage Brown Butter Sauce by Emeril Lagasse

My husband brought home a butternut squash. He loves anything pumpkin or squashy any time of year, really. He's usually good about waiting until fall, though. I knew he wanted me to make ravioli though, because that's the only thing I've ever really made with butternut squash. This time, though, I did use most of the squash to make a butternut squash soup, but decided to share the ravioli recipe, because it's my favorite of the two. Additionally, this recipe is just for two, so double up if you've got more mouths to feed. My niece loves to help in the kitchen and so do my friends, so this is a good one to do with others as long as they're patient!

Pasta Dough:
3/4 cup of flour
1/4 teaspoon of salt
1 egg
1/2 teaspoon of olive oil

Pasta Filling:
1 butternut squash
Butter
1 shallot, chopped
Freshly grated nutmeg to taste
Salt and pepper to taste
2 Tablespoons of Pecorino
1/2 cup of cream

Brown Butter Sage Sauce:
1/2 cup of salted butter
Fresh sage

Garnish:
Sage leaves
Red peppercorns
Pecorino

Start by preheating your oven to 400°F. Cut the stem off the top of the butternut squash, then cut in half lengthwise. Scoop out the seeds, then lay cut-side up on a slightly greased cookie sheet. Use any amount of softened butter you'd like to cover the cut side of the butternut squash, then sprinkle with salt and pepper. I like to put a dollop of butter in the scooped out part of the squash also. That way, periodically while it's baking, I can dip a brush in the butter, and baste the squash throughout the cook-time. Bake for one hour.

While the squash is baking, you should have plenty of time to make the dough and let it rest. Combine the flour and salt into your mixer with the flat beater attachment. Add the egg, and olive oil, and increase the mixer speed until dough is sticking together well (which should only take a minute). Take the dough out "work the dough" by folding it over and pushing it into itself. Do this until your dough looks consistent and can form a nice, tight ball that "springs" back slightly when you make an indent. Cover your ball with clear wrap and let it rest for at least 30 minutes at room temperature.

Once the squash is soft, take it out of the oven and let cool before scooping the squash out of it's skin and puree. Measure out two cups for the filling and reserve the rest to make a butternut squash soup (like I did!) or add it to a broth to use for butternut squash risotto.

Heat a pan with olive oil, and saute the chopped shallot until translucent and slightly golden (medium heat). If the pan is dry, add more olive oil, or at this step, you can choose to add butter instead. Add the two cups of butternut squash puree and saute until the mixture becomes slightly dry. While sauteing, add salt, pepper. Add in the cream, Pecorino, and nutmeg. At this point, I like to use my immersion blender to make the filling smooth, but it's fine to leave it as is. Make sure the mixture is thick enough that it's not runny. Let mixture cool to room temperature.

Once your mixture is cooled you can start rolling out your pasta. You don't want to roll your pasta out ahead of time because it will dry out if you leave it too long. I like to cut my dough into quarters like so:

I do this so that when I'm done cutting out the raviolis from one quarter, I can take the extra dough and roll it out into the next quarter creating less waste. When you roll out pasta (if you have a pasta machine), you pass the pasta through the largest setting several times folding it in half once before putting it through. You want to make sure your pasta dough is a nice, consistent color and texture before putting it through the thinner settings. I pass mine through all the way down to 7 before cutting the raviolis.

For the raviolis, I use a cookie cutter. There may be easier ways, but I like the look of big, plump raviolis in a bowl. I cut out two circles per ravioli, take one side in my hand, place a tablespoon of filling in the center, dip my finger in water to run around the edge of the bottom circle of pasta, then place another circle on top, pinching the edges together and pushing out any air. You want the edge of the ravioli to be as thin as the center, so make sure you're putting some pressure in when you're pinching the sides together. As long as your dough is still pliable, you shouldn't have a problem. If your dough got dried too much, try using a little more water, and using the tines of a fork to press the outside edge together.

This part of the process is usually the fun part to have help on as it's the most time consuming. I usually like to have 5 or six big raviolis per person.

When you're nearing the finish line for putting the raviolis together, put a pot of water on high to boil (make sure to add salt!). Once the water is boiling, put the raviolis in for no more than 2 minutes. Drain the raviolis.

To make the brown butter sage sauce, put half a stick up butter in a pan on medium heat. Right before the butter starts to brown, add minced sage leaves. Once butter is brown, add in raviolis and delicately move them around in the pan with the butter. Do this for only a few minutes.

Place Raviolis in each bowl delicately, and drizzle a tablespoon or two over the top of each. Crack pink peppercorns over the top, and grate some Pecorino over each bowl.

For the garnish, I also like to fry up a few sage leaves in some olive oil, and salt them immediately after removing them from the pan. Voila! Butternut squash ravioli in brown butter sage sauce!

Wednesday, November 2, 2016

Southwestern Burrito Bowl

Hi readers! We are so happy and excited to announce that we will be introducing you to a few new members of 37 Cooks! First up, please meet Sarah Dyer!

******************************************************************************

I consider myself an accidental cook. Having spent most of my childhood outside, I never really found myself drawn to the kitchen. It wasn't until I was a twenty-something living on my own, realizing that frequent dining out was not fiscally responsible, that I fell in love with food. I stumbled my way through the first year or two, learning everything I could from blogs, cookbooks and the occasional cooking show until I really came into my own. A few salty dinners, last-minute take out, and several smoke alarms later, I can proudly say that I made it through the awkward puberty stage of an accomplished cook.

These days, I spend most of my time cooking, writing, and photographing recipes for my blog, Away From the Box, as well as laughing with (sometimes at) my favorite taste testers: My soon-to-be-husband, Kevin, and our dog Milo.

I wouldn't put my cooking into any particular box (get it?) as I try almost every cuisine or method of cooking at least a few times, but I definitely have a real connection with Latin flavors. I love dishes with root vegetables and a subtle kick of spice.

To me, photographing food is just as much fun as making it, so you'll often see me playing with lots of color (if you couldn't already tell by my hair)! My dishes always strive to be as much of a showpiece as they are delicious. The recipe below is not only gorgeous, but also inspired by one of the very first meals I ever mastered in the kitchen. I hope you enjoy it!

Southwestern Burrito Bowl
by Sarah D.
Blogging at Away From the Box
Inspired by Cake & Allie's Southwestern Egg Rolls with Avocado Ranch
Yields 4 hearty bowls

For the Rice:
1/8 cup vegetable or canola oil
1 cup uncooked long grain white rice
4 ounces tomato sauce
1/2 teaspoon cumin
1 teaspoon garlic salt
1/2 teaspoon oregano
2 cups chicken or vegetable broth

For the Toppings:
2 Tablespoons canola or vegetable oil
1 yellow onion, sliced into rings
Black beans, cooked, rinsed and drained
2 roma tomatoes, diced
Corn, steamed and drained
Carrots, diced, steamed and drained
Spinach, chopped, steamed and squeezed dry with a paper towel
Red cabbage, chopped roughly
1 jalapeno, sliced thinly into rounds
1 avocado
Sour cream or plain Greek yogurt (optional)

Place the oil and uncooked rice in a medium skillet over medium heat and saute, stirring occasionally, for about 5 minutes until the rice turns white.

Add the tomato sauce, cumin, garlic salt, oregano and broth to the skillet and stir until combined. Reduce heat to a simmer and cook, covered with a heavy lid, for about 15 minutes. Do not remove the lid.

After the 15 minutes, remove from heat and let sit for another 5 minutes. Uncover and fluff with a fork. The rice should be dry and not gummy (unless the lid was lifted) and can be made ahead of time if needed.

While the rice is cooking, heat the canola or vegetable oil in a small skillet over medium high heat. Toss in the onions, making sure to coat each piece in oil.

Cook for about 20 minutes, stirring or tossing often with a pair of tongs. The onions should be soft and translucent, slightly browned and smelling sweet. You can continue cooking for a deeper caramelization or stop now, as they should finish around the time the rice does.

For easy preparation, use the steamable frozen bags of vegetables for the corn, carrots, spinach and black beans. Using canned or cooking from fresh is also an option, but takes more time.

In a bowl, layer about 1/2 cup of rice, the sautéed onions, black beans, tomatoes, corn, carrots, spinach, red cabbage and jalapeno to your tastes. Remove the pit from the avocado and make a cross hatch pattern in the flesh, then scoop onto the top of the bowls, leaving the skin behind. Drizzle with sour cream or plain Greek yogurt and enjoy!

Tuesday, August 23, 2016

Barbecue Vegetable Tacos with BBQ Sauce Creama

I was so excited when I found out that Jay Ducote was going to sponsor us! When I think of barbecue sauce, of course I think of the grill. What is better on a summer day than throwing some stuff on the grill for family and friends? When I have company, I like to include something for everyone. I thought doing a vegetarian taco would be a nice option. My husband, a big meat eater, was satisfied with the meatiness of the Portobello mushrooms, but don’t be shy to grab some chicken, steak or swordfish and grill it up the same way along with the veggies. Tacos are a fun dish and the Jay D’s sauce compliments the vegetables so well! I like to keep my cooking simple, so a great sauce and some vegetables makes a quick, delicious, healthy meal anytime.

Barbecue Vegetable Tacos with BBQ Sauce Crema
by Sarah M.

1 pound small portobello mushrooms, halved
1 zucchini, sliced into rounds
1 squash, sliced into rounds
1 red onion, cut into chunks
1 each yellow and red bell pepper, cut into chunks
Olive oil
Salt
Freshly ground black pepper
Jay D's Louisiana Barbecue Sauce

To serve:
Small flour tortillas
BBQ sauce crema (see below)
1/4 head red cabbage, shredded

It is important that the vegetables be cut into similar sizes so they cook evenly. Place all the vegetables in a large bowl, drizzle a bit of olive oil and season with salt and pepper. Toss all the vegetables to coat. Alternating types and colors, thread the vegetables onto skewers. Baste the vegetable skewers with Jay D's Louisiana Barbecue Sauce.

Heat grill to medium-high (350° - 400°F). Cook the vegetable skewers on the grill for about 10-15 minutes, or until the vegetables become tender and a bit charred. While cooking, turn the skewers occasionally and continue basting with the barbecue sauce.

When then vegetables are done, turn off the grill. Throw the tortillas on the grill for about 15-20 seconds a side and keep warm in a kitchen towel.

I like to serve this up family style so everyone can make their own!

BBQ Sauce Crema

1 cup sour cream
1 1/2 Tablespoons Jay D's Louisiana Molasses Mustard
Juice from 1/2 lime
1/2 teaspoon chili powder

Mix all the ingredients together until thoroughly combined. I suggest making this first so it sits and the flavors combine.

Thursday, May 12, 2016

Instant Pot Risotto with Butternut Squash and Dried Mushrooms


I was full of skeptical curiosity the day my Instant Pot arrived. It's a big thing on the cooking-related Internet, and you can read all kinds of glowing recommendations, just as I did. It's an electric pressure cooker, sure. But, it does so much more than that! It steams, sautés, slow-cooks, keeps warm. It knows how to make rice and yogurt. It has pre-programmed routines for poultry, soups, porridge, and stews. Now I tend to be an old-fashioned cook. Would this new-fangled machine really make me love it?

I unpacked my new 6-quart Instant Pot IP-DUO machine, washed it, made it welcome, and tried the necessary first pressure test with plain water. Yes, it gets to pressure; yes, seems to work fine. Now it was on to cooking!

I love risotto. It's both luxury and comfort in a bowl. What I don't love about it is standing at the stove, constantly stirring, so the texture is perfect. So I tried a savory risotto made with butternut squash, dried mushrooms, and saffron.

Wow! What a taste, and so easy! While my recipe instructs you to check the consistency at the end, and simmer again if the squash was watery, my risotto didn't need this at all. It was perfect just as it was.

Instant Pot Risotto with Butternut Squash and Dried Mushrooms
by Maurita Plouff blogging at Get the Good Stuff!
Serves 6

1 medium leek, white and pale green parts only, halved lengthwise and washed free of dirt
1 small butternut squash (to yield 2 cups peeled and chopped)
1 ounce dried mushrooms (you can use as little as half an ounce of dried porcini, morels, or a mixture) 
2 Tablespoons unsalted butter
1 1/2 cups white Arborio rice
1/4 cup dry white wine (I used vermouth)
4 cups (1 quart) chicken or vegetable broth
1 teaspoon dried thyme
A generous pinch saffron threads
1/2 cup finely grated Parmesan cheese (about 1 ounce)

Slice the white and pale green parts of the leek into thin slices. Peel and chop a small butternut squash, so that you have about 2 cups of squash in half-inch cubes. If you're using prepared pre-cut squash, cut it into smaller pieces, so it will get tender. Crumble the dried mushrooms so they're in fairly small bits.

Put the liner in the Instant Pot - always make sure that the liner's in there! Push the "sauté' button, and melt the butter. Add the leek and cook, stirring often, until softened - about 2 minutes. Add the rice and stir until it is coated in the butter. Pour in the wine and stir over the heat until fully absorbed into the grains, 1 to 2 minutes. Add the broth, squash, dried mushrooms, thyme, and saffron.
Lock the lid onto the pot. Use the manual mode, and set the machine to cook at high pressure for 10 minutes.

At the end of these 10 minutes, use the quick-release method to bring the pot’s pressure back to normal. Unlock and open the cooker. Stir the risotto gently to check its consistency. Sometimes the squash will have released lots of moisture, and if it has, a quick simmer-and-stir at the end will fix it. Push the 'sauté' button again, and bring the risotto to a gentle simmer. Stir until it's thickened, about 2 minutes, then turn off.

If you will be using cheese, stir in the Parmesan now. Replace the lid onto the cooker without locking it in place. Set aside for 5 minutes to melt the cheese and blend the flavors. Stir again before serving.

Wednesday, May 11, 2016

Spicy Indian Dal with Fragrant Jasmine Rice


It's a funny thing. Willie, my husband, signed up for the Instant Pot Challenge. I wanted nothing to do with it, because pressure cookers are just not my thing. That's what I thought. Then the Instant Pot was delivered to our front door. Willie was away on business and I kept getting all of these recipe ideas. Not to mention, I joined the Instant Pot Community on Facebook and 52,000 (and counting) people kept posting the amazing Instant Pot this and the incredible, life-altering Instant Pot that. And then there were the food photos. So, what was I to do? I sent Willie a text. "Um, honey, can I use your pot?!"

He said yes and from that point on I believe I've made dinner for 3 weeks straight in the Instant Pot. I am a true fan and I've been trying to convert some of my favorite recipes for use in the Instant Pot, as well as making up original ones. Sometimes you just know things and I know I will be a lifelong fan of this machine. It's a game changer.

I seem to have become something of a walking infomercial for the Instant Pot. It's one thing to tell all of your besties (which I did), but I had to have a medical procedure and while I was in the recovery room, I started telling two nurses about the Instant Pot. "Did you know you can make dinner in mere minutes in one pot?" "Did you know you can make boiled eggs that are guaranteed to peel easily?" "Did you know you can make cheesecake in this thing?" One nurse ordered on her's phone right then and there and the other nurse said she would be ordering later in the week on payday. Luckily, my daughter, Lauren, was there to witness how this all went down, otherwise, who would believe me?

The following dish is healthful and that's all fine and good, but it is incredibly flavorful as well, and I am just as addicted to this dish as I am to the Instant Pot. The recipe was primarily written for the slow-cooker that took 5-7 hours on low. In the Instant Pot, I cooked it on Manual - 7 minutes. MINUTES, people! I told you! It is truly a game changer!

Spicy Indian Dal with Fragrant Jasmine Rice
by Sandra
Adapted from a recipe in The Six O'Clock Scramble Meal Planner: A Year of Quick, Delicious Meals to Help You Prevent and Manage Diabetes

Rice:
1 cup Jasmine rice
1 1/2 cups chicken broth (OR 1 1/2 cups water and one teaspoon Better than Bouillon)
1 stick cinnamon, optional
6 whole cloves, optional
2 cloves garlic, smashed (optional)

Dal:
2 Tablespoons vegetable oil* (I used avocado oil)
1 red onion, peeled and diced
1 jalapeno pepper, halved lengthwise, seeded and sliced
3 cloves garlic, minced
1 1/2 teaspoons fresh ginger, peeled and minced
1 teaspoon turmeric
1 Tablespoon garam masala (an Indian spice blend)
1 1/2 cups red or yellow lentils
1 teaspoon coarse kosher salt
28 ounces canned whole tomatoes, with their liquid, crushed by hand + 1 can full of water
Cilantro, chopped, as garnish on top of each serving
Mango chutney, about a Tablespoon on top of each serving

Note: I have one Instant Pot, so I make the rice first and then set the rice aside and make the dal. If you have two Instant Pots, you may make both recipes at the same time, or make the dal in the Instant Pot and use a rice cooker or stove top method for the rice.

To make the rice:
Place all rice ingredients in the liner of the pot. Place the lid on the Instant Pot and turn the knob on top of the lid to "sealing". Press the Manual button and set the pressure to high and the time to 3 minutes. After cooking is completed, do a "no pressure release" by letting the pot rest for 10 minutes. Then release any remaining pressure and remove the cinnamon stick and cloves and stir the rice. Pour contents of the liner into a serving dish and set aside. Clean the liner and dry it thoroughly and you are ready to make the dal.

To make the dal:
Press the saute button and when the LED display shows "HOT", add the vegetable oil and then add the onions, jalapeno, garlic, and ginger. Stir constantly until onions have softened. Add turmeric and garam masala and stir until vegetables are well coated. Turn off the Instant Pot. Add lentils, salt, tomatoes, and water. Place the lid on the Instant Pot and turn the knob on top of the lid to "sealing". Press the Manual button and set the pressure to high and the time to 7 minutes. When cooking is completed, immediately release the pressure (also known as "quick release". Remove the lid and stir the contents. Garnish with cilantro and mango chutney.

*If desired, you can just skip the saute step, omit the vegetable oil, and instead put all ingredients (except garnishes) in the liner and follow cooking directions from that point forward.

Monday, May 9, 2016

Cinnamon Wheat Berry Salad


I love having easy salads in my refrigerator during the summer. They are perfect to add to anything grilled or packed up to take on a picnic. I made this salad several times last year and it was always enjoyed.

One of the greatest perks to a pressure cooker is being able to cook dried beans and grains without soaking. I usually remember that I need one or the other the day I need to cook it, skipping an overnight soak is one of my favorite things. Even with skipping an overnight soak, it still cooks in less time than soaked on the stove top. The greatest thing about an electric pressure cooker like the
Instant Pot? You can start it and walk away – you don’t have to watch it. I really don’t know how I made it without my pressure cooker for so long!

Cinnamon Wheat Berry Salad
by Lindsay, blogging at Kitchen Musings Today
Adapted from Afro-Vegan: Farm-Fresh African, Caribbean, and Southern Flavors Remixed

Salad:
1 cup wheat berries, rinsed and picked over
3 1/2 cups water
1 cinnamon stick
1 cup water
3 carrots, 1/4-inch slices
1 cup dried apricots, sliced
6 Tablespoons packed chopped cilantro
Salt and pepper
1/2 cup sliced almonds, toasted

Dressing:
3 Tablespoons apple cider vinegar
1 Tablespoon fresh lemon juice
1 teaspoon Dijon mustard
1 teaspoon maple syrup
1/2 teaspoon sea salt
1/4 teaspoon ground cinnamon
1 Tablespoon olive oil

1. Place wheat berries, water and cinnamon stick in your pressure cooker. Replace lid and turn knob to sealing. Select manual and set the cook time for 22 minutes. Once it has finished cooking, allow to rest in the pressure cooker for 15 minutes. Turn knob to venting and release any remaining pressure. Transfer the wheat berries to a colander and allow to drain. Transfer to a large bowl.

2. Add 1 cup water to the empty pressure cooker liner and place steamer basket filled with carrots in it. Replace pressure cooker lid and turn knob to sealing. Press the steam button and set the timer to zero. Once the cook time is done carefully turn the knob to venting. You will have a lot of steam released. Transfer carrots to the colander and run cold water over them until they are cool. Add to the bowl with the wheat berries.

3. Add the apricots and cilantro to the wheat berries.

4. In a small bowl add the first 6 dressing ingredients. Whisk until combined. While constantly whisking drizzle in the olive oil. Pour dressing over the wheat berry mixture. Give it a good stir. Add salt and pepper as needed. Cover and allow to rest in the refrigerator at least one hour. Stir in the toasted almonds before serving.


Thursday, March 17, 2016

Whole Wheat Rotini with Garden Vegetables


I really enjoy The Six O'Clock Scramble Meal Planner: A Year of Quick, Delicious Meals to Help You Prevent and Manage Diabetes. It is actually more than just a cookbook. This book is perfect if you like to plan and prepare to get yourself ready for an easy week. I find that my weeks are much smoother and enjoyable if I have a plan of what we will be eating. The variety of fast, easy meals are perfect for any family. My husband and I are looking forward to using this book to try new recipes while still being conscious of our health. If you’re looking for an easy, healthy meal plan to follow, I suggest this book. Another thing I enjoy about the book is that the recipes are not only diverse, but also easy and quick for the busy home cook.

Whole Wheat Rotini with Garden Vegetables
by Sarah M.
Adapted from Penne Rigate with Garden Vegetables, page 380 in The Six O'Clock Scramble Meal Planner: A Year of Quick, Delicious Meals to Help You Prevent and Manage Diabetes by Aviva Goldfarb

16 ounces whole-wheat penne riagte (I had a pound of whole wheat rotini on hand, so that’s what I used)
1 Tablespoon extra-virgin olive oil
1 pound hot Italian sausage (recipe says optional, but I chose to include it)
1 small red onion, diced
1 teaspoon minced garlic (about 2 cloves)
8 ounces sliced mushrooms
1 yellow bell pepper, seeded and diced (I had mini peppers on hand, so used 2 yellow and 1 red)
1 zucchini, quartered lengthwise and sliced
24 ounces red pasta sauce, any variety (I used a jar of low sodium marinara)
2 Tablespoons Worcestershire sauce
1/4 - 1/2 cup nonfat sour cream (I used 1/4 cup)

Cook the pasta according to the directions on the package

Heat a large skillet on the stove over medium-high heat. Coat the pan with the olive oil and add the sausage. I bought fresh links and took the sausage out of the skins. Let the sausage brown until almost cooked through. Add in the onions and garlic and sauté about 2-3 minutes. Add in the rest of the vegetables and stir until everything is combined. Cover the pan with the lid partially and stir periodically until the peppers, mushrooms and zucchini look almost tender. Turn the heat down a few notches and add the pasta sauce and Worcestershire sauce. Mix everything to combine well and continue to cook about 10 minutes, or when the sauce is nice and hot.

Turn the heat off on the pan. If your pan is large enough, add the pasta and the sour cream right in. Carefully toss until everything is combined.

Thursday, December 10, 2015

Stuffed Eggplant and Kale and Asparagus with Lemongrass and Basil

For the second roll of my Leafcutter Designs Vegetarian Recipe Dice I got eggplant, cumin, onion, rice, tomatoes, corn, cheddar, kale, lemongrass, asparagus, and basil.

Stuffed Eggplant
by Louise

1 medium eggplant (about 1 1/4 pound)
Olive oil
Kosher salt
1/2 cup chopped red onion
1 ear of corn, kernels cut off
1/2 teaspoon cumin
2 Tablespoons white wine
2 Tablespoons tomato paste
1 1/2 cups cooked short grain brown rice seasoned with 1/4 teaspoon cumin
8 grape tomatoes
1/2 cup shredded cheddar

Preheat oven to 350°F. Slice eggplant in half lengthwise. Scoop out center of eggplant (a melon baller works well for this) leaving a half-inch thickness; and discard as many seeds as possible. Drizzle olive oil into eggplant cavities (spread with fingers) and sprinkle with salt. Bake eggplant shells 20 minutes or until lightly browned but still hold their shape. Set aside.

Chop eggplant flesh. Heat oil in a sauté pan over medium heat. Add chopped eggplant flesh, red onion and corn kernels and sprinkle with salt and cumin. Stir in wine and tomato paste. Sauté about 8 minutes or until vegetables are softened. Set aside.
To assemble eggplants: Spray an ovenproof baking dish with vegetable spray and place the eggplant shells in the dish. Spoon half of brown rice into bottom of each eggplant shell pressing down with the back of the spoon to level the rice. Slice grape tomatoes into 3 slices each, 4 slices if they are on the larger side. Lay the slices of tomato over the rice and sprinkle with salt. Spoon the cooked filling over the grape tomato slices and cover the dish with foil. Bake in the preheated oven 30-35 minutes. Remove the baking dish from the oven and sprinkle each of the eggplant halves with half the cheese. Return the eggplants to the oven and continue baking about 8 minutes or until cheddar is melted.

Kale and Asparagus with Lemongrass and Basil
1 stalk of fresh lemongrass*
1/4 pound thin asparagus
1 Tablespoon canola oil
4 cups washed kale, cut into bite-sized pieces
4 basil leaves, cut into a chiffonade
Kosher salt
Freshly ground pepper
Peel the tough outer layer off the lemongrass. Slice the lemongrass very thinly into circles. Set aside. Cut off the bottom 1” of the asparagus and discard the tough stems. Slice the asparagus stalks into circles about 1/8” thick. Leave the last 1-2” (the bud) intact. Heat the oil in a sauté pan over medium heat. All all ingredients into the pan and toss the pan to coat the vegetables with the oil. Sprinkle with salt and pepper to taste. Stir fry the vegetables until the kale is slightly wilted but still green, about 6-8 minutes.

*I eat lemongrass. The first time I was ever served Thai food, the lemongrass was part of the dish. I enjoyed the flavor and the crunch. I’ve since seen recipes where the lemongrass was used to “infuse” a liquid or a dish, then removed. I found that to be very wasteful and it never quite relayed the same burst of lemongrass flavor as including sliced lemongrass. If a cook is uncomfortable with this, by all means use the “infusion” method and remove the lemongrass before serving the kale.

Thursday, December 3, 2015

Fresh Spring Rolls with Vegetables and Paprika-Pepper Vinaigrette

I decided to try the vegetarian Recipe Dice from Leafcutter Designs because I love vegetables, and have no problem eating a veggie-centric meal, unlike my husband who is a carnivore at heart. These dice were so fun! When you’re tired of making the same old thing, they give your creativity a boost.

For this recipe, it’s probably easiest to do most of the steps a day ahead of time. That will let the mushrooms soak up a good amount of vinaigrette, and will leave just the assembly of the rolls, which should be done shortly before you plan to serve them. Keep the assembled rolls on top of and covered with damp paper towels then cover that in plastic wrap to keep them from drying out and/or sticking to each other.

The amount of each ingredient needed will depend somewhat on how much of each you put in your spring rolls. The amounts I’ve given are estimates. Mix up anything that’s left over in a bowl with some vinaigrette and you’ve got a great little salad! You’ll also likely have some paprika oil left over, but once you try it you’ll be glad you have extra!

Fresh Spring Rolls with Vegetables and Paprika-Pepper Vinaigrette
by Jennifer Scantlin

For the paprika oil:
1/2 cup extra-virgin olive oil
2 Tablespoons ground paprika

For the vinaigrette:
3 Tablespoons paprika oil (from above)
1 Tablespoon plus 1 teaspoon sherry vinegar
1 small clove garlic, minced or put through a garlic press
1/2 teaspoon salt
1/4 teaspoon freshly ground black pepper
1 teaspoon lemon juice

For the couscous:
1/2 cup Israeli couscous
1/2 Tablespoon olive oil
1/4 teaspoon salt
3/4 cup water

For the marinated mushrooms:
1 Tablespoon vegetable oil
8 ounces mushrooms, thinly sliced
1/4 teaspoon salt

To assemble the Spring Rolls:
Prepared Israeli couscous
Prepared vinaigrette
Marinated mushrooms
1/2 zucchini or yellow squash, julienned
2-3 leaves Swiss chard, sliced into thin strips
8 dried spring roll wrappers (they look like very thin and hard tortillas)

Make the paprika oil: Combine the oil and paprika in a small saucepan over medium-low heat. Heat, stirring occasionally, until warm, about 5 minutes. Turn off heat and let sit until cool, about one hour. Strain mixture into a bowl or glass through a coffee filter or several layers of cheesecloth.

Make the vinaigrette: Combine all ingredients in a small bowl or jar with lid and whisk or shake well.

Make the couscous: Heat the oil in a small saucepan over medium heat. Add the couscous and stir continuously until lightly browned, about 5 minutes. Add the water and salt and bring to a boil. Cover pan with lid and turn heat to low. Cook until couscous is tender, 8-10 minutes. Remove pan from heat, place couscous in a bowl and add a tablespoon of the vinaigrette. Stir to combine and let cool.

Cook mushrooms: Heat oil in a sauté pan over medium high heat. Add mushrooms and cook until beginning to brown, about 3 minutes. Add salt and stir to combine. Place mushrooms in a bowl with the remaining vinaigrette and stir to coat. Let sit at room temperature at least an hour, or place in refrigerator overnight.

Assemble the rolls: Have a large, smooth work surface to assemble rolls on. Place some warm water into a large pie plate. Place a spring roll wrapper into the pie plate and submerge in the water with your hands. You will feel the wrapper getting soft. When the entire wrapper is soft, place it flat on your work surface. Place the fillings in the middle of the wrapper and fold the wrapper in half over the filling. Fold in the sides and continue to roll up. Place on a plate lined with damp paper towels and cover with more damp paper towels then plastic wrap. Don’t let the rolls touch one another or they may stick together. Continue with remaining wrappers until all ingredients have been used. Enjoy!

Tuesday, December 1, 2015

Artichoke with Brussels Sprouts and Parmesan, Sauteéd Kale and Couscous with Carrot

My first roll with the Leafcutter Designs Vegetarian Recipe Dice got me kale, carrots, tomatoes, parsley, couscous, lime, Parmesan, onion, garlic, artichoke, and Brussels sprouts. I used these ingredients to create 3 elements of an entrée.

Artichoke with Brussels Sprouts and Parmesan
by Louise

1 large artichoke
1 rounded cup Brussels sprouts
1/3 cup sliced red onion
3 cloves fresh garlic, smashed and chopped
Kosher salt
Freshly ground black pepper
2 Tablespoons white wine
2 Tablespoons seasoned bread crumbs
1/2 cup shredded Parmesan cheese

Set up a bowl with ice water. Trim and stem artichoke. Using a scissor, trim the tops off the lower leaves of the artichoke. Slice off the top quarter of the choke. Using a tablespoon, scoop out the inner purple leaves of the artichoke and the fuzzy “choke". Boil in salted water approximately 40 minutes until a knife goes through the bottom with slight resistance. Plunge into ice water to stop the cooking process. Place upside down on a rack to drain. Prepare the filling.

Peel leaves off Brussels. Quarter the innermost core of the sprout. Heat oil in a sauté pan over medium/high heat and add Brussels, onions and garlic; sprinkle with salt and freshly ground pepper. Cook about 5-7 minutes, stirring occasionally. Deglaze pan with wine. Stir in bread crumbs and Parmesan cheese. Fill cavity of artichoke with 1/3 to ½ of filling. Spread leaves and stuff with remaining filling. Place artichoke in a small deep baking dish and add enough water to go ¼ way up the artichoke. Bake in 350°F oven for 30 minutes or until a knife inserted into the artichoke gives little to no resistance.

Sauteéd Kale

2 teaspoons olive oil
2 cloves garlic, smashed
4 cups washed kale, cut into bite sized pieces
Big pinch salt
Freshly ground pepper
Heat olive oil in a sauté pan over medium heat, add garlic, stir and cook until garlic is fragrant. Immediately add washed kale, salt and pepper and toss until coated. Cook 5-7 minutes until crisp-tender. Set aside.

Couscous with Carrot
1 1/4 cups water
Big pinch salt
1 cup Israeli couscous
1 large carrot, peeled and cut into small dice
1 Tablespoon lime juice

Bring the water to a boil with the salt. Add the couscous and carrot and lower heat to a simmer. Cook 20 minutes covered. Stir in lime juice. Taste and adjust seasoning if needed. Set aside.

Wednesday, November 12, 2014

Slow Cooker Frittata

I'm always looking for an easy, healthy, and TASTY dish for brunch! This slow cooker frittata fills the bill. Perfect with a blueberry muffin and fruit cup.

Slow Cooker Frittata

by Judy

2 Tablespoons olive oil

5 ounces fresh baby spinach, washed and chopped
1 cup fresh mushrooms, chopped
2 green onions, sliced 
1/2 cup diced ham
1/4 cup roasted red pepper (from a jar), chopped
5 ounces crumbled Feta cheese
8 eggs, well-beaten
1/2 teaspoon Greek seasoning

Saute spinach, mushrooms, green onions, and ham in a skillet with the olive oil, just until spinach wilts. Spray interior of the Hamilton Beach Set & Forget 6 Qt. Programmable Slow Cooker with non-stick cooking spray. Spoon spinach mixture into slow cooker, add red pepper and Feta, then top with beaten eggs. Sprinkle with Greek seasoning. Set cooker to low setting and cook for 2 to 2 1/2 hours, until center no longer looks wet. Makes 4 to 6 servings.

Tuesday, November 4, 2014

I'm Lazy When It Comes to Lunch

I try to eat meatless meals or soup with a lot of vegetables for lunch every day. But, some days I’m busy or I just don’t feel like doing the prep work at noon because I usually have prep work for dinner.  On those days, I might eat leftovers or I might eat bread and butter or I might eat a cookie. Or two. Who knows? I never feel great in the afternoon on those days that I only eat bread or cookies. I made this cauliflower dish on the stove top for lunch one day and it was excellent. So spicy and yummy and wonderful! I remember thinking "I could eat this every day for lunch! Like totally!" But, I’m not all that keen on cooking a meal at lunch when I will be cooking a meal at dinner, because I end up cooking all day. Although that sounds just fine to me, I do have other things I need to get done. So I thought, "hmmm, why not make this dish in my slow cooker?!" So, I did and I’m glad. Between this dish and this soup, I have plenty of vegetables for lunch every day!

Cauliflower in Spicy Tomato Curry
by Sandra
Adapted from A Celebration of Herbs

1 Tablespoon ground coriander
1 ½ teaspoons ground cumin
¼ teaspoon ground fennel seed
1 teaspoon sugar
½ teaspoon turmeric
¼ teaspoon cayenne pepper
*
1 onion, chopped
1 clove garlic, minced
1 Tablespoon fresh ginger, chopped
1 11.5 can tomato juice
1 head cauliflower, cut in florets
*
Brown rice, cooked (optional)
Peanuts, chopped
Cilantro or parsley, chopped

Place the first 6 ingredients in the slow cooker (I used my 
Hamilton Beach Set & Forget® 6 Qt. Programmable Slow Cooker) and stir together. Add the onion, the garlic and the ginger and stir well. Add the tomato juice and stir until combined. Add the cauliflower and stir. Cook on low for 4 hours and check to see if the cauliflower is cooked. Check for salt. Serve alone or over brown rice if you prefer. Top with chopped peanuts and chopped cilantro or parsley.

P.S. This makes a delicious meatless entrée for dinner as well.


Tuesday, October 7, 2014

Summer Vegetable Hand Pies with Tomato Jam and Herbed Yogurt Dipping Sauce

For a long time, I was intimidated by the thought of hand pies because they seemed so fragile. I envisioned the dough tearing and the filling spilling out. The dough recipe I adapted, though, was not only easy to make but very forgiving without being tough. I used 1/2 whole wheat and 1/2 white flour and it was great.

The possibilities are endless for this dough - fill it with whatever you choose! I used a mixture of in-season vegetables from my local farmer's markets: Onion, corn, pink eyed peas, and yellow squash. I also added a little slab bacon (yes, I cooked the veggies in a little bacon grease.) To top it off, I made two sauces: A tomato jam (at the time I was making this recipe, it was peak tomato season in Georgia, so I couldn't resist!) and a cool, creamy herbed yogurt sauce. I had planned to try them both and choose one, but I ended up using a little of each, so I included both recipes. They can be made a day or two ahead of time, and actually taste better after sitting overnight.

Summer Vegetable Hand Pies with Tomato Jam and Herbed Yogurt Dipping Sauce
by Jennifer
Dough recipe adapted from Manjula's Kitchen Samosa

Makes 8 pies


Pie dough:
1/2 cup Bob's Red Mill Organic Whole Wheat Flour
1/2 cup Bob's Red Mill Organic Unbleached White Flour
2 Tablespoons plus 2 teaspoons vegetable oil
1/2 teaspoon kosher salt
6 Tablespoons lukewarm water

Filling:
2 ounces slab bacon, diced
1/2 medium onion, chopped
1/2 medium yellow squash, seeds scooped out and discarded and squash diced
1/4 teaspoon kosher salt
1/2 cup fresh corn kernels (from 2 medium ears corn)
3/4 cup cooked pink-eyed peas
1/2 Tablespoon each chopped fresh parsley and basil

Tomato Jam:
1 Tablespoon olive oil
1 small onion, chopped
1/2 teaspoon kosher salt
1 Tablespoon light brown sugar
1 teaspoon red wine vinegar
1 pound fresh tomatoes, cored and chopped
1/4 teaspoon red pepper flakes
1/4 teaspoon pepper vinegar (optional)

Herbed Yogurt Sauce:
1/2 cup plain Greek yogurt
1/4 teaspoon Kosher salt
Juice of 1/2 lemon
1 Tablespoon finely chopped fresh herbs, such as parsley, basil and chives

I will preface the dough instructions by saying that the recipe I adapted for the dough was for samosas, and had a video with it. The woman in the video mixed, kneaded and let the dough rest in a deep-dish glass pie dish, and used no utensils - just her fingers to bring the dough together and then kneaded it by hand. I decided to try it, and it worked great! (And it was one less dish to wash.)

To make the dough, combine flours, oil and salt. Slowly add water and stir until dough comes together. Knead for about a minute, then press into a disk, cover with plastic wrap, and let rest for an hour.

Meanwhile, make the filling: Cook the bacon in a pan over medium heat until done to your liking. Remove all but a Tablespoon of bacon grease from the pan. Add the onions, squash and salt and sauté over medium high heat for about 3 minutes. Add the corn and peas and sauté until corn starts to brown and squash is cooked through, about 3 more minutes. Season with salt and pepper to taste. Off heat, stir in parsley and basil. Set aside until ready to use.

To assemble hand pies, knead dough for another minute, then divide into 8 equal parts. Roll one piece into a ball and roll out to a 6-inch circle on an unfloured surface, keeping other dough covered with plastic wrap. The dough may stick to the rolling pin initially, but as you roll it out it will stop sticking.

Mound about 3 Tablespoons of vegetable mixture onto one half of the circle in a half-moon shape, leaving a 1/4-inch border. Wet the border with a little bit of water. Fold the other half of the dough over the filling. Press edges together, working out excess air and being sure not to get any filling between the edges. Using the tines of a fork, crimp the edge together. Repeat with remaining 7 balls of dough and filling, keeping assembled pies covered with plastic wrap until ready to cook.

Deep fry in 350-375°F oil for about 3 minutes, flipping halfway through.

Tomato Jam: Heat olive oil in a saucepan over medium heat. Add onion and salt and cook until softened, about 3 minutes. Add brown sugar, stir and lower heat to medium-low. Cook about 15 minutes until onions are very soft. Add vinegar and cook 30 seconds. Stir in tomatoes and crushed red pepper and turn heat to medium high. Cook about 10 minutes, stirring occasionally. As tomatoes start to thicken, reduce heat to medium so tomatoes don't burn. Cook about 10 more minutes, stirring occasionally and reduce heat to low. Cook another 10 minutes until texture is very thick. Season with salt to taste. Stir in pepper vinegar off heat, if desired.

Herbed yogurt sauce: Mix all ingredients well.

Monday, September 22, 2014

Roasted Beet and Goat Cheese Dumplings with Toasted Walnut Dipping Sauce


These dumplings are a perfect first course or served on a tray at a party.  They are good warm, but are also delicious served at room temperature.  The sauce also doubles as a great salad dressing.  

Roasted Beet and Goat Cheese Dumplings with Toasted Walnut Dipping Sauce
By Tracy

Sauce:
1/2 cup walnuts, toasted and chopped
2 Tablespoons shallots, chopped
1/2 teaspoon fennel pollen
3/4 cup olive oil
1/4 cup orange juice
3 Tablespoons red wine vinegar
Salt 
Pepper
1 Tablespoon green onion chopped
1 Tablespoon orange zest

In a food processor, combine the first 6 ingredients and pulse until smooth. Season with salt and pepper. Just before serving, top with the chopped green onion and orange zest.

Filling:
1 (4-ounce) package goat cheese
2 Tablespoons fresh basil, chopped
1/2 cup walnuts, toasted and finely chopped
4 ounces red beets (about 2 medium), roasted (I used this method)
1 teaspoon basil olive oil  (or 1 teaspoon of olive oil mixed with 1/4 teaspoon dried basil)

In a small bowl, mix together the goat cheese and basil. Add the walnuts and combine.  Set aside.
  
In a food processor , pulse beets with the olive oil until they are finely chopped.  Set aside.

Dumplings:
1 3/4 cups Bob’s Red Mill Organic Unbleached White Flour 
1/2 cup plus 2 Tablespoons beet juice or water (if you use water, the dumplings will not be colored) 

In a stand up mixer, combine flour and beet juice until dough is smooth. Let rest for 10 minutes. Divide dough into 16 equal portions. Roll each portion into a ball. Roll, out each dough ball into a 2 1/2 to 3-inch circle. Fill each center with 1 teaspoon of the goat cheese mixture and 1 teaspoon of the roasted beets. Fold each dumpling in half and pinch closed.  When all of the dumplings are assembled, bring a large pot of water to a boil. Boil the dumplings in batches, about 3 minutes each or until they float. Remove with a slotted spoon and finish the remaining dumplings. Serve with the walnut dipping sauce.  

Friday, July 25, 2014

Bengali Potato & Zucchini Curry

We love Indian food and when the opportunity arose to prepare a dish from Silk Road Vegetarian, I was excited! The delightful fragrance of the spices had my mouth watering while I was cooking this dish, and the final result was delicious. I would suggest preparing the Raita several hours prior to cooking the curry, so it will be nice and chilled. The ingredients are all easily obtainable and the recipe not too complex; however, it all comes together in a wonderful melange of flavors that will please anyone craving a tasty Indian dish!

Bengali Potato & Zucchini Curry 
by Judy
adapted from Silk Road Vegetarian by Dahlia Abraham-Klein

Prep time: 30 minutes, plus 10 minutes for standing
Cook time: 50 minutes
Serves 4

2 zucchini, sliced into 1/4-inch rounds
2 large baking potatoes, peeled and cubed
1/2 teaspoon ground turmeric
1/2 teaspoon garlic salt
2 Tablespoons oil
4 cloves garlic, minced
1 teaspoon fresh ginger, minced
1/2 teaspoon ground ginger
3 teaspoons curry powder
1 teaspoon ground cumin
2 tomatoes, peeled and chopped
4 Tablespoons water
1 teaspoon granulated sugar
1 teaspoon salt
Basmati rice for serving
Raita (recipe below)

Combine the zucchini, potatoes, turmeric, and garlic salt in a large bowl and toss gently. Set aside for 10 minutes.

Heat the oil in a large skillet set over medium heat, saute the zucchini and potato mixture for about 7 minutes or until slightly golden.

Remove the zucchini and potato mixture with a slotted spoon, keeping as much oil in the pan as possible. Set mixture aside on a platter.

Return the same skillet to the stove and reduce heat to medium. Saute the garlic, ginger, ground ginger, curry powder and cumin, stirring for 2 to 3 minutes, or until fragrant.

Add the tomatoes, water, sugar, and salt. Increase heat to medium-high and cook until boiling. Add the zucchini and potato mixture, reduce heat and simmer covered for 25 to 30 minutes, or until potatoes are tender. Serve over rice and with Raita.

Raita 
by Judy
adapted from Silk Road Vegetarian by Dahlia Abraham-Klein

1 teaspoon cumin seeds

2 cucumbers, peeled, seeded and finely chopped
2 cups plain whole-milk yogurt
2 green onions, chopped
1 Tablespoon lemon juice
Salt, to taste
Freshly ground black pepper, to taste
Fresh mint, for garnish

Dry roast the cumin seeds in a skillet for about 5 minutes, stirring constantly, until fragrant. Combine cucumber, yogurt, onions, lemon juice, salt and pepper in a medium-sized bowl. Crush cumin seeds with a mallet or the back of a large spoon and add to cucumber-yogurt mixture. Serve chilled, garnished with mint.