Showing posts with label Maryjo. Show all posts

Tuesday, December 6, 2016

Chicken and Spinach Enchiladas

I’m not sure how “retro” a recipe is from 1986 but I ran into a problem finding my mother’s old recipe books. We recently packed up her house and they are all in a box in storage! So, I rummaged through my own collection and found my old “Southern Living 1986 Annual Recipes” book. It’s full of recipes that call for canned this or jarred that. I picked out a couple of recipes to try and landed on a chicken enchilada recipe. I thought I could surely make it super yummy without using canned cream of chicken soup! I added spinach to the recipe (my 13 year old son protested but I won). I also made a béchamel sauce using chicken stock and heavy cream to substitute for the canned condensed soup. It was a winner winner chicken dinner! Served it with doctored up canned black beans (yes, I did use canned beans). You can take the girl out of the 80’s but you can’t take the 80’s out of the girl!

Chicken and Spinach Enchiladas
by Maryjo
Adapted from the Easy Chicken Enchiladas recipe from Southern Living 1986 Annual Recipes

3 Tablespoons butter
3 Tablespoons flour
2 cups chicken stock (or broth)
1/2 teaspoon garlic powder
3 Tablespoons heavy cream
2 cups chopped cooked chicken
1 cup sour cream
2 cups packed fresh spinach
2 cups shredded Monterey Jack cheese
2 cups shredded sharp cheddar cheese
1 4-ounce can chopped green chiles
1/4 cup chopped onion
1 teaspoon salt
1/2 teaspoon black pepper
1 teaspoon ground cumin
12 fresh corn tortillas
Vegetable oil
1/2 cup shredded sharp cheddar cheese

Preheat oven to 350°F. In a medium saucepan, make a roux by melting the butter over medium high heat. When melted, add the flour, stir around until the flour is coated and continue to stir for about 3 minutes on medium high heat so that the flour taste will be cooked out of the sauce. Add the chicken stock and whisk until thickened, about 5 minutes. Add the garlic powder, stir, and set aside to cool.

In a large bowl, add the chopped cooked chicken, sour cream, spinach, Monterey Jack cheese, cheddar cheese, green chiles, chopped onion, salt, pepper, ground cumin, and the roux. Mix well.

Heat about 3 tablespoons of vegetable oil in a skillet and fry each corn tortilla for 5 seconds on each side (to soften them up). Add a little more oil if it runs low. Place the tortillas on a paper towel to drain.

Spray a 13 x 9 x 2-inch casserole dish with non-stick spray. Put about 1/3 cup of the chicken and spinach filling onto each tortilla, rolling them up and placing each tortilla seam side down in the casserole dish. Note: I had filling left over, which I put into a zip top bag and threw into the freezer for another quick meal another day.

Cover with foil and bake for 20 minutes. Remove foil and add the remaining ½ cup of shredded cheddar cheese. Change the oven from bake to broil and turn up the heat to 450ºF. Bake uncovered for an additional 5 minutes. Serve with sour cream, or pico de gallo, or sliced avocados, or black beans, or all of the above. Olé! 1986 Style!

Monday, October 17, 2016

Sautéed Onion and Mushroom Quiche Pie

Do you ever get in a food rut sometimes, cooking the same things over and over and over again? Well, I do. And quiche is one of those food rut dishes for me (Spinach…always spinach…for years and years…spinach). But, I just shook things up a bit in our little quiche consuming world by using an assortment of spices I got from The Spice House. I said to myself, “Enough is enough! How much spinach can one person eat in the form of a quiche?”

I started by ditching the green stuff and using mushrooms and onions instead, along with a couple of surprise spices added to the filling AND the crust. Let me pause right here to say that if you have one of those store bought frozen pie shells in your freezer, use it! You don’t have to get all gourmet and fancy. Your family will love you and the quiche regardless. Give this quiche a try. It’s husband and teenaged son approved! Funny note, when my son was little he refused to call it a “quiche.” In his opinion it was a “quiche pie” and he would never use the word quiche by itself. So on to the quiche pie recipe…

Sautéed Onion and Mushroom Quiche Pie
by Maryjo
Crust recipe adapted from the crust recipe for Potato Bacon Torte by Melissa d'Arabian

Crust (makes two pie shells):
2 sticks cold butter, cubed
2 1/4 cups all-purpose flour, plus more for dusting
1 teaspoon salt
1 Tablespoon The Spice House Porcini "Extra AA" Dried Mushrooms, Powdered
1 teaspoon The Spice House Garlic Powder, Granulated Organic
8 to 10 Tablespoons ice cold water

Filling:
2 Tablespoons extra virgin olive oil, divided
1 large yellow or white onion, sliced (about 2 cups raw)
1/4 teaspoon Kosher salt, divided
1/4 cup water (if needed)
4 ounces cremini mushrooms, sliced (about 2 cups raw)
4 large eggs, beaten
2 Tablespoons flour
1 Tablespoon The Spice House Porcini "Extra AA" Dried Mushrooms, Powdered
1 teaspoon The Spice House Onion Powder, Granulated Organic
1 teaspoon The Spice House Garlic Powder, Granulated Organic
1 teaspoon table salt
1 teaspoon fresh thyme, stems removed, lightly chopped
1/4 teaspoon anchovy paste
1/8th teaspoon fresh cracked The Spice House Brazilian Pink Peppercorns
1 cup half & half
2/3 cup mayonnaise
8 ounces Baby Swiss cheese, shredded

To make the crust:
Put the cold butter, flour, salt, mushroom powder, and garlic powder into a food processor. Pulse to combine. Add 1 Tablespoon of water at a time, pulsing 1 to 2 times to combine before adding the next Tablespoon of water. When the dough starts to clump together slightly and looks a bit like wet sand (usually after 8 Tablespoons of water in my house), stop! You don’t want to put too much water in there. Divide the dough in half and form each half into a disk. Wrap each one individually in plastic wrap and refrigerate for at least 30 minutes (overnight is even better). When you’re ready to make the quiche, roll out one of the disks on a lightly floured surface until it is large enough to line your pie dish (either a 9 inch or 10 inch dish will do the trick). Carefully place the crust into the pie dish, trimming and decorating the edges however you like, and return it to the refrigerator while you prepare the filling. Anytime I have two disks of pie dough and only use one, I throw the other into a zip top bag and put it in the freezer for another day.

For the filling:
Preheat your oven to 350ºF. Add 1 tablespoon of olive oil to a large skillet (I used a 12 inch cast iron). Warm the pan over medium heat until the oil is shimmering. Add the onions to the pan and sprinkle with half of the Kosher salt (1/8th teaspoon). Cook slowly until they are soft and golden brown. Reduce the heat and add a little water if they start getting too dark too fast. This should take about 15 to 20 minutes. Be patient. You’ll be glad you were. Remove the onions from the pan and set aside to cool.

Add the remaining olive oil, the mushrooms, and the remaining Kosher salt to the skillet and sauté until they are golden brown (they will shrink down considerably). Set them aside to cool.

In a large bowl, add the remaining ingredients and whisk until combined. Special note: I used pink pepper corns because they have a milder, fruitier flavor than black pepper, but black pepper is perfectly fine. So don’t let this one ingredient scare you off!

Pour the mixture into your 9 or 10-inch unbaked pie shell. Place the pie dish onto a clean baking sheet (just in case it spills over the edge while cooking) and bake the quiche on the middle rack for 1 hour, turning the quiche halfway through cooking for even browning. If you think it’s getting too brown before it’s finished cooking, just put a foil tent over the top. Allow it to cool for 15 to 20 minutes because it will need time to firm up a bit before cutting and serving.

Now, please excuse me…I have some quiche pie to eat!

Wednesday, July 6, 2016

Barbecue Chicken Salt Caramel Popcorn

Alrighty friends. I came up with this idea early on in this challenge (even before we received the Jada Foods Chicken Salt Seasoning samples) and I’ve refused to let it beat me. This was a tough challenge! But, I think I made it tough on myself with my hair-brained idea to make a sweet-n-savory Barbecue Chicken Salt caramel popcorn. Yes…you read that right. CRAZY! I know, I know, I know. But, that’s what just kept screaming at me in my head. So rather than doing something safe and, well, normal, I opted for something weird and a little upside down. My thought was that barbecue has sweet elements in it (molasses, brown sugar) and smoky flavor too. These flavors are meant to be together…like beans and rice, like peas and carrots, like peanut butter and maple syrup…right? It’s fate. So, if you’re into weird and upside down, you’re gonna love this! Honestly, we can’t stop eating it in my house! We may need an intervention.

Barbecue Chicken Salt Caramel Popcorn
by Maryjo
Adapted from Classic Caramel Corn by Karo on allrecipes.com

9 cups Skinny Pop popcorn (pre-popped plain popcorn)
4 ounces unsalted butter
1 cup brown sugar
1/2 cup Karo light corn syrup
1/2 teaspoon baking soda
1 Tablespoon Barbeque Chicken Salt (plus additional shaken onto popcorn)
1 Tablespoon liquid smoke
2 ounces roasted, unsalted pistachios

Preheat your oven to 250°F. Place the popcorn onto a 13 x 18 baking sheet and warm in the oven while you prepare the caramel (heating the pre-popped corn will help to take any possible moisture out).

In a medium saucepan, melt the butter, corn syrup, and brown sugar on medium-high heat, stirring constantly, until the sugar is dissolved. Bring the sugar mixture to a low boil and let it boil for
5 minutes without stirring.

While the caramel is cooking, remove the popcorn from the oven and put into a large heatproof bowl. Add the pistachios to the popcorn.

After five minutes, remove the caramel from heat. Add the baking soda, Barbecue Chicken Salt and the liquid smoke to the caramel and whisk together until well-blended (about 20 seconds). Pour the caramel over the popcorn and pistachios and stir to cover well with the caramel mixture. Spread onto a baking sheet, shake additional Barbecue Chicken Salt over the popcorn and bake for 15 minutes. Stir the popcorn, shake additional Barbecue Chicken Salt flavor on top of the popcorn and bake for another 15 minutes. Stir the popcorn again, shake additional Barbecue Chicken Salt flavor on top and bake for a final 15 minutes. Remove from oven, separate popcorn into smaller bite-sized pieces, and let cool. Serve!

Thursday, March 10, 2016

Chorizo Stuffed Mushrooms


Crunch, crunch, crunch. The moment I received the General Mills cereal in the mail I immediately opened all three boxes and had a sample of each one. It was research! Seriously! Okay, okay, so I was immediately transported to my youth, eating breakfast at our round, formica-topped kitchen table with a plastic bowl full of milk with those beautiful little rings of General Mills Cheerios floating on top, and my mother’s seeming daily effort to get my brother and sister and me to finish up so that we wouldn’t miss the school bus. That was a long time ago and things have certainly changed. General Mills is beginning to phase out the use of artificial flavors and colors in their cereal, and I couldn’t be more pleased! We’re all so much more conscious of the quality of the ingredients in our food. Kudos to General Mills!

As for the challenge at hand, I wanted to make something savory with their cereal just to shake things up a bit. So I opted for a Mexican flavor profile in the form of a stuffed mushroom appetizer. I used the GM Golden Grahams in this recipe and it did not disappoint. This recipe makes 12 stuffed mushrooms (just enough to get a small party started).

Chorizo Stuffed Mushrooms
by Maryjo

10 ounces Mexican chorizo
6 cremini mushroom stems, finely chopped
1/4 cup scallion, finely chopped (1 medium scallion)
1/4 cup red bell pepper, finely chopped (about 1/3 of a large pepper)
1 serrano pepper, finely chopped (seeds and membranes removed)
2 Tablespoons plain dry bread crumbs
4 Tablespoons Golden Grahams, finely crushed
4 Tablespoons Parmesan cheese
1/4 teaspoon table salt
1 dash of Mexican style hot sauce
1/2 teaspoon Worcestershire sauce
2 Tablespoons freshly chopped cilantro
1/4 teaspoon ground cumin
12 medium-sized cremini mushrooms, cleaned and stems removed

Preheat the oven to 325°F. Brown the chorizo in a skillet for about 5 to 7 minutes, until brown and a little crispy. Drain off any excess fat. Add the chopped cremini mushroom stems, scallion, red bell pepper, and serrano pepper. Sauté for an additional 8 to 10 minutes. Remove to a medium-sized mixing bowl. Add the bread crumbs, Golden Grahams crumbs (reserve 1 Tablespoon for topping), Parmesan cheese (reserve 1 Tablespoon for topping), and remaining spices. Mix well. Stuff each mushroom cap with about 1 Tablespoon of stuffing and place in a shallow baking dish that is just large enough to hold all 12 mushrooms. Mix the reserved Golden Grahams crumbs and Parmesan cheese and sprinkle on top of each mushroom. Bake for 45 minutes, until they are brown and crispy on top.

Wednesday, February 24, 2016

Beef Rogan Josh

I have a lot of favorite cookbooks in my kitchen library, but my newest favorite is Rick Stein’s “India: In Search of the Perfect Curry: Recipes from My Indian Odyssey.”

This book contains beautiful, eye-catching photos of India, the people, and the food; from fresh produce and spices to completed dishes. I’m a visual learner so I found the photography in this book remarkable. Just looking at the pictures transported me to India. I could almost smell the spices in my mind.  But the recipes in this cookbook are the stars. Stein has filled the pages with entertaining stories of his adventures through India finding different styles and flavors of curry. My absolute favorite recipe is on page 258, Lamb Rogan Josh, which Stein explains, “…comes originally from Persia where rogan means ‘oil’ and josh means ‘hot.’” Instead of using lamb I used beef; chuck eye roast to be specific. This curry is absolutely lovely. It has a medium heat that sort of catches you by surprise. And the flavor from the spices unfold as you eat it, warming your soul. This is a great dish for a cold winter night.

The first time I made this curry I chopped and measured all of the ingredients before I started cooking. This recipe has twenty-two ingredients, and twelve of them are spices. That’s a lot of bowls! After going through the cooking instructions I decided it was better to use one bowl for the whole ingredients (except the toasted fennel seeds) and one bowl for the ground ingredients. Also, because Stein uses metric units of measure in his ingredient lists, you’ll have to convert those ingredients to U.S. customary units. I’ve converted the measurements for you in the recipe below. One last top tip! Cook the curry a day or two ahead and let it hang out in the refrigerator. The curry will develop an even warmer, deeper, and richer flavor while it sits in the fridge.  Enjoy!

Beef Rogan Josh
By Maryjo
Adapted from Rick Stein’s Lamb Rogan Josh in “India: In Search of the Perfect Curry: Recipes from My Indian Odyssey.”

1.5 ounces ghee (clarified butter)
2-inch piece of cinnamon stick
3 dried Kashmiri chilies, torn into pieces
6 green cardamom pods, lightly bruised with a mortar and pestle or rolling pin
4 whole cloves
1 large onion, chopped
3 cloves garlic, finely crushed
1 1/4-inch piece of fresh ginger, finely grated
2 Tablespoons Kashmiri chili powder
1 Tablespoon ground coriander
1 Tablespoon ground cumin
2 teaspoons turmeric
1/4 teaspoon ground mace
1 teaspoon Garam Masala, plus 1 teaspoon extra to finish
1 teaspoon toasted ground fennel seeds, plus 1/4 teaspoon extra to finish
4 Tablespoons tomato paste
1 1/4 pounds boneless beef chuck eye roast, trimmed of excess fat, cut into 1 ¼ inch cubes
1 teaspoon salt
1 1/4 cups water
4 1/2 ounces plain yogurt
1/4 cup heavy cream
Handful of fresh cilantro leaves, roughly chopped, to finish

Toast the fennel seeds in a small frying pan until fragrant (remember to reserved 1/4 teaspoon for the finish). Heat the ghee in a large, heavy bottomed pot, like a Dutch oven, over medium heat. Add the whole spices and fry them for about a minute. Add the onion and continue to cook it over medium heat for about 10 minutes, until they are translucent and soft. Add the garlic and ginger and stir for about a minute and then add the ground spices (remember to reserve the extra garam masala for the finish).  Stir for about 30 seconds. Add the tomato paste, beef, and salt and stir it around to be sure the meat is coated all over with the spice and onion mixture. Pour in the water and bring it to a simmer. Cover, reduce the heat to low and simmer for 1 hour. Once you’re sure the meat is tender and cooked through, take it off heat and add the yogurt, cream, and reserved fennel seeds and garam masala. Serve over steamed basmati rice, with fresh cilantro leave scattered on top.

Wednesday, November 18, 2015

Pork Cutlet with Wilted Kale and Farfalle with Roasted Vegetables

What a great idea! I wish I had invented “Recipe Dice." Leafcutter Designs has come out with several types of inspirational dice to help get your creative juices flowing when it comes to cooking, cocktail making or Chai (though I’m not familiar with “Chai” so if you know what Chai is…you’re at least one up on me!) The three sets you can choose from are Cocktail Dice, Chai Dice, and Recipe Dice. The idea is that you roll the dice and make something out of the ingredients that you roll. It’s harder than you think. Once you get over the fear of rolling the dice and getting some really odd combination of ingredients, it’s a lot of fun and super inspiring. I chose the Recipe Dice, and the meal ideas are seemingly limitless.

When I opened my little box containing the newest 37 Cooks challenge, I was very excited. I played with the dice a bit, trying to coax them into a meal I thought I could create with little to no anxiety. But, with every toss of the dice, with every attempt to manipulate the ingredients list, I felt guilty for not playing the game the way it was intended. So I left the dice in their cute little spice jar on my kitchen counter for a couple of weeks, knowing full well I had to face them eventually. Every time I walked into the kitchen I would see them there, staring back at me. Goading me into trying to create something new and different. I decided enough was enough. I re-read the instructions, rolled the dice, then, according to the directions, I picked five ingredients that I wanted to change, and re-rolled those five. I decided to stick with what fate handed me (no fudging with the ingredients to make them fit). The dice I rolled included pork, rutabaga, Parmesan cheese, summer squash, asparagus, black pepper, kale, oregano, pasta, artichoke, lemon, and bell pepper…E-I-E-I-O! It was as if the dinner gods spoke to me. I couldn’t believe it, but I managed to whittle out a dinner with all of the ingredients that tasted really good. And it forced me to use ingredients together that I would ordinarily have never considered combining. Spoiler alert! Everyone I know is getting a set of these dice for Christmas! That’s just how I roll!

Roll of the Dice Pork Cutlet with Wilted Kale and Farfalle with Roasted Vegetables
by Maryjo

Pork Cutlet:
1 pork tenderloin, silver skin removed, cut into 6 equal pieces (each package comes with 2 tenderloins, so I put one in the freezer and used the other for this recipe)
1 cup all-purpose flour
3 eggs
2 Tablespoons water
2 cups Panko bread crumbs
1 ounce Parmesan cheese, shredded
2 teaspoons table salt
1 teaspoon black pepper
1/2 teaspoon garlic powder
6 Tablespoons vegetable oil

Preheat your oven to 200ºF. Remove the silver skin from the pork tenderloin and cut the tenderloin into 6 equal 2 1/2 to 3-inch disks. Working with one piece of pork at a time, place each pork disk between two sheets of plastic wrap and pound them flat until it’s about 1/4-inch in thickness.

Combine the flour with 1 teaspoon salt and 1/2 teaspoon black pepper in a shallow dish. In another dish, beat the eggs and water lightly together until combined. In a third dish, combine the Panko bread crumbs, Parmesan cheese, 1 teaspoon salt, 1/2 teaspoon black pepper, and the garlic powder. 

Heat two Tablespoons of vegetable oil in a large skillet over medium-high heat. Dredge one of the pork cutlets in the flour, shaking off excess flour. Dip into the egg and water mixture. Then coat the cutlet in the Panko and cheese mixture, pressing the cutlet into the bread crumbs to make sure they stick, and place in the hot skillet. If your skillet is large enough, you can cook two cutlets in the skillet at one time. While the first two are cooking, start working on the next two cutlets. Cook for two to three minutes per side. When golden and crispy, place on baking sheet and keep warm in the oven until all 6 cutlets are cooked. Add 2 more Tablespoons of vegetable oil to the skillet and cook the next two cutlets. Once again, place the cooked cutlets in the oven with the others. Finally, add the remaining two Tablespoons of vegetable oil to the skillet and cook the last two cutlets. Serve hot with sliced lemon.

Wilted Kale:
1 Tablespoon vegetable oil
1/2 medium yellow onion, sliced into long thin strips
1 bunch kale, cleaned, stems removed, and chopped
1 clove garlic, crushed
1/4 teaspoon crushed red pepper flakes
2 Tablespoons lemon juice (about 1/2 lemon)
1/4 teaspoon salt

In a large skillet, heat the vegetable oil on medium high. When the oil is hot (it should be shimmering), add the onions. Sauté for 2 to 3 minutes. Add the kale, garlic and red pepper flakes and stir until the kale is wilted, about 2 minutes. Take off the heat and add the lemon juice and salt. Toss to coat and serve hot.

Farfalle with Roasted Vegetables:
2 medium rutabaga, peeled and diced into 1 1/2-inch chunks
3 Tablespoon vegetable oil
1/2 teaspoon salt
1/2 teaspoon black pepper
1/2 pound farfalle pasta (bowtie pasta), cooked according to directions on box
4 ounces asparagus, cleaned and cut into 1 1/2 to 2-inch pieces
1 red bell pepper, seeded and cut into 1-inch pieces
1 yellow squash, cleaned and cut into 1-inch pieces
1 zucchini squash, cleaned and cut into 1-inch pieces
1 teaspoon salt
1/2 teaspoon black pepper
3 ounces artichoke hearts
1 Tablespoon fresh oregano, chopped
Zest and juice from two large lemons
1 Tablespoon white wine vinegar
1/2 teaspoon salt
1/4 teaspoon black pepper
1/4 cup olive oil

Preheat oven to 400ºF. Coat the rutabaga in 1 Tablespoon of the vegetable oil, 1/2 teaspoon of salt, and 1/2 teaspoon black pepper. Place on baking sheet and roast for 20 minutes (turning half way through). 

Cook the farfalle pasta according to the directions on the box, drain, and set aside in a large bowl. 

Combine asparagus, bell pepper, yellow squash, and zucchini squash in large bowl with remaining 2 Tablespoons vegetable oil, 1 teaspoon salt, and 1/2 teaspoon black pepper. After the rutabaga has roasted for 20 minutes, add these vegetables to the sheet pan with the rutabaga and continue to roast for another 20 minutes. When done, add the roasted vegetables to the pasta. Add artichoke hearts (I used the canned artichoke hearts in a brine) and the chopped oregano. Stir to combine. 

In a separate bowl, prepare the dressing by combining the lemon zest, lemon juice, vinegar, 1/2 teaspoon salt, 1/4 teaspoon black pepper, and olive oil. Mix well and then pour the dressing over the pasta and roasted vegetables. Stir to combine and serve warm or at room temperature.

Monday, October 12, 2015

Truly Good Orzo Pasta with Truly Good Foods Blackened Pumpkin Seeds

Years ago. I discovered Giada De Laurentiis’ recipe for Tri-Colore Orzo.

My family LOVED it, and I’ve been making a variation of her recipe ever since, using dried cranberries and toasted almonds. I thought Truly Good Foods' Blackened Pumpkin Seeds would be great in another variation of this orzo pasta. So, I got out my trusty recipe workbook and started throwing ideas for flavors around. This orzo pasta recipe offers sweet tomato flavor with salty feta, crunchy fresh grilled zucchini, and a little heat from the blackened pumpkin seeds. I hope you enjoy it as much as I do.

Truly Good Orzo Pasta with Truly Good Foods Blackened Pumpkin Seeds
by Maryjo
Adapted from Giada De Laurentiis’ recipe for Tri-Colore Orzo

1 pound orzo pasta
1/4 cup plus 1 Tablespoon extra virgin olive oil, divided
2 medium-sized zucchini (about 2 1/2 to 3 cups)
1/2 teaspoon salt
1/4 teaspoon fresh cracked pepper
1 cup cherry tomatoes, sliced in half
1 lemon, juiced (about 4 Tablespoons of lemon juice)
3 scallions, sliced thinly on the bias (about 1/3 cup)
2 Tablespoons fresh thyme, stems removed, lightly chopped (about 20 stems)
Salt and pepper to taste
3/4 cup feta cheese, crumbled
1/2 cup Truly Good Foods Blackened Pumpkin Seeds

Cook the orzo pasta according to the package directions (usually about 6 to 7 minutes in salted boiling water). I like to slightly under cook my pasta because it keeps cooking a bit while it’s cooling. Drain and spread out on a large baking sheet. Drizzle 1/4 cup extra virgin olive oil over the pasta and toss to coat. Spread out once again and allow to cool for 20 minutes, stirring half way through to help it cool faster.

Slice the zucchini lengthwise into 1/4- to 1/2-inch planks. You’ll get three to four planks out of each zucchini. Coat both sides of the zucchini planks with 1 Tablespoon olive oil, and season with 1/2 teaspoon of salt and 1/4 teaspoon fresh cracked black pepper. Grill on low heat for 3 to 4 minutes (turning over half way through cooking). You just want to get some grill marks on them. They need to be firm so they can be cut into cubes later. When cooled, dice the zucchini into 1/2-inch cubes.

In a large bowl, gently mix the cooled orzo pasta, diced zucchini, cherry tomatoes, lemon juice, sliced scallions, and chopped thyme. If it looks dry, add one more Tablespoon of olive oil. Season with salt and black pepper to taste. If you are serving immediately, add the feta cheese and the Truly Good Foods Blackened Pumpkin Seeds (add more if you really like it crunchy). Serve at room temperature. If you are serving this dish later, wait to add the cheese and seeds. Chill the pasta and add the cheese and pumpkin seeds right before you serve.

This makes 10 to 11 cups of pasta salad.

Tuesday, September 29, 2015

Butter Toffee Peanut Crusted Pork Tenderloin

Butter Toffee Peanuts and pork? Um, yes please! I had my choice of several varieties of Truly Good Foods premium snacks, but landed on their Butter Toffee Peanuts as a crust for pork tenderloin. I thought the sweet/savory mix might work well, and it did. These medallions of pork are crunchy around the edges, tender and juicy in the middle, and have a surprise hint of sweet butter toffee and peanuts. This recipe is delicious and, despite my twelve year old son’s protestations that 8 ingredients in a recipe is too complicated, they really are super easy to make. Trust me!

Butter Toffee Peanut Crusted Pork Tenderloin
by Maryjo

1 pork tenderloin
1 cup Truly Good Foods Butter Toffee Peanuts
1/2 cup panko bread crumbs
1 teaspoon salt
1/2 teaspoon black pepper
1 cup all-purpose flour (dredge)
2 eggs, beaten (egg wash)
2 to 4 Tablespoons olive oil

Pork tenderloin usually comes packaged with two tenderloins. I used only one of the tenderloins for this recipe. Trim the tenderloin of excess fat and remove the silver skin, if it has not already been removed by the butcher. I also cut the tenderloin in half cross ways so that it would fit into my skillet.

Set your oven rack to the upper middle position and preheat to 375°F. In a food processor, pulse the Truly Good Foods Butter Toffee Peanuts, panko bread crumbs, salt, and pepper until coarsely ground.

Dry off the tenderloin halves to remove excess moisture. Dredge each tenderloin half in the all-purpose flour, shaking off any excess. Quickly dip each tenderloin half into the egg wash, and then roll each in the ground Butter Toffee Peanut and Panko mixture. 

Working with one tenderloin half at a time, heat 2 Tablespoons of oil in a large skillet over high heat until shimmering. Reduce the heat to medium-high and brown the first tenderloin half on all sides until dark golden brown and transfer to a baking sheet. If needed, add another Tablespoon or two of oil to the skillet and brown the second tenderloin half. Place it next to (but not touching) the first tenderloin and bake in the oven for 25 to 30 minutes. Check for doneness with an instant read meat thermometer. 145°F for medium rare, 160°F for medium. Let the tenderloin rest for 10 minutes, uncovered. Slice into medallions and serve. This dish goes well with mashed potatoes, steamed rice, or even with a fresh green salad.

Tuesday, September 15, 2015

Greek Inspired Tomato, Onion & Mint Crostini

Years ago I went to a friend’s backyard party and our host served a yummy Italian-style crostini appetizer. I loved them so much I went home and made them for myself, adding ingredients that I thought sounded good. I’ve served these little crostini gems for years, along with my homemade pizzas on family pizza night. When presented with a bottle of Honey Ridge Farms Balsamic Honey Vinegar, the first thing I thought was to prepare a Greek inspired tomato and onion crostini. Turns out it worked like a charm. I substituted mint for basil and topped each crostini with feta cheese instead of Parmesan and it was delicious! The honey fragrance in the vinegar pairs very well with all of the ingredients, but especially well with the mint and feta cheese.

Greek Inspired Tomato, Onion & Mint Crostini
by Maryjo

2 ripe tomatoes, seeded and diced (1 cup)
1/4 small red onion, diced (1/2 cup)
2 Tablespoons Honey Ridge Farms Balsamic Honey Vinegar
2 Tablespoons olive oil
1/4 teaspoon salt
Pepper to taste
1 Tablespoon mint, cut chiffonade
1 loaf country Italian style artisan bread
1 whole clove of garlic
Crumbled feta cheese

Add tomatoes, onions, Honey Ridge Farms Balsamic Honey Vinegar, olive oil, salt and pepper to a bowl. Mix the ingredients well. If you are serving the crostini later in the day, cover the bowl and store in the refrigerator until you are ready to serve. When ready to serve, cut the mint into thin strips and add to the tomato and onion mixture.

Then slice the bread into 1/2-inch thick round disks. Toast them on the grill or toaster oven until crispy and golden. Rub one side of each toasted round of bread with the garlic clove to release some of the garlic flavor onto the bread. Top each toast with 1 to 1/2 Tablespoons of the tomato mixture and then 1/2 teaspoon of crumbled feta cheese. Serve immediately. This recipe will make approximately 10 crostini appetizers.

Tuesday, September 1, 2015

Asian Honey Butter Glazed Chicken Thighs

Honey creme! Who doesn’t like honey creme? I opened a jar of Honey Ridge Farms Clover Honey Creme, gave it a stir and a taste and thought (much like anyone would) of making a glaze for chicken thighs. My Asian honey butter glaze has the earthy, natural sweet honey taste combined with the umami, salty taste of soy sauce and ginger. Just writing this is making my mouth water…(insert cheesy elevator music here while a pause to make sure my recently made honey butter glazed chicken thighs still taste as good as they did when I first took them out of the oven)…

Another chicken thigh consumed…here is how you make them.

Asian Honey Butter Glazed Chicken Thighs
by Maryjo

1 stick of butter (I used salted but you can use unsalted)
2 cloves of garlic, minced
3 Tablespoons of Honey Ridge Farms Clover Honey Creme
2 Tablespoons soy sauce
1 Tablespoon fresh ginger, grated
1 scallion, thinly sliced
1/4 teaspoon salt
1/4 teaspoon black pepper
1 Tablespoon chopped cilantro
6 to 8 chicken thighs, bone in and skin on

Melt the butter in a saucepan. Add the garlic, Honey Ridge Farms Clover Honey Creme, soy sauce, ginger, scallion, salt and pepper. Stir to combine and let it simmer for 3 to 5 minutes on low heat. Remove from heat and stir in the chopped cilantro. Reserve 1/4 to 1/2 cup of the glaze in a separate bowl for dipping later.

Preheat your oven to 350ºF. Trim away excess fat and skin from the edges of the chicken thighs. Season both sides of each chicken thigh with salt and pepper. Using a pastry brush, apply the glaze to the bottom of each chicken thigh and place them a baking sheet fitted with a wire rack. Then, skin side up, brush the tops of each chicken thigh generously with the glaze. Place the chicken thighs into the oven, uncovered, for 30 minutes. At the 30 minute mark, once again, brush the tops of each chicken thigh with the Asian honey butter glaze. Bake for an additional 30 minutes. When the chicken reaches an internal temperature of 165ºF, remove them from the oven and set aside to cool. Discard any unused glaze from the bowl used during cooking. Use the reserved glaze to brush on top of the chicken or for dipping while eating. Serve hot.

Thursday, July 30, 2015

Cluck ’n Moo Mexi-Fritters

You give me ground meat, and being the simple home cook that I am I go straight to meatloaf, meatballs, or sloppy Joe’s. ARGH! So, in my feeble attempt to think “outside of the box,” I decided to make a fritter. Okay, okay, so I can still see the box sitting on the bar stool next to me but I’m outside of it...a little!


Testing this recipe was fun and super filling. My sister, who has decided that all carbs are sinful and that she will NOT partake of anything with flour or corn in the ingredients list, stopped by my house when I was in the throes of testing my recipe. She tried one of my little Mexi-Fritters because “they don’t have THAT much flour or corn in them.” Half an hour later, she and my husband were asking for another batch. Rules are meant to be broken.

Cluck’n Moo Mexi-Fritters
by Maryjo

1 Tablespoon olive oil
1/2 cup onion, diced medium
1 garlic clove, minced
1 pound Cluck 'n Moo Ground
1/2 teaspoon cayenne pepper, divided
1/2 teaspoon ground coriander
1/4 teaspoon dried oregano
1 Tablespoon plus 1/2 teaspoon ground cumin, divided
1 teaspoon chili powder
2 teaspoons salt, divided
1/4 teaspoon red pepper flakes
1/2 of a 14.5 ounce can petite diced tomatoes
1 teaspoon Tabasco sauce
3 large eggs, beaten
1/2 ear of fresh corn on the cob, kernels removed (about 1/2 cup)
2 sliced Serrano peppers (removing seeds optional)
1 Tablespoon fresh cilantro, chopped
1 1/2 cups sharp cheddar cheese, shredded
1 1/2 cups all-purpose flour
1 Tablespoon baking powder
Oil for frying

Heat the olive oil in a skillet or Dutch oven over medium high heat. Add the onions and cook until tender, about two to three minutes. Add the garlic and the Cluck 'n Moo Ground. Brown the meat, breaking up the pieces into smaller chucks as you cook. Continue cooking about 5 to 7 minutes, until the meat is cooked fully through. Add 1/4 teaspoon cayenne pepper, the ground coriander, the oregano, 1 Tablespoon of the ground cumin, the chili powder, 1 teaspoon of the salt, the red pepper flakes, the 1/2 can of petite diced tomatoes, and the Tabasco sauce. Cook an additional 5 minutes. Remove from heat and allow to cool completely. Using a food processor, put half of the meat mixture into the food process and pulse 5 to 10 times until the meat is ground fine. Add it back to the skillet or Dutch oven and combine the ground meat with the chunky meat.

In a large bowl, add the cooled meat, the beaten eggs, corn kernels, Serrano peppers, fresh chopped cilantro, sharp cheddar cheese, all-purpose flour, baking powder, the remaining 1/4 teaspoon cayenne pepper, the remaining 1/2 teaspoon ground cumin, and the remaining 1 teaspoon of salt. Mix well (I use my hands for this but be sure to remove your jewelry…it’s a sticky mess.)

I used a deep fryer to cook the first batch I prepared, and I used a skillet to cook another batch. If you use a fryer, follow the fryer manufacturer’s directions. I used peanut oil in my deep fryer (as suggested by the manufacturer.) I scooped 1
Tablespoon of the dough into a sticky ball and placed them onto a floured plate. Cooking a dozen at a time, I cooked the fritters for three minutes, turning them with a slotted spoon to make sure they browned evenly on all sides. After three minutes I drained them on a wire rack, salted them, and served. If you decide to cook them in a skillet, just put enough oil in the bottom of the skillet to come about half way up the side of the fritters. Heat the oil before adding the fritters. Again, cook the fritters for about 3 to 4 minutes, turning half way through. Then drain on a wire rack or paper towels. Remember, the meat is already fully cooked!

These are delicious as a little appetizer popper or served inside a soft flour tortilla (sort of like a falafel.) Play with it. I made a spicy jalapeño aioli to go with it. Note that you’re going to get at least two dozen fritters out of this recipe, depending on the size of dough ball you make. If you have more than you need, just measure the fritters out onto a lined baking sheet and freeze them. Once frozen, drop the individually frozen fritters into a zip top bag and put them back in the freezer. If you want to cook a dozen fritters, just pull a dozen out of the bag, thaw them completely, and cook just as described above.

Tuesday, June 16, 2015

Cluck’n Moo Chimichurri Burger


Some years ago, on a visit to central Texas to spend some time with my dad, I decided to make some chimichurri sauce to go with the fajitas I was told were going to be served for dinner. If you’ve never had chimichurri sauce before, you’re in for a treat. It’s tangy and spicy and surprisingly fresh tasting. So, anyway, I got to my dad’s house and quickly whipped up a batch of chimichurri sauce. We all sat around the table and my dad says, “What’s this green stuff in this bowl?” Note that he didn’t actually say “stuff” but something a little more explicit. I explained to him what it was, and he begrudgingly agreed to try some. At the end of the meal he looked at me from across the table and proclaimed, “The green swamp goo was pretty good!” Thanks, Dad.

Anyway, when presented with the Cluck’n Moo Challenge, the first thing that came to mind was a chimichurri burger. Al, my way better half, was all too willing to be my official taste tester…again. I received a generous sample of the Cluck 'n Moo Ground and OMG! It was frozen SOLID! I was worried about Cluck’n Moo shipping the ground meat to me all the way to Texas in our 90º weather, but it arrived fully frozen. Yowza, we were in business. Honestly, looking at the product I would never guess that it was a mixture of beef and chicken. And cooking with it was just like cooking with any ground product. It is fresh, and delicious! And the fact that it’s gluten-free and antibiotic and hormone free? Even better. Fewer calories, less fat (and less saturated fat) is A+ in my book. According to my husband, that translates to more cheese allowance on his burger!

Cluck’n Moo Chimichurri Burger
by Maryjo

2 Tablespoons vegetable oil
1 1/2 cups red onion, diced
1/2 teaspoon red pepper flakes
1 Tablespoon crushed garlic (about 4 cloves)
2 1/2 pounds of Cluck 'n Moo Ground
3 Tablespoons red wine vinegar
1 Tablespoons Dijon mustard
1/2 teaspoon ground cumin
1/4 cup chopped parsley
1 teaspoon salt
Chimichurri Sauce (recipe below)
Cotija cheese, crumbled
Ciabatta rolls
Mayonnaise

Heat the vegetable oil in a skillet over medium-high heat until shimmering. Add the diced red onion and red pepper flakes and sauté over medium-high heat until soft, about three minutes. Add the crushed garlic, stir, and remove from heat to cool.

In a large bowl combine Cluck 'n Moo Ground, red wine vinegar, Dijon mustard, ground cumin, chopped parsley and salt. When cooled, add the sautéed onion mixture. Mix to combine and then form into six to eight patties. Cook the Cluck’n Moo patties as you would any burger (in a skillet or on the grill.) I grilled these burgers on a gas grill on high heat for about two minutes on each side. Then I turned the heat down to medium-low and let them hang out on the grill to cook through for another 6 or 7 minutes (turning them over again after 3 minutes.) Just remember that these burgers contain a combination of beef AND chicken, so you have to be sure you get the internal temperature up to 165°F. Use an instant read thermometer to check the internal temperature of your burgers before taking them off the grill. As the burgers were finishing up on the grill, I topped each one with 1 Tablespoon of the chimichurri sauce and about 1 Tablespoon of cotija cheese (you can use any cheese you like - feta would be a great substitute here.) Serve the burger on a ciabatta roll or on your favorite bun. I put some chimichurri sauce on one half of the roll and a little mayonnaise on the other half. Plantain chips with a little bowl of chimichurri dipping sauce make a great side dish too!

Chimichurri Sauce
by Maryjo

1 small red onion, quartered
5 cloves garlic
1 teaspoon red pepper flakes
2 cups fresh parsley, stems removed
1/4 cup red wine vinegar
1/2 teaspoon salt
1/2 cup olive oil

In a food processor, pulse the red onion and garlic until chopped. Add the red pepper flakes and the fresh parsley and pulse five to seven time until chopped and combined. Using a spatula, scrape the ingredients back down to the blade. Add the red wine vinegar and salt, replace the lid and pulse three or four more times to combine. With the food process running, slowly drizzle the olive oil into the mixture using the feed tube. You may need to stop and scrape down the sides again to be sure everything combines well. That’s it! Taste it for seasoning and add salt if needed. Then let it chill in the refrigerator (this sauce is even tastier the next day.)

Thursday, April 16, 2015

Vodka Apricotini (a/k/a “Mine!”)

This was a fun challenge. I had a lot of fun making it and my husband had a lot of fun drinking it. But, I think the funniest part of this challenge was the day I prepared the cocktail for a photograph. From the outset, I had decided that no matter what I was going to use the two funky martini glass (pictured here) that I won at a fundraiser in January this year. I filled one of the glasses and walked it out to the garage to show my husband and to give him a sip. I asked him what I should call it and he promptly said “Mine!” Ultimately, I landed on Apricotini. But that wasn’t the funny part. I left him with the drink, went back inside and made another one to photograph. Picture taken, I drank it. Only trouble was I ended up wearing most of it. I could have sworn I aimed for my mouth. I mean, I’ve been eating and drinking things my whole life. Why, all of the sudden, can I not get the edge of the glass to my mouth? I made another cocktail and it happened again! Seriously? What was wrong with me? Just then, my husband came back into the house…with cocktail down the front of his shirt! We decided that the funky shaped martini glasses were the problem. That’s our story and we’re sticking with it!

Vodka Apricotini (a/k/a “Mine!”)
by Maryjo

1 cup of ice
1 Tablespoon apricot puree (recipe below)
1 Tablespoon flavored simple syrup (recipe below)
1 1/2 ounces of your favorite traditional Vodka (right now, my fav is Ivanabitch)
1/2 teaspoon lime juice

Shake all of the above ingredients in a cocktail shaker until well blended. Strain into your favorite martini glass and enjoy!

Apricot Puree
by Maryjo

20 dried apricots
2 cups water
2-inch knob of fresh ginger, sliced into 1/4” pieces
1 teaspoon ground cardamom

Place the dried apricots in a small sauce pan, cover with 2 cups of water, the sliced ginger, and the cardamom. Stir, bring to a boil, then reduce to a low simmer for 30 minutes. Turn off the heat and let it cool to room temperature. Drain the liquid from the apricots and ginger into a bowl to be used in the simple syrup. Pick out and discard the ginger. Put the now plump apricots into a blender with about 1/4 cup of the drained liquid. Blend until it is a smooth puree. Press the puree through a fine mesh strainer to be sure all of the lumps are out. You’ll be left with about 1 Tablespoon of pulpy (is that a word?) stuff in the strainer that should be discarded. You've made a beautiful, bright orange colored apricot puree with a hint of ginger and cardamom. This recipe will make about 1/2 cup of puree, or between 6 and 8 Apricotinis.

Ginger/Cardamom Flavored Simple Syrup
by Maryjo

Using the liquid from the puree above, filter the remaining apricot and ginger liquid through a coffee filter to remove the gritty ground cardamom. Discard the cardamom. Now it’s time to make a simple syrup with 1/2 cup of the filtered liquid and 1 cup of white sugar (if you don’t have enough filtered liquid, just top it off with water until it measures 1/2 cup.) If you've never made a simple syrup before it’s super “simple”! In a small sauce pan, add the 1/2 cup of liquid and 1 cup of sugar. Over medium high heat, stir until the sugar is dissolved. Just be careful not to boil the mixture (it’ll mess with the sugar to water ratio.) Remove it from the heat and let it cool to room temperature. Voila! Sweet, sticky goodness.

Tuesday, March 10, 2015

Crispy Bilinski’s Balsamic and Kale Chicken Meatballs

Meatballs anyone? I love meatballs, all kinds. So when I was presented with Bilinski’s healthy Kale Balsamic Chicken Sausage, the first thing I thought of was meatballs. Okay, so I tried to stay true to Bilinski’s healthy point of view (so I didn't deep fry them.) I baked these crunchy little gems of healthy chicken kale and balsamic sausages and served them with a balsamic/whiskey and strawberry Bar-B-Q sauce. I hope you enjoy.

Crispy Bilinski’s Balsamic and Kale Chicken Meatballs
by Maryjo

1/2 cup plus 2 Tablespoons panko breadcrumbs
1 teaspoon olive oil
2 Tablespoons milk
12 ounces Bilinski's Kale Balsamic Chicken Sausage
2 whole eggs

Mix 1/2 cup of panko breadcrumbs with olive oil and broil at 350°F for 3 to 5 minutes, stirring halfway through, until they are golden brown (but not burned...trust me...you've gotta watch these...they will burn the minute you turn your back on them.) You can also brown them in a skillet if you prefer. Put them in a bowl and set aside.

In a small bowl, combine 2 Tablespoons of panko breadcrumbs and 2 Tablespoons of milk. Stir to coat the breadcrumbs with the milk and let it sit for about 5 minutes, until the milk has softened the panko. This is called a panade, but we’re not fancy in my house...we call it the moist maker!

Pre-heat your oven to 375°F and line a baking sheet with parchment paper. Cut the fully cooked chicken sausages into 1-inch pieces and put them in a food processor. Pulse about 10 times to break them up. Then run the food processor for about 20 seconds until the chicken sausage looks coarsely ground. Add the eggs and pulse until combined. Add the panade to the food processor and pulse to combine. No need to add salt or pepper because the fully cooked Bilinski's chicken sausage is already well-seasoned.

Using a tablespoon-sized measuring spoon, make small, appetizer-sized meatballs (they’re soft, so don’t be alarmed.) Drop them into your bowl of previously toasted panko bread crumbs and turn to coat, then place them on the cookie sheet. Continue to make meatballs, rolling them in the toasted panko, until you have about 30 meatballs. Bake them for 10 minutes, then gently and carefully turn the meatballs over so they can brown on the other side. Cook an additional 10 minutes. Remove them from the oven and let them cool. They will firm up as they cool. Serve with any store-bought bar-b-q sauce or make your own. I made a Balsamic/Whiskey and Strawberry sauce (recipe below) to compliment the balsamic flavor in the Bilinski's sausage.

Balsamic/Whiskey and Strawberry Bar-B-Q Sauce
by Maryjo

3/4 cups balsamic vinegar
1 medium shallot, finely chopped (about 3 Tablespoons)
1/2 cup fresh strawberries, chopped
1 Tablespoon olive oil
1 clove garlic, crushed
1/4 teaspoon crushed red pepper flakes
1 cup ketchup
6 Tablespoons brown sugar (dark or light, doesn’t matter)
1 teaspoon Worcestershire sauce
1/8 teaspoon fresh cracked black pepper
2 Tablespoons whiskey (I used Johnny Walker Red)
1/2 cup water

Put the balsamic vinegar in a small sauce pan and bring to a boil, then reduce to a simmer for about 25 to 30 minutes, until the balsamic vinegar is reduced to about 1/3 cup.

In a skillet, sauté the shallots over medium heat until tender (about 3 minutes). Turn the heat to low and add the strawberries. Cook for an additional 3 to 5 minutes, stirring often. Add the balsamic reduction and the remaining ingredients and simmer for about 10 minutes. Remove from heat and serve.

Wednesday, January 14, 2015

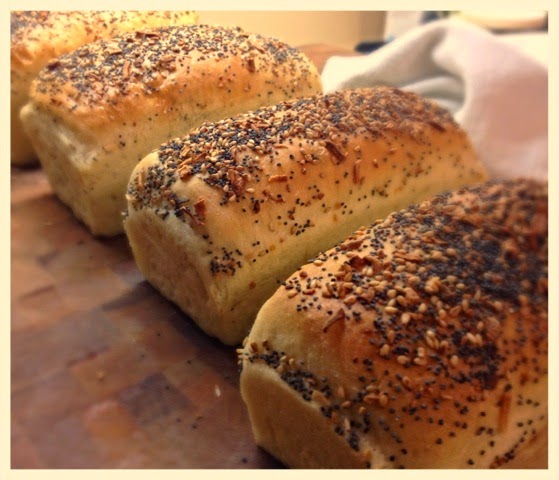
Mini Everything Loaves

To me, making bread from scratch has always seemed a daunting task. A few years ago, I learned a recipe for a rustic, artisan type loaf and I've pretty much stuck to making that bread for friends and family all year long ever since. I heard it said once or twice that baking is a science. It’s true! It IS a science, but I think it’s more like…well…magic (like nerve impulses in the human body or electricity…MAGIC.) I could not begin to explain to you how baking works, but I know a few things are very important. First, you have to accurately measure your flour (this is VERY important.) You ALSO need happy yeast. Okay, so “happy” is a stretch, but I assume they are happy when they are swimming and foaming up in a bowl of warm, sweet water. Among a few other components, a warm place for your dough to hang out for a while is also important. I know it sounds complicated, but if you trust the process you, too, can master bread making. And Make-Ahead-Bread: 100 Recipes for Melt-in-Your-Mouth Fresh Bread Every Day will set you on that glorious path of coaxing yeasted dough into crunchy, chewy vessels of warm yumminess. Make ahead bread? Really? Yes, really!

Mini Everything Loaves
by Maryjo
Adapted from “Mini Sunflower Seed Loaves” from Make Ahead Bread: 100 Recipes for Melt-in-Your-Mouth Fresh Bread Every Day by Donna Currie

1 1/4 cups warm water (105°F to 110°F)
2 1/4 teaspoons active dry yeast
1 Tablespoon sugar
2 1/2 cups (11 1/4 ounces) bread flour, plus more as needed
1/2 cup (3 ounces) semolina flour
1 teaspoon kosher salt
1 Tablespoon olive oil
1 Tablespoon toasted sesame seeds
1 Tablespoon poppy seeds
1/2 teaspoon granulated garlic
1 teaspoon dried onion flakes
Nonstick baking spray
Egg wash (1 egg beaten with 1 Tablespoon water)

Place the warm water, yeast, and sugar in a small bowl (I actually used a two-cup measuring cup for this step…works like a charm.) Use an instant read thermometer to be sure your water is at least 105˚ but not warmer than 110˚. In about 5 minutes time, the yeast will be all foamy and ready to get to work.

While you’re waiting for the yeast to foam up, combine the bread flour, semolina flour, salt, and oil in a large bowl (I used a stand mixer with a dough hook.) Add the foamy, now very alive, yeast to the flour and mix on low until a dough ball forms and all of the flour has been incorporated into the dough. If you live in a humid climate like me, your dough may still be too wet (sticky.) Just sprinkle a little flour into the mixer (1 Tablespoon at a time) until the dough is no longer sticky. Turn up the speed to medium and knead the dough for 5 to 7 minutes, until the dough has a more elastic consistency.

Next, combine the sesame seeds and poppy seeds in a separate small bowl and pour half of the seeds onto the dough ball (reserve the other half to sprinkle on top of the bread.) Continue to knead the dough for another minute on medium speed until the seeds are well incorporated into the dough ball. Cover the bowl with plastic wrap or a warm damp towel and let is rise until it has doubled in size (about an hour.)

This recipe calls for you to use four mini loaf pans (5 3/4 x 3 inches.) Spray each pan really well with non-stick spray and set aside.

Once the dough has doubled in size, turn it out onto a floured surface and then divide the dough into four equal blobs (or four equal parts.) Working with one piece of dough at a time, pat the piece of dough into a square equal to the length of the pan you’re using (in my case the dough needed to be roughly 5-inches square.) Roll up the dough into a jellyroll or cinnamon roll type log. Pinch the seam closed, as well as the ends of the log to seal it closed and place it, seam side down, in the loaf pan. Repeat with the other three pieces of dough. At this point you can cover the pans with plastic wrap (seal them in a plastic bag) and refrigerate them for 12 to 24 hours before you bake them. But, I couldn't wait that long, so I baked these the same day.

Preheat the oven to 350°F. If you did refrigerate your dough, you’ll want to remove the pans from the refrigerator, take the pans out of the plastic bag and let them sit out on the counter for about 30 minutes before baking. Since I didn't refrigerate my dough, I gave the dough another 15 minutes to rise a little more while the oven was heating up.

Combine the remaining sesame seeds and poppy seeds with the garlic granules and onion flakes in a small bowl. Brush each loaf with egg wash and sprinkle each loaf generously with the seeds, garlic and onion. If you are using pans that are close to 5 3/4 x 3 inches, bake the bread for about 20 to 30 minutes. The internal temperature of the loaf should read 195°F on an instant read thermometer.

Remove the loaves from their pans and cool them on a rack before you slice into them.