Wednesday, December 30, 2015

Butterfly Kiss


The Wild Hibiscus Flower Company makes all their products by hand, in Australia. Their website says, “The butterfly pea flower is a native from Thailand where it is called Dok Anchan (Latin name is clitoria ternatia). It grows on a vine producing bountiful crops of delicate blue and purple flowers which are typically dried.” I chose this extract for my recipe because I am in the garden industry and we sell this exact plant at our garden center. It was kismet! I love citrus-based drinks and I am a lover of all things bubbly. “But then if a squeeze of lemon or lime is added, it then changes to royal purple and almost pink in some instances due to the change in acidity.” Because of the lemon juice, the drink hue is lavender-pink. I had some help with this recipe. We lost a special friend in 37 Cooks. Chris and I used to bounce ideas and recipe photos back and forth. Her husband, Sean, was her taste tester and part-time sous chef. I decided to ask Sean if he would partner with me on this challenge. We both loved Butterfly Kiss and we hope you do too. 'Clink!'

Butterfly Kiss
by Sharyl

1 ounce dry gin
1/2 ounce fresh lemon juice
1/2 ounce simple syrup
15 drops of Wild Hibiscus b'Lure Butterfly Pea Flower Extract
2 ounces chilled champagne or Prosecco
1 lemon twist

Combine the gin, lemon juice, simple syrup and b’Lure Butterfly Pea extract, in an ice-filled shaker. Shake vigorously. Strain into a chilled coupe. Top with the champagne and lemon twist garnish. Enjoy!

Note: simple syrup is a 1:1 ratio of water to white sugar, heated to a boil and stirred until mixed. Cool. Store in the refrigerator.

Tuesday, December 29, 2015

Hibiscus Wine Punch with Ice Ring and Cubes


For a recent party I had, I decide to make punch and ice cubes and a ring from the Wild Hibiscus Flowers in Syrup and Hibiscus Flower Extract I received. Wow, everyone thought it looked and tasted delicious. Enjoy

Hibiscus Wine Punch with Ice Ring and Cubes 
by Nancy Follwell
Ice ring:
Bundt pan
Wild Hibiscus Flowers in Syrup
1 lemon, sliced, cut in half
Cold water to cover
1 large squirt Hibiscus Flower Extract

Place hibiscus flowers, spaced in the bundt pan. In the spaces, place two lemon slices, making sure they all face the same way. Add enough water to cover the bottom. place in freezer and freeze till water is almost firm. Add remaining water to completely cover. Freeze till firm.

Hibiscus Ice Cubes:
1/2 the juice from Wild Hibiscus Flowers in Syrup
5 squirts Hibiscus Flower Extract
2 cups water

Mix together and place in ice cube trays. Freeze until firm.

Wine punch:
2 bottles white wine
1 large bottle ginger ale
5 large squirts Hibiscus Flower Extract
Place ingredients in a punch bowl. Add ice ring and serve with ice cubes.

Monday, December 28, 2015

Wild Hibiscus Flower Company


Our cooks went "wild" with our most recent challenge! Our newest sponsor, the Wild Hibiscus Flower Company, generously sent each cook a jar of Wild Hibiscus Flowers in Syrup. Each cook was also sent their choice of amazing flower extracts. 

The Wild Hibiscus Flower Company was founded in Australia by Lee Etherington in 1999 with the creation of their flagship product, Wild Hibiscus Flowers in Syrup. It was by chance at a more than lively dinner party one night that Lee, his partner Jocelyn, and their guests dropped a flower into a glass of champagne. Watching in amazement as the flower started to unfurl and look particularly special in the glass, the idea was sparked by Lee to create the first bottled hibiscus flowers in syrup.

Lee devised proven techniques in farming and production and a natural preservative - a mix of spring water and Australian cane sugar - that keeps the flowers perfectly candied and ready to eat for more than 36 months.

Our cooks went above and beyond with their creativity using these very special products! If you want to learn more about the Wild Hibiscus Flower Company, be sure to follow them on FacebookPinterest and Twitter

Monday, December 21, 2015

Ham and Pea Risotto with Swiss Chard

My approach to cooking is to find inspiration all around me. Cookbooks, magazines, TV shows, what’s in the fridge, what’s on sale, what’s in season, what IS the season, all are sources of inspiration. Now I have a new source of inspiration. The Recipe Dice from Leafcutter Designs. The little glass jar is about the size of my spice jars and fits perfectly in my spice drawer.

Yesterday, I finally had some time off and no commitments other than to do what I want. And I wanted to cook. I opened up the spice drawer and saw the Recipe Dice and thought, “well, let’s give ‘em a roll.” I’m sure they came with suggestions on how to use them, but of course I promptly misplaced them. Simply put, these are dice. One just needs to roll them.

This roll turned up pork, rice, Parmesan cheese, Swiss chard, bell peppers, squash, Brussels sprouts, garlic, rutabaga, lemon, and mint. I checked my fridge to see what I had: A big chunk of ham, various bits of cheeses, Swiss chard…okay this was promising. I check my pantry and find Arborio rice…in my head an idea is coming together. I eliminate a few veggies and dial into what my brain and my stomach are telling me. I’m thinking risotto. With ham. And peas. And lots of cheese, not just Parmesan. I think I need the Swiss chard as a foil for the richness of the risotto. Now, I’m zipping around the kitchen thinking about risotto. I’m also feeling quite pleased with myself for having made several quarts of chicken stock a few weeks earlier and stashed it in the freezer. Yes. This dish was meant to be.

Ham and Pea Risotto with Swiss Chard
by Woo

Two bunches of Swiss chard (I used rainbow chard, so colorful)
3-4 large cloves of garlic, sliced
2 Tablespoons of extra virgin olive oil
Pinch of crushed red pepper flakes (or two pinches)
Salt
Lemon wedge

Before starting the risotto, prep the chard. Chop, wash, and drain the chard. Set aside. Peel 3-4 large cloves of garlic and slice. In a large skillet add two Tablespoons of extra virgin olive oil, the garlic, two big pinches of crushed red pepper flakes. Heat the large skillet containing the olive oil and garlic. When the garlic is just starting to color, add the majority of the chard, salt, layer the remaining chard, salt. Using tongs, turn or stir the chard to cook evenly and quickly sauté. Remove from heat. Set aside. Just before the risotto is finished, reheat briefly, squeeze a little lemon juice over the chard or sprinkle a touch of red wine vinegar.

1/4 cup extra virgin olive oil
3/4 cup of finely chopped onion
1 heaping cup Arborio rice
1/2 cup dry white wine
6 cups of homemade chicken broth (more or less), simmering
1 cup of diced fully cooked smoked ham
1 cup of sweet baby peas (I used frozen)
Half a small log of goat cheese
3 Tablespoons of cream cheese
2 Tablespoons Parmesan cheese
4 Tablespoons butter
Salt and white pepper to taste

Heat the olive oil in a heavy saucepan over medium heat. Add the finely chopped onion and cook until almost melted in texture and golden. Stirring as needed. This took me about 10 minutes. Add the Arborio rice and stir to coat in the olive oil and get the rice grains slightly toasted about a minute or two. Increase the heat a tad. Add the white wine. Stir constantly. When the wine is half absorbed add a cup of the simmering chicken broth. It should just cover the rice. Stir, stir, stir. When the broth has absorbed into the rice, add another ladle and stir. (Fire the chard. Heat the large skillet containing the olive oil and garlic. When the garlic is just starting to color, add the majority of the chard, salt, layer the remaining chard, salt. Using tongs, turn or stir the chard to cook evenly. Don’t forget to stir the risotto! Remove chard from heat. Set aside. Just before serving squeeze a little lemon juice over the chard or sprinkle a touch of red wine vinegar.) Repeat until the rice is almost ready, add the ham and peas, and one more ladle of broth. Stir. Add the cheeses. Stir until incorporated. Adjust seasoning. Add butter and stir well. Use a little more broth to adjust the consistency. I like a risotto that “relaxes” into the bowl or plate instead of piling up like a hill. Serve the ham and pea risotto with a big tangled mess of the sautéed chard on top. The chard adds texture and a brightness to the rich risotto. Trust me on this pairing. It works.

Thursday, December 17, 2015

Cranberry & Ginger Jello Shots

Time for the holidays! Every year for our family turkey dinner I make extra cranberry sauce. After the guests are gone I use it in sorbet, mix it with ginger ale, spread it on scones, use it in leftover turkey sandwiches - but maybe this year, I'll share the extras with my friends and family.

I was thrilled to receive in the mail a tidy package from Leafcutter Designs, containing a small jar of Cocktail Dice. Excitedly, I dumped the dice on the table: Ginger ale, orange slice/twist, tequila, triple sec, shaken, cranberry juice, nutmeg, double old fashioned glass. Hmm...the tag on the jar instructed to strategically remove two dice. Sorry, "shaken" and "double old fashioned glass" - you don't get to play this time!

Cranberry & Ginger Jello Shots
by Sarah Kwan of earthlydelightsblog.com
Makes 8 jello shots

8 3-ounce paper Dixie cups (you could also use mini muffin liners, which would likely yield 11-12 shots)
3 ounces dark chocolate, chopped into evenly small bits
2 Tablespoons ginger beer
2 Tablespoons triple sec, such as Grand Marnier or Cointreau
1 package unflavoured gelatin
1/4 cup spiced cranberry sauce (liquid only), warmed (see recipe below)
1 Tablespoon lime juice
3/8 cup reposado tequila

To garnish:
Candied cranberries (dip fresh cranberries in a mixture of honey and water, toss in granulated sugar, let dry for 1/2 hour)
Twist of orange or lime
Diced candied ginger

Melt the chocolate, and coat the inside of each Dixie cup with a small spoon (I used a lobster spoon for the task), up to about halfway up the cup. (Note: You can see from the photo that I spread the chocolate a little further up on one side of the cup. This step is optional. If using mini muffin liners, coat the inside of the liner fully.) Place cups on a tray and chill in the fridge for at least 1 hour, to harden the chocolate.

Pour ginger beer and triple sec into a bowl, and sprinkle the gelatin over it to bloom the gelatin.

When the gelatin appears translucent and soaked through, stir in the warmed cranberry sauce, until the gelatin is fully dissolved.

Stir in the lime juice and tequila.

When the gelatin mixture is cooled to about room temperature, pour it into the chocolate cups.

Refrigerate for about 8 hours, then carefully peel away the Dixie cup.

Garnish with candied cranberries, a citrus twist, and diced candied ginger.

Spiced Cranberry Sauce

1 12-ounce bag of fresh cranberries
Juice and zest of 1 orange
Water
1 cup granulated sugar
1 stick cinnamon
Pinch of nutmeg

Pour the orange juice into a measuring glass, and add enough water to measure 1 cup of liquid.

Combine the cranberries, juice and water, sugar, cinnamon and nutmeg in a pot, cover and heat on medium-high, until the liquid boils and the cranberries burst.

Remove from heat and stir in orange zest.

Tuesday, December 15, 2015

Cran-Rosemary Martini

How do you make concocting cocktails more fun than it already is? Roll the dice, cocktail dice that is - Leafcutter Designs. The best part about it is you get to drink the mistakes until you get it just right - lol.

I rolled the following dice: Vodka, cranberry, lime, “wild", shaken, martini glass - I looked in our herb garden and grabbed a handful of rosemary for the “wild" and viola! - an amazing Cran-Rosemary Martini

Cran-Rosemary Martini
By Lori Churchill

Cranberry juice, unsweetened (I used Knudsen’s Just Cranberry)
Vodka (I always use Tito’s, an award-winning favorite)
Rosemary Light Simple Syrup (recipe below)
2 Limes - for juice and garnish

Rosemary Light Simple Syrup

In a small sauce pan, add 1/2 cup water, 1/4 cup turbinado sugar and 5 sprigs rosemary (each approximately 2 inches long). Bring to a boil for 1 minute, then let stand for 30 minutes. So worth it and AMAZING!

In a cocktail shaker add the following:

1 shot cranberry juice
1 1/2 shots vodka
1 shot Rosemary Light Simple Syrup
1/2 shot lime juice

Add cubed ice to the cocktail shaker and shake until nice and cold. Pour in a martini glass. Garnish with a sprig of rosemary and a twist of lime and enjoy!

Friday, December 11, 2015

Meet our newest cook, Melissa Cook!

Hey there, I am Melissa Cook. I live in Shreveport, Louisiana with my husband, Sid, and our two sons, Trey and John. I was born in Arkansas and have lived all over the southeastern United States. I have been in Shreveport all of my adult life. I worked in hospice before having kids and love helping people. I have been home with my boys for almost 17 years. In 2011, with some guidance from friends and the guys at the local welding supply company, I taught myself to weld. I make furniture and small decorative iron pieces. Having a high schooler and an 8th grader has slowed me down some, but I still get out and make things when my favorite decorators call.

I grew up with great cooks. I love the warmth and comfort of a home cooked meal. Some of my favorite memories include the gardens of my grandparents', shelling peas with cousins, and helping my grandmother put up vegetables for the winter. My dad and I still have contests every summer to see who can grow the best tomatoes. He usually wins. My go-to meals are classic, southern home cooking, but I also love to try foods from other regions and cultures. I'm fortunate to have a husband willing to try everything I cook and kids that are becoming more adventurous. While I grew up with good food, I didn't really cook until I was out on my own. I had a great group of neighbors when I first got out of school. We would plan meals and gather to cook. Everyone was responsible for their part of the meal, but it was a group effort. Those meals were always filled with laughter and love. That's what I like the most about being in the kitchen.

I'm always up for an challenge and pretty fearless. I am so excited to be one of 37.

My husband, Sid, loves to celebrate by having family over on Sunday evenings. This is usually something we decide on Saturday, but a few weeks ago we decided during lunch, after church. This left little time for preparation so we bought a caramel apple pie at Sam's Club for dessert. As we were eating the perfectly fine pie, I decided that it could be divine if it was made with homemade caramel and real butter in the crumb topping. So I pulled out my favorite caramel recipe and made it my own. We had it for Thanksgiving and it was a big hit!


Better than Sam's Caramel Apple Pie
by Melissa Cook
Adapted from Caramel Pecan Sundaes in Ina Garten's "Barefoot Contessa at Home" (I borrowed her caramel sauce)

1/3 cup water
1 1/2 cups sugar
1 1/4 cups heavy cream
1/2 teaspoon pure vanilla extract
6 medium Granny Smith apples, peeled and sliced 1/8-1/4 inch thick
1 Pillsbury Refrigerated Pie Crust
1 stick salted butter, cold and diced to 1/2 inch
1/2 cup brown sugar
1 cup flour

Preheat your oven to 350°F.

Mix 1/3 cup of water and 1 1/2 cups of sugar in a heavy, medium saucepan. Cook over low heat 5-10 minutes, without stirring, until the sugar dissolves. Turn up the heat to medium. You may gently swirl the pan to stir the mixture. Cook until the sugar becomes a warm, golden brown. Turn off the heat or remove the pot from the burner. Carefully add the 1 1/4 cups of cream and 1/2 teaspoon of vanilla. This will cause some bubbling and steam so use care. The caramel will harden, but never fear! A couple of minutes over low heat with a gentle stir will soften the caramel and it will become smooth. Remove from heat. Add the sliced Granny Smith apples. 

Lightly grease a 9" tart pan or pie plate. Unroll your Pillsbury Refrigerated Pie Crust and press gently into the pan. Fill the crust with pie weights or, my personal favorite, dried peas and bake for 5 minutes. In a medium bowl, add one stick of cold, cubed butter into the brown sugar and flour. I use a large fork to press the ingredients together. When the mixture is crumbly and forms pea sized bits it is ready. Remove the crust from the oven. Using a slotted spoon, fill the crust with the apples and caramel. Leave a little room for the crumb topping. Top with the crumbly butter, sugar and flour mixture. There should be some caramel left in the pot. Save it for later or drizzle over the pie when you serve it. It is really good on a spoon!

Bake in 350°F oven for 45 minutes. Make sure you let the pie rest long enough to set. I waited an hour and mine came out of the tart pan and sliced beautifully.

Thursday, December 10, 2015

Stuffed Eggplant and Kale and Asparagus with Lemongrass and Basil

For the second roll of my Leafcutter Designs Vegetarian Recipe Dice I got eggplant, cumin, onion, rice, tomatoes, corn, cheddar, kale, lemongrass, asparagus, and basil.

Stuffed Eggplant
by Louise

1 medium eggplant (about 1 1/4 pound)
Olive oil
Kosher salt
1/2 cup chopped red onion
1 ear of corn, kernels cut off
1/2 teaspoon cumin
2 Tablespoons white wine
2 Tablespoons tomato paste
1 1/2 cups cooked short grain brown rice seasoned with 1/4 teaspoon cumin
8 grape tomatoes
1/2 cup shredded cheddar

Preheat oven to 350°F. Slice eggplant in half lengthwise. Scoop out center of eggplant (a melon baller works well for this) leaving a half-inch thickness; and discard as many seeds as possible. Drizzle olive oil into eggplant cavities (spread with fingers) and sprinkle with salt. Bake eggplant shells 20 minutes or until lightly browned but still hold their shape. Set aside.

Chop eggplant flesh. Heat oil in a sauté pan over medium heat. Add chopped eggplant flesh, red onion and corn kernels and sprinkle with salt and cumin. Stir in wine and tomato paste. Sauté about 8 minutes or until vegetables are softened. Set aside.
To assemble eggplants: Spray an ovenproof baking dish with vegetable spray and place the eggplant shells in the dish. Spoon half of brown rice into bottom of each eggplant shell pressing down with the back of the spoon to level the rice. Slice grape tomatoes into 3 slices each, 4 slices if they are on the larger side. Lay the slices of tomato over the rice and sprinkle with salt. Spoon the cooked filling over the grape tomato slices and cover the dish with foil. Bake in the preheated oven 30-35 minutes. Remove the baking dish from the oven and sprinkle each of the eggplant halves with half the cheese. Return the eggplants to the oven and continue baking about 8 minutes or until cheddar is melted.

Kale and Asparagus with Lemongrass and Basil
1 stalk of fresh lemongrass*
1/4 pound thin asparagus
1 Tablespoon canola oil
4 cups washed kale, cut into bite-sized pieces
4 basil leaves, cut into a chiffonade
Kosher salt
Freshly ground pepper
Peel the tough outer layer off the lemongrass. Slice the lemongrass very thinly into circles. Set aside. Cut off the bottom 1” of the asparagus and discard the tough stems. Slice the asparagus stalks into circles about 1/8” thick. Leave the last 1-2” (the bud) intact. Heat the oil in a sauté pan over medium heat. All all ingredients into the pan and toss the pan to coat the vegetables with the oil. Sprinkle with salt and pepper to taste. Stir fry the vegetables until the kale is slightly wilted but still green, about 6-8 minutes.

*I eat lemongrass. The first time I was ever served Thai food, the lemongrass was part of the dish. I enjoyed the flavor and the crunch. I’ve since seen recipes where the lemongrass was used to “infuse” a liquid or a dish, then removed. I found that to be very wasteful and it never quite relayed the same burst of lemongrass flavor as including sliced lemongrass. If a cook is uncomfortable with this, by all means use the “infusion” method and remove the lemongrass before serving the kale.

Tuesday, December 8, 2015

Meet our newest cook, Lindsay O'Connor!

Hello, my name is Lindsay. For as long as I can remember I have loved to cook. I grew up with parents that loved to cook ~ very different things. My mom was a vegetarian, while my dad was a carnivore. I learned early on how to love both types of food. For the most part, my parents cooked with whole-foods before it was popular as it was much cheaper. For a time we even had a garden. It has shaped the way that I cook today. I remember getting cases of fruit and canning it (now I freeze it!) Making Christmas cookies for days to give to friends and neighbors. A tradition that I keep going with my own children.

I spent my childhood in California and Montana and my early adult years in Germany, and Savannah GA. Now I am living in the Midwest. With my husband's job, we move fairly frequently and we pick up favorite meals from where we have lived and traveled. My cooking style is very eclectic. I love to travel and having spent time living abroad, it has shaped the way that I cook. I love being able to create a meal that is more than food ~ I love that it can transport you somewhere else. I also tend to cook healthy meals for my family, HOWEVER, I believe that you can have just about anything in moderation and I love a good comfort meal.

Having two young children means that I want to provide healthy, delicious meals yet not spend all day in the kitchen. There are many days that I am rushed. I am going to share a family recipe that is based off of a California chicken stand. My parents have been making it since before I was born. Now I make it for my family. I have made changes to the recipe to speed it up. I use my pressure cooker. I use an electric instant pot, there are many electric pressure cookers to choose from. You can also simmer it on the stove for about an hour ~ that is the way my parents have made it.


Sedric Chicken
by Lindsay

4 boneless, skinless chicken breasts, approximately (2 pounds)
1/2 cup water
8 ounces salsa {I use Herdez}
1/2 cup BBQ sauce {I use Sticky Fingers}
Juice of 1 lemon
1 teaspoon Cholula
1 teaspoon salt

Add all ingredients to your pressure cooker. Place the lid on your pressure cooker and set timer for high pressure 13 minutes. Allow the pressure release naturally for 10 minutes. Check to make sure your chicken is cooked to 165°F. If it has not, return it to pressure for 2-3 minutes. Remove the chicken from the pressure cooker. Simmer and reduce the sauce for about 10 minutes. You can eat the chicken straight from the pressure cooker or you can grill it (my favorite) or place it under the broiler for a few minutes, basting it a few times as it cooks. Serve with remaining sauce.

Enjoy ~

Cajun Cabbage Rolls

The second dish from this fun challenge with Leafcutter Designs threw me for a loop!

The remaining Recipe Dice were eggplant, cabbage, green beans, mushrooms, and onions. My grandmother makes rice dressing using pork and eggplant. I have never done that before and when this came up I thought that I'd give it a shot! So, I took some of our Jalapeno Pork Sausage stuffing and cooked it with some eggplant, mushrooms, and onions just like a rice dressing. Here's what happened:

Cajun Cabbage Rolls
By Luke

1 head cabbage
2 Tablespoons olive oil
1 pound Jalapeno Pork Sausage stuffing
1 onion, chopped
1 eggplant, peeled and chopped
2 cups sliced mushrooms
1 can fire roasted tomatoes
1 pound fresh green beans (I used for a side dish)

Start by peeling the cabbage and dropping the leaves into a pot of boiling water to soften them, about 5 minutes. Remove them from the pot and dry with paper towels.

In a large skillet, warm oil and brown meat for 10 minutes, remove from skillet and place in a bowl. Now, brown onions, eggplant and mushrooms until eggplant is softened. Once cooked, remove from skillet, place in bowl and mix well.

Divide the stuffing into portions for about 8-10 rolls. Place stuffing in center of cabbage leaves and roll like a burrito. Use toothpicks to hold leaves together. Position cabbage rolls in a baking dish and top with tomatoes. Cover dish and place in oven at 350°F for 1 hour.

Once done, remove from oven and serve!

Monday, December 7, 2015

The Grapefruit Martini

We have been celebrating the holidays with our great friends for many years. Each year I bring the same thing. Not this year! When I received the Leafcutter Designs Cocktail Dice, I decided to “roll the dice” and see what cocktail I could bring to the party! At first I wasn’t sure how the ingredients would “play” together, but the end result was delightful! Everyone enjoyed the libation and I was thrilled! It isn’t everyday you get to roll the dice and have the perfect result!

The Grapefruit Martini
By Susan R-H

For Each Cocktail You Will Need:

4 ounces of freshly squeezed Ruby Red grapefruit. Your yield will vary on the juice of the grapefruit.
1 1/2 ounces good quality vodka (I chose Grey Goose)
1 1/2 ounces of orange Liquor (I chose Grand Marnier)
1 slice of orange peel

Fill a cocktail shaker with ice. Add all of the ingredients and give it a solid 1 minute shake! Strain into a chilled Martini glass and garnish with the orange peel. This was a very delightful cocktail! It is always an adventure when you “Roll the Dice”.

Thursday, December 3, 2015

Fresh Spring Rolls with Vegetables and Paprika-Pepper Vinaigrette

I decided to try the vegetarian Recipe Dice from Leafcutter Designs because I love vegetables, and have no problem eating a veggie-centric meal, unlike my husband who is a carnivore at heart. These dice were so fun! When you’re tired of making the same old thing, they give your creativity a boost.

For this recipe, it’s probably easiest to do most of the steps a day ahead of time. That will let the mushrooms soak up a good amount of vinaigrette, and will leave just the assembly of the rolls, which should be done shortly before you plan to serve them. Keep the assembled rolls on top of and covered with damp paper towels then cover that in plastic wrap to keep them from drying out and/or sticking to each other.

The amount of each ingredient needed will depend somewhat on how much of each you put in your spring rolls. The amounts I’ve given are estimates. Mix up anything that’s left over in a bowl with some vinaigrette and you’ve got a great little salad! You’ll also likely have some paprika oil left over, but once you try it you’ll be glad you have extra!

Fresh Spring Rolls with Vegetables and Paprika-Pepper Vinaigrette
by Jennifer Scantlin

For the paprika oil:
1/2 cup extra-virgin olive oil
2 Tablespoons ground paprika

For the vinaigrette:
3 Tablespoons paprika oil (from above)
1 Tablespoon plus 1 teaspoon sherry vinegar
1 small clove garlic, minced or put through a garlic press
1/2 teaspoon salt
1/4 teaspoon freshly ground black pepper
1 teaspoon lemon juice

For the couscous:
1/2 cup Israeli couscous
1/2 Tablespoon olive oil
1/4 teaspoon salt
3/4 cup water

For the marinated mushrooms:
1 Tablespoon vegetable oil
8 ounces mushrooms, thinly sliced
1/4 teaspoon salt

To assemble the Spring Rolls:
Prepared Israeli couscous
Prepared vinaigrette
Marinated mushrooms
1/2 zucchini or yellow squash, julienned
2-3 leaves Swiss chard, sliced into thin strips
8 dried spring roll wrappers (they look like very thin and hard tortillas)

Make the paprika oil: Combine the oil and paprika in a small saucepan over medium-low heat. Heat, stirring occasionally, until warm, about 5 minutes. Turn off heat and let sit until cool, about one hour. Strain mixture into a bowl or glass through a coffee filter or several layers of cheesecloth.

Make the vinaigrette: Combine all ingredients in a small bowl or jar with lid and whisk or shake well.

Make the couscous: Heat the oil in a small saucepan over medium heat. Add the couscous and stir continuously until lightly browned, about 5 minutes. Add the water and salt and bring to a boil. Cover pan with lid and turn heat to low. Cook until couscous is tender, 8-10 minutes. Remove pan from heat, place couscous in a bowl and add a tablespoon of the vinaigrette. Stir to combine and let cool.

Cook mushrooms: Heat oil in a sauté pan over medium high heat. Add mushrooms and cook until beginning to brown, about 3 minutes. Add salt and stir to combine. Place mushrooms in a bowl with the remaining vinaigrette and stir to coat. Let sit at room temperature at least an hour, or place in refrigerator overnight.

Assemble the rolls: Have a large, smooth work surface to assemble rolls on. Place some warm water into a large pie plate. Place a spring roll wrapper into the pie plate and submerge in the water with your hands. You will feel the wrapper getting soft. When the entire wrapper is soft, place it flat on your work surface. Place the fillings in the middle of the wrapper and fold the wrapper in half over the filling. Fold in the sides and continue to roll up. Place on a plate lined with damp paper towels and cover with more damp paper towels then plastic wrap. Don’t let the rolls touch one another or they may stick together. Continue with remaining wrappers until all ingredients have been used. Enjoy!

Meet our newest cook, T.S. Lamb!

Hiya, I’m T.S. Lamb (or Tiffany). I’m Michigan born and bred, though I did live in Ireland for 1 year. I’m 42 and married for 15 years. I get to share my house with my awesome husband, Geoff (he’s my co-chef and the more experimental cook. He is still trying to teach me the correct way to mince veggies). We have two kids, Sloan, who is 10 and Evelyn, who is 6 (both budding chefs), and 3 cats (who aren’t). When not cooking I’m an artist, illustrating children’s books and creating anything from pinups to wedding invitations and sort of running a business called Epiphanies. I have been known to ruin food by forgetting about its cooking while doing artwork (Crockpot recipes suffer an inordinate amount from this).

I love most anything outdoors and our family does a lot of bicycling, kayaking, hiking, cross-country skiing, and picnicking. So I’ve developed a love of portable foods. I grew up on what is normally termed “midwest” cooking, not known for bold flavors. I think my first really remembered story about cooking was watching my dad try to make rolls for an anniversary dinner with my mom. He made lobster and other stuff (it didn’t matter to my brothers and I - we just remembered the rolls). He misunderstood the roll recipe where it said “roll to 1/2" thick and cut”. Well he rolled the dough out like a kid rolls a snake of playdough and cut 1/2” thick slices. I swear there were thousands of little rolls all over the kitchen. I remember he ran out of space and looked really panicked. My mom still says it was the best anniversary dinner because of that.

I sometimes experiment with Irish foods, but I LOVE our 4 seasons in Michigan and all the different types of foods that go with them. I never really consider myself a cook, I suppose I consider Geoff the cook and I am more the baker. A lot of our food experimentation is because my hubby likes bolder flavors and partially because we started having dinner parties. 

I love dinner parties! and food parties! It's a great way to experiment with food and have a good exchange of ideas and discussions of flavors, textures, recipes, etc. (I’ve become enamored with the texture of foods in the last year or two). I’ve even gotten my slightly introverted hubby interested in them. To date, the Murder Mystery Dinner has been the best (all dishes influenced by Murder Mystery books) and the Sensuous Food Party as the lamest (its just a hard concept to describe to people...and we probably need to try with different folks).

The recipe below is one my hubby came up with for a brunch with my friend, Maurita. Fun and easy recipe and even the kids loved it.

Geoff here. As I no longer have a sense of smell, much of my cooking is affected by equal parts taste memory and texture. Many of my dishes are steeped in childhood memories of sitting at my grandparents' kitchen. One of my favorite snacks growing up was Welsh Rabbit. I recently "punched it up" to serve as a main dish for a Sunday Brunch, thus was born Eggs Rarebit. 

Eggs Rarebit
by T.S. Lamb and her husband Geoff

The Base:
1 Tablespoon unsalted butter (for toasting)
16 thick slices of good toasting bread (I prefer sourdough or rye)
2 teaspoons white vinegar (for poaching)
8 eggs
Hummus
8 slices of deli ham (big enough to almost cover the bread)

The Topping:
1 teaspoon of prepared horseradish (or mustard powder)
1 Tablespoon of Worcestershire sauce
2 bottles (12 ounces each) of Stout
3 cups of shredded Cheddar (I prefer a mix of mild and sharp)

On a griddle or in a heavy pan, melt 1 Tablespoon butter and toast the bread slices on both sides. Using a 2-inch circular cookie cutter, cut a hole in the center of eight of the toast slices. Set the toast aside and feed the toast circles to ducks or nearby children.

Add water to a 12-inch skillet until it is 1-inch deep. Add the vinegar and simmer over medium heat. poach the eggs two to four at a time (whatever you're comfortable with) for five minutes per batch (seven to eight minutes will yield a firm yolk, if that's what you prefer). Remove with slotted spoon to a bowl with warm water until assembly time.

Move your oven rack to the middle and preheat your broiler for the highest setting.

In a 2-quart saucepan, mix the horseradish, Worcestershire sauce, and one bottle of stout. Reserve 1/4 cup of the second bottle and drink the rest. Simmer the mixture until it reduces by half. Slowly stir in the cheddar cheese until it is all melted and the mixture is slightly thicker than sour cream. Thin out with the reserved stout as needed. Once the mixture is perfect, drink the remaining stout.

Once the cheese is ready, it is time for assembly.

On a half-sheet pan, place six to eight of the uncut toast slices. Spread each slice with a thin layer of hummus and add a slice of ham. Top these with the cut toast slices. Within the cut-out section, place a poached egg. Top each "sandwich" with enough of the cheese mixture that it spreads slightly over the sides (I find that a spatula works great here).

Place on the center rack for 10 minutes. The cheese will be bubbly and begin to brown into a delicious crust.

Serve immediately. Yields 8 servings (less if you're very hungry).

Wednesday, December 2, 2015

Meet our newest cook, Glenn!

My name is Glenn, and I live with my wonderful bride and Houston, Texas native, Iloe (pronounced eye-low) in Huntsville, Texas (on the fringe of the Piney Woods of East Texas). I have a few passions in life - my bride of 16+ years, the NFL, my vocation (I'm a radio personality), and cooking!

I grew up around food and cooking - as a young child, my mother was a waitress at a traditional Jewish deli. I spent every afternoon there, watching the cooks in the kitchen and learning, and that was my cooking education. As for my style of cooking, I'm real big on comfort foods, e.g. matzo ball soup, hamburger stew, tortilla soup, etc. At the same time, I'm real big on preparing snack-type foods for NFL game day.

I am so excited to be part of the 37 Cooks family. With that said, this is a milestone for me personally. In May, 2015, I was diagnosed with Multiple Sclerosis - and at first I thought I'd never be able to hold my Chef's knife, let alone cook meals, any longer. I'll be battling this disease the rest of my life as there is no cure, but I've found ways to work around this in the kitchen with the help of my dear bride.

There are only Iloe and I - we have no children together, and for the bulk of our marriage I've done most of the cooking, primarily due to the fact I used to get home from work early every day, so it gave me the time to prepare great meals just about every day.

Here's my recipe for baked Honey Mustard Chicken Wings - it's simple, easy, and so enjoyable.


Honey Mustard Chicken Wings
by Glenn

20-24 drumette/wingette pieces
1+ Tablespoon kosher salt
1+ Tablespoon cracked black pepper
3 Tablespoons prepared mustard
3 Tablespoons honey
1 generous Tablespoon prepared horseradish sauce


Place wings on sheet pan with wire grate (spray both sides of grate with PAM or similar cooking spray). Salt and pepper the wings, and cook in a preheated oven at 425°F for a total cook time of 90 minutes. Turn the wings over at 35 minutes and go another 35 minutes. While the wings are in the oven, prepare the honey mustard sauce by combining the mustard, honey and horseradish. Then baste the wings on one side and give it another 10 minutes in the oven. Turn the wings and baste again and give it another 10 minutes. You can always adjust the honey mustard sauce to your individual tastes. The horseradish sauce (I prefer Woebers brand) gives the wings a nice little bite on the back side of every bite.

Enjoy!

Ti' Punch


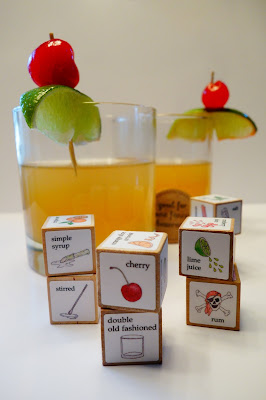
This challenge led us to taking our chances and rolling some dice...Cocktail Dice! What a fun idea from Leafcutter Designs!

Each year, my husband and I host a Bottle Exchange party. It's similar to a White Elephant, but with wrapped bottles of wine and spirits. We typically have a signature drink for the party, however, this year we will be changing it up thanks to Leafcutter Designs. Ingredients will be available and a roll of the Cocktail Dice will determine each individual's drink. I love adding this twist to an already amusing evening.

For this drink, my husband and I each took half of the dice and gave them a roll. We ended up with a roll that was perfect to make an islander drink from Martinique called the Ti' Punch, meaning little punch. It's a very simple drink, but it packs a flavorful punch.

This recipe calls for simple syrup, which is very easy to make. I recommend using an unrefined pure cane sugar to make a darker syrup. Trust me, the taste is so much better.

Ti' Punch
By Tonda

Juice of one lime
2 ounces dark rum, we used Neisson Rhum Agricole
1 ounce pure cane simple syrup (start with 1/2 ounce and add more if you need the sweetness) (recipe below)
Maraschino Cherry to garnish
Ice

Simple Syrup

1 Cup water
1 Cup unrefined, pure cane sugar

Add water and sugar to a small saucepan and bring to a boil, stirring until the sugar crystals dissolve. Remove from heat and allow to cool. *This will keep in your refrigerator for about a week.

Squeeze the lime into a double old fashioned glass. Add rum, simple syrup, and a couple of cubes of ice. Stir to combine. Garnish with a lime wedge and maraschino cherry.

Tchin-tchin!

Tuesday, December 1, 2015

Meet our newest cook, Doug!

I'm Doug and I live to eat!

Driven by a sense of curiosity, adventure and possibly a few pages from Anthony Bourdain's M.O., the enjoyment of good food is a very key part of my lifestyle. (The other key part, obstacle racing!) I enjoy the process of making food just as much as sharing the discoveries with friends and family over a glass of wine or craft beer. My cooking style typically rotates between Chinese, Japanese, Italian and French cuisine, depending on my mood. As long as there's an interesting technique or ingredient to try out, I'm more than happy to test it out in the kitchen. My favourite kind of meals involve comfort food. Every food culture has a number of dishes that nourish the soul and cure the mind.

Lately, I've taken more science-based approaches to food inspired by the Modernist Cuisine and The Food Lab cookbooks. From using sous vide to break down short ribs to using baking powder to break down skin proteins on a chicken, I'm hoping to merge new discoveries with traditional techniques to make even better tasting creations.

Ragu Bolognese is a dish that I have tried to master even before I took cooking seriously. I fell in love with this dish when I tried it at a restaurant in Hong Kong many years ago. Although that version was more like baked spaghetti with meat sauce and cheese, it was full of umami and the flavours were so comforting. The recipe I use to make bolognese has changed over my cooking career, and has been inspired by a variety of recipes (rather than a specific one). It is still one of my favourites since the beginning.


Ragu Bolognese
by Douglas

Olive oil
Garlic (chopped)
1/2 medium onion, diced
2 stalks celery, diced
1 small carrot, diced
Fresh parsley, diced
Dried sage
125g pancetta
1/2 pound ground pork
1/2 pound ground beef
1 cup red wine
1 can whole tomatoes
1 cup beef stock
1 cup milk/cream
Few dashes fish sauce
Parmesan

Place a medium pot (5 Liters) on the stovetop and set to medium heat. After a few minutes, add a few glugs of olive oil to the pot and throw on the garlic. Stir until fragrant. Toss in the onions and continue to stir until the onions are soft (about 5-10 minutes). Add the diced celery, carrots, 1/2 of the diced parsley and dried sage. Continue to stir for about 10-15 minutes, or until all the vegetables have softened. Remove vegetables from the pot and then add a few glugs olive oil. When the oil has warmed up, add the pancetta and stir until the fat has been rendered. Remove pancetta with a slotted spoon and then add the ground pork and beef. Break up the ground meat until browned completely. Add the wine to deglaze and scrape off the bits at the bottom. Re-add the pancetta, and vegetables back to the pot as well as the can of whole tomatoes. Next, add the beef stock and 1/2 of the cream. Reduce the heat to medium-low and let the sauce slowly simmer for 60 minutes. After the sauce has reduced, add the fish sauce, the remaining parsley & cream and shave some Parmesan into the sauce to finish.

For plating:

Cook your favourite pasta (penne, rigatoni or tagliatelle work best here) until it's just shy of al dente.

 In a separate pan on medium heat, add about 1-2 ladles of the ragu and a ladle of the pasta water. When the ragu is bubbling in the pan, add the pasta and mix until the sauce coats the pasta. Bring the pasta to a plate and then sprinkle some chopped parsley and shaved Parmesan.

 Bon appetit!

Artichoke with Brussels Sprouts and Parmesan, Sauteéd Kale and Couscous with Carrot

My first roll with the Leafcutter Designs Vegetarian Recipe Dice got me kale, carrots, tomatoes, parsley, couscous, lime, Parmesan, onion, garlic, artichoke, and Brussels sprouts. I used these ingredients to create 3 elements of an entrée.

Artichoke with Brussels Sprouts and Parmesan
by Louise

1 large artichoke
1 rounded cup Brussels sprouts
1/3 cup sliced red onion
3 cloves fresh garlic, smashed and chopped
Kosher salt
Freshly ground black pepper
2 Tablespoons white wine
2 Tablespoons seasoned bread crumbs
1/2 cup shredded Parmesan cheese

Set up a bowl with ice water. Trim and stem artichoke. Using a scissor, trim the tops off the lower leaves of the artichoke. Slice off the top quarter of the choke. Using a tablespoon, scoop out the inner purple leaves of the artichoke and the fuzzy “choke". Boil in salted water approximately 40 minutes until a knife goes through the bottom with slight resistance. Plunge into ice water to stop the cooking process. Place upside down on a rack to drain. Prepare the filling.

Peel leaves off Brussels. Quarter the innermost core of the sprout. Heat oil in a sauté pan over medium/high heat and add Brussels, onions and garlic; sprinkle with salt and freshly ground pepper. Cook about 5-7 minutes, stirring occasionally. Deglaze pan with wine. Stir in bread crumbs and Parmesan cheese. Fill cavity of artichoke with 1/3 to ½ of filling. Spread leaves and stuff with remaining filling. Place artichoke in a small deep baking dish and add enough water to go ¼ way up the artichoke. Bake in 350°F oven for 30 minutes or until a knife inserted into the artichoke gives little to no resistance.

Sauteéd Kale

2 teaspoons olive oil
2 cloves garlic, smashed
4 cups washed kale, cut into bite sized pieces
Big pinch salt
Freshly ground pepper
Heat olive oil in a sauté pan over medium heat, add garlic, stir and cook until garlic is fragrant. Immediately add washed kale, salt and pepper and toss until coated. Cook 5-7 minutes until crisp-tender. Set aside.

Couscous with Carrot
1 1/4 cups water
Big pinch salt
1 cup Israeli couscous
1 large carrot, peeled and cut into small dice
1 Tablespoon lime juice

Bring the water to a boil with the salt. Add the couscous and carrot and lower heat to a simmer. Cook 20 minutes covered. Stir in lime juice. Taste and adjust seasoning if needed. Set aside.