Showing posts with label Matt. Show all posts

Thursday, January 19, 2017

Guava Pastries

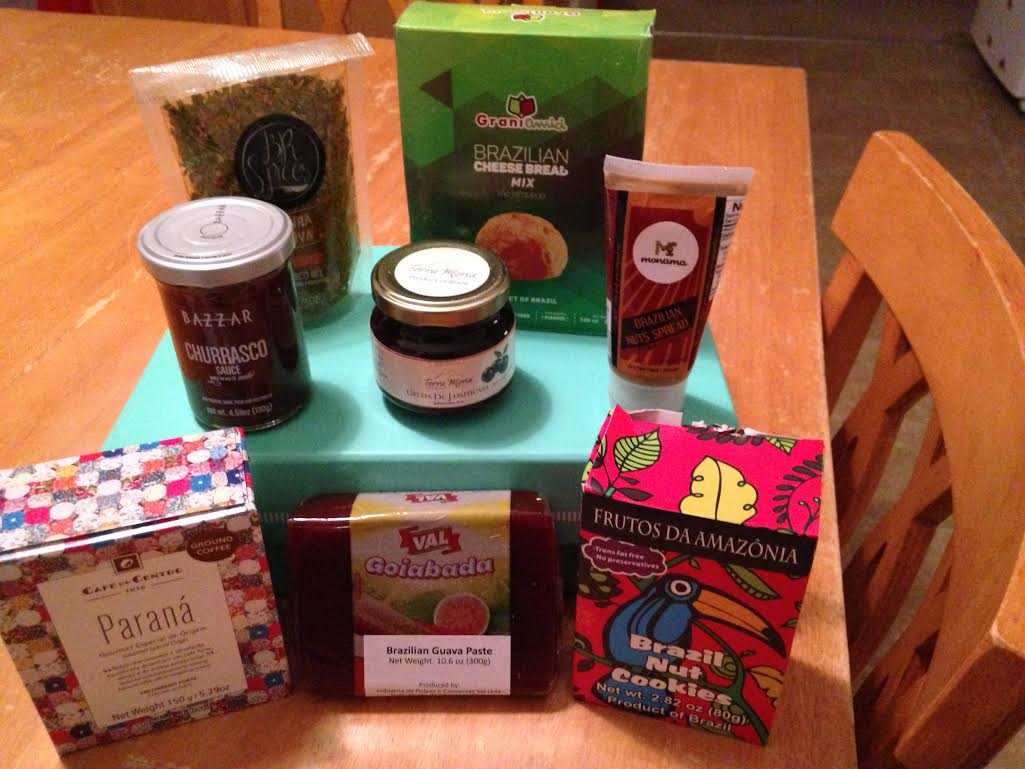
A while back, I was lucky enough to be chosen to receive a box from a company called Try the World. They send out monthly subscription boxes, with different products from around the world.

My box contained some really great stuff from Brazil and as soon as I saw the guava paste, I knew I was gonna make guava/cream cheese turnovers. The recipe follows, and the turnovers were delicious!

Guava Pastries
by Matt the Butcher

1 package Guava paste
1 box frozen puff pastry dough
1 8 ounces package cream cheese

Preheat oven to 425°F.

Follow package directions for rolling out puff pastry, and cut each sheet into 4 squares. Cut cream cheese and guava paste into 8 pieces each. Lay one piece of cream cheese and guava on a square of dough and sprinkle with a little sugar. Fold and seal the dough and place pastries on a sheet of parchment paper on a sheet pan. Bake for 20-25 minutes till golden brown.

Tuesday, August 16, 2016

Smoking a Fatty

I've tried many, many different brands of BBQ sauce, and I've never thought that any one in particular stood out from all the others, until I tried Jay D's Louisiana BBQ Sauce. This is really good stuff we're talkin' about here! When Jay Ducote was kind enough to send us at 37 Cooks some samples, I was ready!

Everyone that knows me knows that I love to barbeque. I knew that I was gonna use Jay D's sauce on something on the grill or in the smoker.

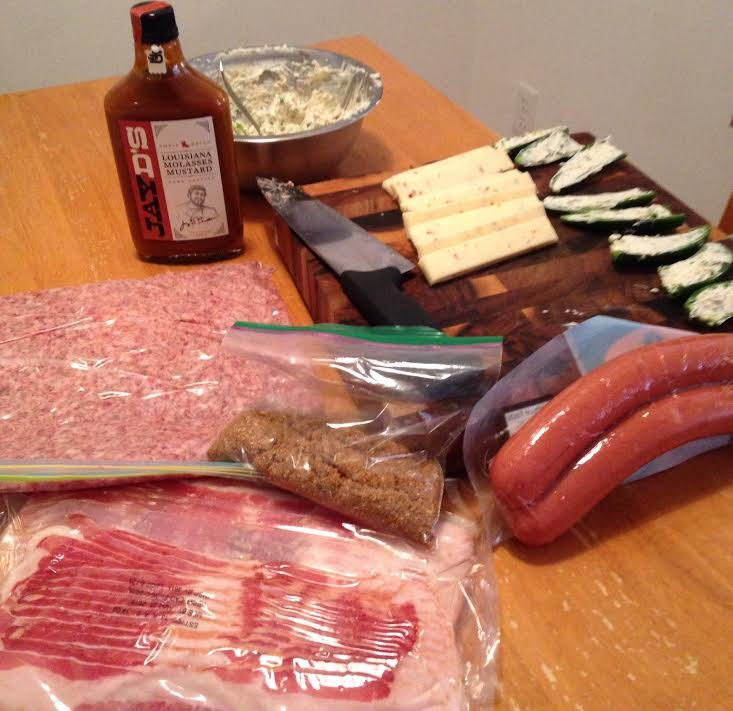
I couldn't do plain BBQ chicken, that was too easy and kind of an everyday thing, if you catch my drift, so I decided to go all out and smoke a Fatty. Now before you call the cops, this isn't what ya might think. This is a smokey, cheesy, meaty, fatty, saucy, thing of beauty. There's plenty of how-to videos on YouTube for this. It's not something I would make for a dinner or on a regular basis, but it's a fun thing to do for when you have a get-together. A little goes a long way and if you do this properly, you'll forever be known as a Smokin' Badass!

Smoking a Fatty
by Matt the Butcher

1/2 cup dark brown sugar
1/2 cup Cajun seasoning
16 slices bacon
1 pound roll bulk breakfast sausage
16 ounces cream cheese, room temperature
1 bunch scallions, green and white part, chopped
1 large link smoked sausage
1 package pepper jack cheese sticks
4 jalapeno peppers, sliced in half longways, ribs and seeds removed
1 cup Jay D's Louisiana Barbecue Sauce

Mix the dark brown sugar in a small bowl with the Cajun seasoning. This will be your rub. Set aside.

Lay 8 slices of bacon side-by-side on a sheet of parchment paper and use the other 8 slices to make a bacon weave. I had to look up on YouTube how to weave it and its pretty easy. Set aside the bacon weave.

Put the breakfast sausage in a gallon lock-top plastic bag, close the bag and, using your fingers, press the sausage flat until it completely covers the bag. Set aside.

Mix the cream cheese with the scallions, and a few tablespoons of the rub. Using a teaspoon, stuff the pepper halves with some of the cream cheese mixture. Set aside.

Carefully, cut open the bag with the flattened breakfast sausage in it, and lay the sausage on a sheet of parchment paper and spread half the cream cheese mixture down the middle third of the sausage. Lay the smoked sausage link onto the cream cheese, and top with the remaining cream cheese. Lay 3 pepper halves longways along the bottom edge of the cream cheese, then a few strips of the pepper jack cheese, then another 3 pepper halves, then a few more strips of the cheese, until you use all the peppers, and all the cheese strips. then sprinkle half the rub all over the sausage log.

Now, holding both ends of the parchment paper, fold the edges of the sausage over the cream cheese and using your hands, seal all the sausage around the cream cheese and lay the roll on the bacon weave. Baste with the Jay D's BBQ sauce, and roll the bacon around the sausage, trying to get the ends of the bacon on the bottom, just 'cause it looks better like that! Tuck in any stray ends of bacon, baste with more BBQ sauce, and sprinkle the rest of the rub all over it.

Place the Fatty in a disposable pan, and smoke it at 225°F for about 3 hours, or till it's 160°F in the center. Let cool, slice it and be prepared to impress all your meat eating friends!

Friday, August 12, 2016

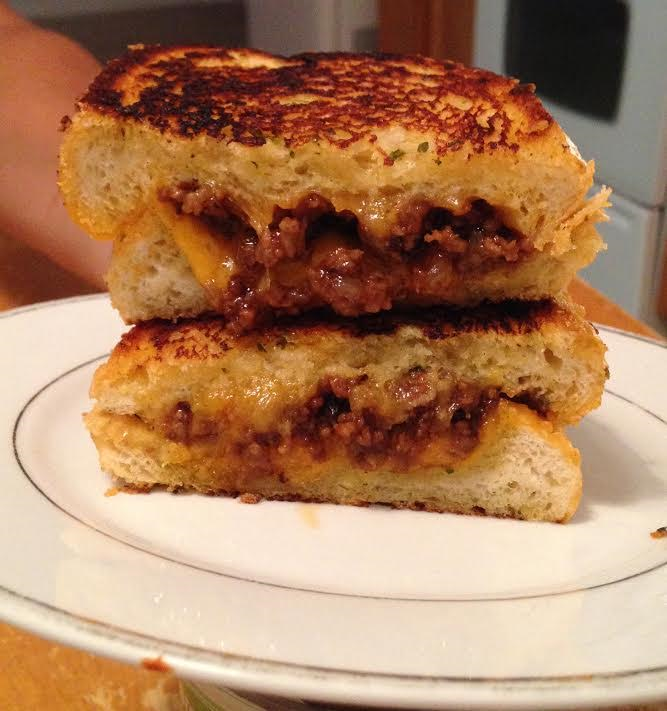
Jay D's BBQ Sloppy Joe Grilled Cheese

 
As a member of 37 Cooks, we get sponsors sending us some of their products to try. When I heard that Jay Ducote was gonna send us two varieties of his own BBQ sauce to try, I thought to myself that with the hundreds of BBQ sauces already on the grocery store shelf, this guy must have a set of brass cojones to even attempt another BBQ sauce. When I got the sauces in the mail, and opened them, I was very pleasantly surprised. These sauces were delicious, and different! I could practically drink them straight from the bottle!!

Jay D's BBQ Sloppy Joe Grilled Cheese
by Matt the Butcher
Adapted from 5 Boys Baker's Sloppy Grilled Cheese Sandwiches

1 pound ground beef
1 medium onion, fine dice
1/2 cup Jay D's Louisiana Molasses Mustard
6 slices Texas toast, or any thick-sliced bread
1/2 cup mayo
2 cups shredded sharp cheddar cheese

Whenever I make Sloppy Joes at home, I never use the canned sloppy joe sauce, subbing out BBQ sauce instead. Here goes...brown the ground beef, along with the onion, in a skillet. Drain grease, if needed. Add the BBQ sauce and cook until its really, really thick. Try not to eat it all, save some for the sandwiches! To assemble the sandwiches, preheat a skillet on medium heat, butter one side of all the bread slices. Lay the bread in the pan, buttered side down, add some cheese, spread some of the meat mixture on top of the cheese and add more cheese on top. Lay another slice of the bread on top of the cheese, butter side up. Cook until the bottom of the bread is golden brown, then carefully flip it over and cook the other side. Plate, and enjoy! Keep some of Jay D's Louisiana Molasses Mustard on the side for dipping!

Thursday, July 28, 2016

Try the World - Churrasco BBQ Pork

Hi readers! Here is our third and final Try the World review and recipe! Today we bring you Matt the Butcher's amazing Churrasco BBQ Pork!

*******************************************************************************


As a member of 37 Cooks, I was one of the lucky three that received a Try the World box to review and, of course, to cook with! I got a Brazil box and was pretty impressed. It was packaged well and contained eight different items. Churrasco dry spice mix, Brazilian coffee, a jar of churrasco sweet bbq sauce, a jar of jam made from a blackberry that is found only in Brazil, a tube of nut butter made from Brazil nuts and cashews, a box of cheese bread mix, a packet of shortbread cookies with chopped Brazil nuts in them, and a block of Brazilian guava paste. These were not simply little sample packs. The coffee, for instance, was a little over 5 ounces, more than enough for a couple of pots of coffee. 

Also included in the box was a Culture Guide, which I thought was pretty cool. It's about the size of a greeting card, and opens five times. It tells you all about the products in the box, with ideas on how to use them. On the reverse side, there's a menu using the products.  

Here's a recipe that I made with the dry Churrasco spice mix. As soon as I saw the Churrasco spice package, I knew I was gonna make something on the BBQ. I just got a new grill and was dying to try it out, along with the rotisserie attachment! Here goes....

Churrasco BBQ Pork
by Matt the Butcher

1 packet Churrasco Spice Mix
1/4 to 1/3 cup olive oil
3 to 4-pound Boston butt, tied with cotton twine (The only reason it needs to be tied is if it's going on a rotisserie. I say cotton, because if ya use polyester twine, it'll melt and that would totally suck.)

Combine the spice mix with just enough olive oil to make a very thick paste. Rub it all over the meat,
really working it in, and use all the rub. Wrap the meat tightly in plastic wrap and refrigerate overnight. I cooked mine for about 5 hours, using indirect heat on my BBQ. You can either BBQ it, or roast it in the oven. 

To roast it in the oven, place the meat in a baking dish and bake at 275°F for 4 or 5 hours, until the internal temp is about 185°F. Tent with foil if it looks like its burning before it's done. 

Low and slow is the key to a nice, tender Boston butt. I like mine almost falling apart. I couldn't use a probe thermometer on mine, as it was going round and round on a rotisserie, so after about 3 1/2 hours, I started poking it with a pointy knife, to see if it was done. When the knife slid in with hardly any resistance, that baby was done! And it was absolutely delicious!

Wednesday, June 22, 2016

Not your Mother's Collard Greens

When the folks at Jada Chicken Salt offered us samples of their different flavors, I couldn't wait to use them. Unfortunately, I had no idea of what I was going to make, until I saw some nice collard greens at the produce stand. I knew the Chicken Salt would work great in my greens! And speaking of greens, I worked with a young man that claimed his Granny made the best collard greens in the world. I told him that mine were better than his Granny's, and I'd make him some to compare, but that he had to be honest and tell me who had the best greens. I brought some to work one day, heated them up and let him try them. He opened the container, poked around in it with his fork, smelled it, then ate a big forkful. The big grin on his face told me whose greens were the best! And now, they're even better with the addition of Chicken Salt!

Not your Mother's Collard Greens
by Matt the Butcher

4 cups chicken broth
1 bunch collard greens, washed, tough stems removed
20 cloves peeled garlic (that's right, 20!!)
1 medium onion, sliced
8 ounces Teet's Smoked Pure Pork Sausage, sliced
2 Tablespoons Barbeque Chicken Salt
1 teaspoon Red Pepper Chicken Salt

Chop greens, add to a large pot with all the other ingredients and bring to a high simmer. Cook until greens are tender, about 90 minutes.

Wednesday, June 8, 2016

Chicken Salt Grilled Cheese

The fine folks at Jada Chicken Salt were kind enough to send all of us at 37 Cooks a generous sampling of all their Chicken Salt flavors to use and come up with some original recipes. When I signed up for this particular challenge, I had no idea what I was gonna make. At lunchtime one day, I came up with an inspiration! I was planning on making a grilled cheese sandwich and thought I'd try the Chicken Salt on it! Now, most grilled cheese sandwiches are made using butter on the outside of the bread. But, I've been using mayo instead and I thought, why not use Sriracha mayo along with the Chicken Salt? Here's what I ended up with!

Chicken Salt Grilled Cheese
by Matt the Butcher

2 slices plain white bread
2 slices deli-style American cheese
1 teaspoon Low Sodium Chicken Salt
1/2 teaspoon Barbeque Chicken Salt
2 or 3 teaspoons Sriracha mayo


Preheat a small cast iron skillet over medium heat until drops of water sizzle when sprinkled in it. While the pan is heating, lay out the 2 slices of bread. Sprinkle the Chicken Salts on the bread slices and spread the Sriracha mayo over the Chicken Salt. Lay one slice of bread in the hot pan, mayo side down. Next, lay the 2 slices of cheese on the bread and top with the other slice of bread, mayo side up. Cook until nicely browned, then flip and cook the other side and there ya go! The best grilled cheese ever!!

Friday, March 25, 2016

Sweet and Savory Stuffed Chicken Thighs

When I heard that 37 Cooks was being sponsored by General Mills, I was really excited! I mean, come on, General Mills? That's the big time, folks! Their challenge was to come up with a recipe or two, using the cereals that General Mills to sent us. I really had to think this out. I wanted something a little different, as well as delicious! Most of the time when I make stuffing, I love to add some fruit to it, either apples or raisins, as well as a little spice. I decided on Sweet and Savory Stuffed Chicken Thighs, using Trix cereal mixed in with stuffing and it worked out great!

Sweet and Savory Stuffed Chicken Thighs
by Matt the Butcher

1 medium onion, chopped
1 Tablespoon butter or bacon grease
2 cups chicken stock or water
4 Tablespoons butter or margarine
1 teaspoon red pepper flakes
1 box chicken stuffing mix
2 cups Trix cereal, very coarsely crushed
6 boneless, skinless chicken thighs
3 slices bacon, cut in half
Toothpicks or skewers

Preheat the oven to 375°F. Saute the onion in one Tablespoon butter or bacon grease. Bring to a boil the chicken stock and 4 Tablespoons butter, add the sauteed onion, the red pepper flakes, stuffing mix, and the Trix. Stir well to combine, take off the heat, and set aside, to cool. You want the stuffing to be fairly dry, so keep the lid offa the pot.

While the stuffing is cooling, lay each boneless chicken thigh on a cutting board and either pound them a little thinner, or fillet them open with a sharp knife. When stuffing is cool, place a heaping Tablespoon or two, depending on the size of the chicken thighs, on one end of each thigh. Fold the other side of the thigh over the stuffing and secure with toothpicks or skewers. Warning!! This is not the time to be all OCD. This stuffing will be all over the place, so don't try to make nice and neat little bundles. That's gonna be way too much work. 

Place the stuffed thighs in a baking pan, leaving enough room to put the extra stuffing around the chicken bundles. Lay the bacon strips on top of the thighs, tucking the ends under. Cover and bake for 20 minutes, then turn oven up to 425°F, uncover pan, and bake another 20 minutes until chicken is 160°F. If the bacon is not done enough for you, simply turn on the broiler, and broil till the bacon's done (I don't like really crispy bacon, so there was no need for me to do this). Serve with couscous, and garlicky green beans!

Friday, February 26, 2016

Stir-Fried Spiced Cabbage

I love spicy food, and when I saw this old cookbook, I had to have it! The following recipe makes a simple, tasty side dish, that goes with just about everything!

Stir-Fried Spiced Cabbage
by Matt
Adapted from The Hot and Spicy Cookbook by Moira Hodgson

1 pount Chinese cabbage
2 Tbs. sugar
2 Tbs. vinegar
1 Tbs. soy sauce
1/2 Tsp cayenne pepper
1 Tbs. vegetable oil
2 cloves garlic, minced
3 scallions chopped, including green part

Slice the cabbage fine. In a bowl, combine sugar, vinegar, soy sauce and cayenne. Heat the oil in a large skillet or a wok. Add garlic and scallions and stir fry for 2 minutes. Add the cabbage and stir fry for 2-3 minutes. Stir in vinegar mixture, heat through and remove from flame. Cool and serve at room temperature.

Notes: I use yellow onions instead of scallions, as I don't always have scallions in the fridge. Also, occasionally I'll chop up a few slices of bacon and sauté them before I sauté the onions.


Thursday, November 5, 2015

The Bus Stop

This is one of the hardest posts I've ever written. I'm dedicating this drink, which I made using the Cocktail Dice from Leafcutter Designs, to my dear friend and fellow 37 Cook member, Christy Hughes, who recently, suddenly, and totally unexpectedly passed away. Christy was from Texas and she loved jalapeno peppers, so I knew I had to incorporate a jalapeno in my recipe as a nod to her. Also, I think everyone that knows me expects something a little spicy in most of my recipes! I had tears running down my face as I was assembling the drink but, as Christy would expect, I held the drink up and toasted her. I love you, Christy.

Now, back to the dice challenge. The cocktail dice were a lot of fun, rollin', rollin' and rollin', trying to come up with different drinks. My oldest daughter is a bartender and she said if The Bus Stop came out good, she was gonna use it as a drink special in the restaurant where she works! Why call the drink The Bus Stop you ask? We have a really fun group on Facebook called Serious Eats Water Cooler. We travel all over the world in our imaginary bus to visit each other, cook, eat and drink and I think Christy would laugh at the name! If you make this drink, make a toast to my friend for me. Thanks.

The Bus Stop
by Matt the Butcher

1 scant teaspoon sugar
Fresh jalapeno pepper, sliced
1 ounce triple sec
1 ounce white rum
Ice
Ginger ale
Sweet pickled jalapeno slices for garnish

In a tall glass, muddle the sugar, 3 or 4 slices of fresh jalapeno pepper and 1 ounce of triple sec. Strain into a rocks glass, add three or four slices of fresh jalapeno according to how spicy you want your drink. Mine wasn't real spicy. Add the rum, ice, and a splash or 2 of ginger ale. I garnished mine with some sweet pickled jalapeno peppers that my dear friend, Brooke, sent to me. They're spicy, sweet, vinegary and really topped off this drink well!

Matt's daughter, Tanya and her boss. They featured The Bus Stop at their bar in Idaho. It was a huge success!

Tuesday, December 23, 2014

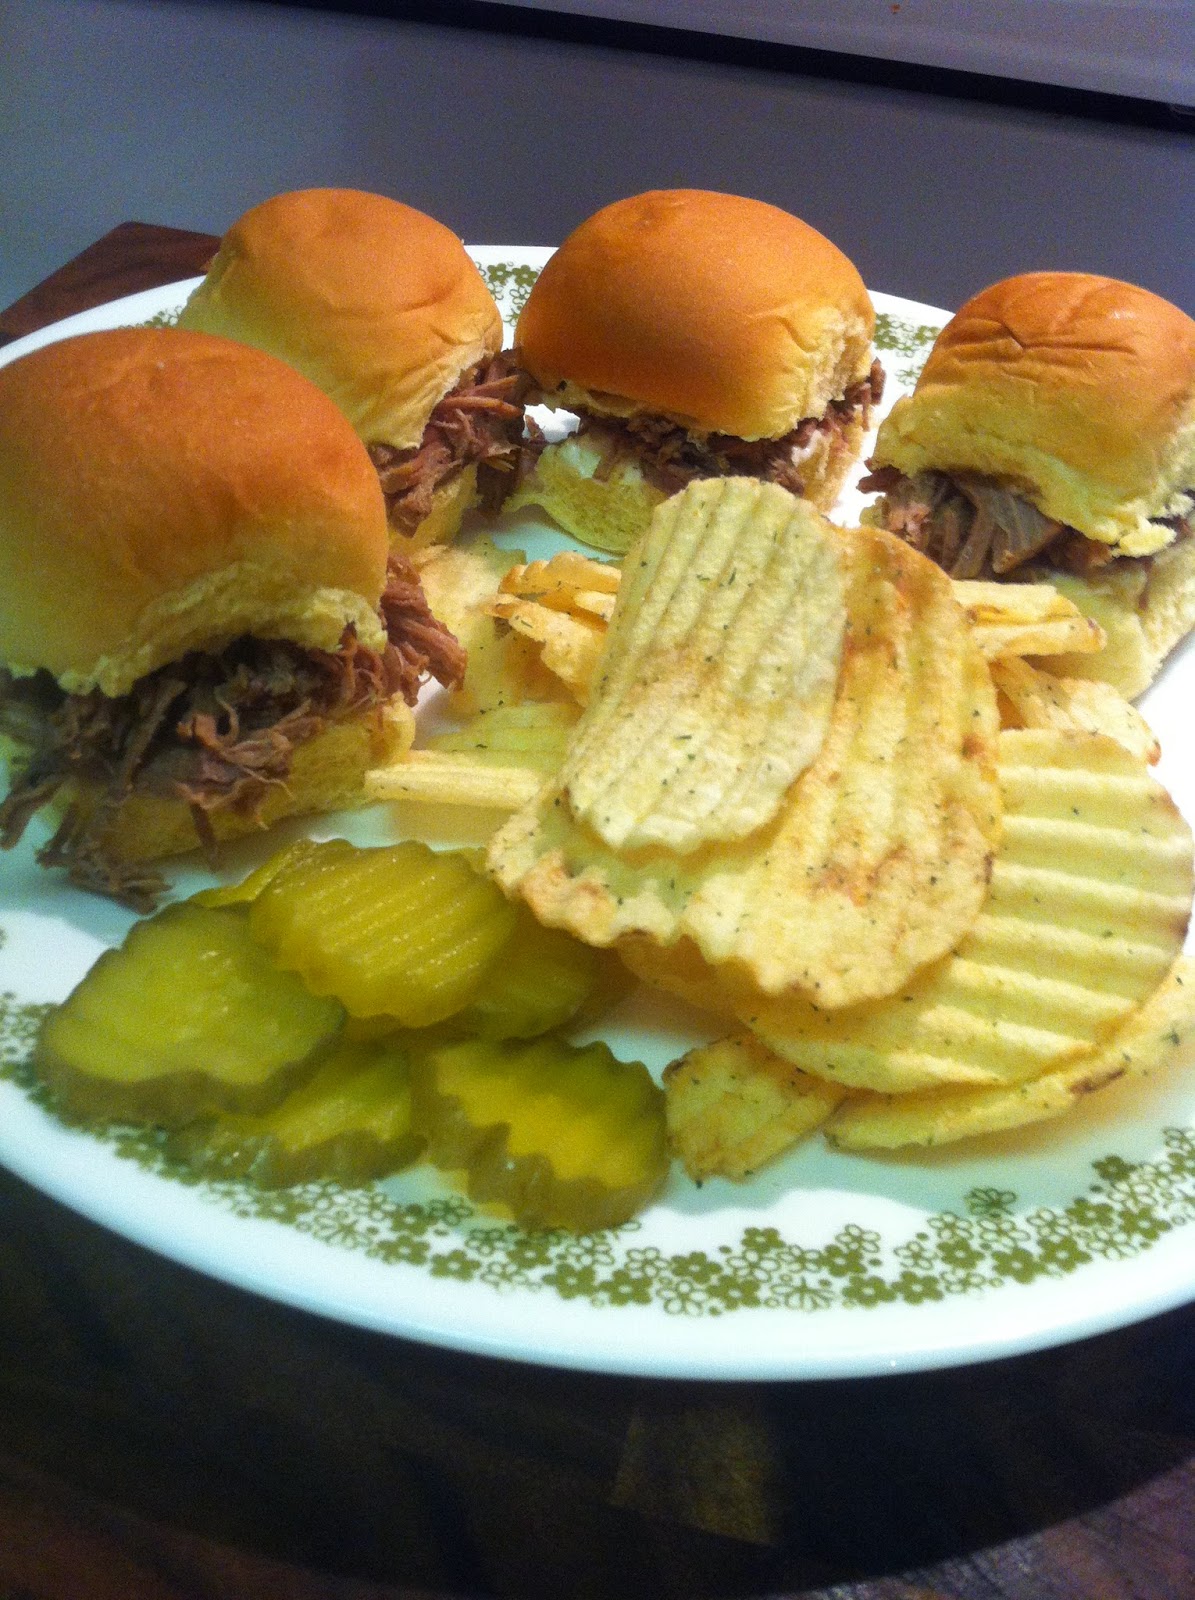
Shredded Beef Sliders

Our latest challenge for 37 Cooks is sponsored by Hamilton Beach. This was another awesome challenge for us, as the kind folks at Hamilton Beach sent each of us a Hamilton Beach Set & Forget 6 Quart Programmable Slow Cooker. When my slow cooker arrived and I opened it, my wife said I looked like a kid at Christmas! I don't get excited by a lot of things anymore, what with me being old, cynical and cranky, but lemmee tell ya, this is a badass slow cooker. The first thing that impressed me was the cooking probe! I've used probe thermometers before, usually when I'm smoking a pork butt, and I've never seen one on a slow cooker before! I also like the "Set & Forget" feature that you can use along with the probe. Set the slow cooker up, insert the probe, set it to cook for a certain amount of time and it automatically turns to the warm setting so your food don't overcook! Awesome feature. When we signed up for this challenge, the first thing I thought of was Italian beef sandwiches. I guess this is a very regional dish and, just like Philly Cheese Steaks, no two recipes are the same, so I decided just to wing it and see what happens! I made little sliders, but this recipe would be much better on a good crusty roll to soak up all the juices. Here we go...

Shredded Beef Sliders 
by Matt the Butcher

2 large onions, roughly chopped
3 to 4 pound boneless beef shoulder roast
4 cups beef broth or water
2 heads garlic, peeled
3 bay leaves
1 Tablespoon dried oregano
2 teaspoons Slap Ya Mama Cajun Seasoning
1 teaspoon black pepper
1 package onion soup mix
1 16-ounce jar of giardiniera
Some good crusty rolls or bread
Plenty of napkins. This stuff is delicious and very sloppy!

Put the onions in the slow cooker, lay the beef roast on top. Add the broth, garlic, bay leaves, oregano, Slap Ya Mama seasoning, black pepper and the dry onion soup mix. Cover and using the program mode, program the slow cooker to cook for 10 hours on the Low setting. After 10 hours, the cooker automatically sets itself to the Warm setting, which is awesome if you're not home when the food is done. Right before serving, remove the roast and the bay leaves, setting the roast aside to rest. Drain the giardiniera and put it into the slow cooker. Mix it into the gravy and let it sit. Taking 2 forks, shred all the meat and put it back into the gravy. Slice the rolls, break out the napkins and call everyone to the table. Using a slotted spoon, pick up a nice spoonful or two, placing it on a roll and dig in!

Made in the USA, with love, by Matt the Butcher

Cooks note: I'm a butcher by trade and whenever a customer asks me what the best cut of beef to use for a pot roast is, I always recommend a beef shoulder roast. You can pretty much use whatever cut of beef that you prefer, as you're gonna cook it till it shreds, but I like the shoulder roast. There's not as much fat in it as a chuck roast and I find that a bottom round or top round just doesn't have the flavor of a shoulder roast.

Friday, October 17, 2014

White Pizza

I like to make pizza at home, probably about once a month or so. I've tried different making style pizzas, and I've been very happy with the Detroit style pizza, but I'm never happy when trying to replicate a New York style pizza. I just can't seem to get the crust the way I remember it from when I lived in NY. Everyone that's tried my pizza says it's really, really good, but I'm never satisfied with the crust. That being said, the kind folks at Bob's Red Mill sent all of us at 37 Cooks a 5-pound bag of white flour and a 5-pound bag of whole wheat flour to use in our recipes. As soon as I got my flour, I knew I was gonna make some pizza. While the pies I made are not authentic New York pizza, they were absolutely perfect! The crust on all of them was as close to a NY pizza as I've ever had! I made a cheese pizza, a pepperoni pie and a white pizza. Here's the recipe for the white pizza.

White Pizza
by Matt

For the crust, which makes enough for three 12" pies:
1 1/2 Tablespoons honey
15 ounces warm water, about 110°F
2 teaspoons active dry yeast
15 ounces of Bob's Red Mill Organic Unbleached White Flour
7 ounces of Bob's Red Mill Organic Whole Wheat Flour
2 teaspoons salt
3 Tablespoons olive oil


Mix the honey with the warm water, then stir in the yeast, and let it sit for about 10 minutes. It should look all foamy, and smell nice and yeasty! Put the flour and salt in a mixer
bowl, put the bread hook on, add the water/yeast mixture to the flour and mix on medium low speed, adding the oil as it's mixing. Once everything is incorporated, let it knead for 8-10 minutes. I find that I need to add a few Tablespoons of flour as it's kneading. The dough needs to pull away from the sides of the bowl and be pretty smooth.

I usually make my dough 3 days before pizza night, portioning it out in three equal portions, then put each dough ball in a separate gallon-sized freezer bag, along with a Tablespoon or two of olive oil, and let 'em rest in the fridge. But for this pie, I made the dough in the morning, stored it in the fridge for about four hours and took it out about 2 hours before the actual pie making. When you're ready to make a pie, put a pizza stone in the oven, on the next to lowest rack, and preheat the oven at 500°F for 45 minutes.

For the topping:
2 heads (yes, you read it right...2 heads) of garlic, peeled and finely chopped
2 or 3 Tablespoons olive oil
1/3 cup of heavy cream
1 teaspoon salt
12 ounces whole milk mozzarella, shredded
8 ounces whole milk ricotta cheese, seasoned to taste with salt and pepper

Put the chopped garlic and the olive oil in a small saucepan over medium heat and let it cook until the garlic is very soft, stirring occasionally. Do not let the garlic get brown, as it will be bitter. Once the garlic is soft, add the heavy cream and the salt. Bring to a very low boil, then lower the heat to medium and let the mixture cook down a little for about 10 minutes, stirring occasionally. Take the mixture off the heat, taste and add salt if necessary and let it cool down a little while you're stretching the dough.

 Take a dough ball, lay it on a floured surface and spread it out, using enough flour to keep it from sticking. Once you're happy with it, slide the dough onto a pizza peel that's been sprinkled with some cornmeal and a little flour to keep the dough from sticking to the peel. Top the crust with the mozzarella cheese, then spread the garlic mixture evenly over the cheese with a spoon and then top with generous dollops of the seasoned ricotta cheese. Sprinkle on a little oregano, or even some red pepper flakes if you wish, then carefully slide the pizza offa the peel onto the stone and bake for 8 to 10 minutes, until the crust is nicely browned.

Thursday, June 5, 2014

New feature here at 37 Cooks!

Welcome to a new feature here on the 37 Cooks Blog! From time to time we plan to have a "guest blogger"! How cool is that? And while we love sharing our recipes with you all, our guest bloggers will be sharing other stuff! You see, we realized what an interesting bunch we are! We have someone who taps their own maple trees, someone who can teach us all a little something about gluten-free living, and some of us have taken amazing trips and are able to take us on a virtual tour of some of the many places visited. You might even see a feature or two from some of our past sponsors! We are thrilled to kick off our new feature with Matt "Cake Daddy" Baird! He's a very talented guy and you will love his story! ~ Susan

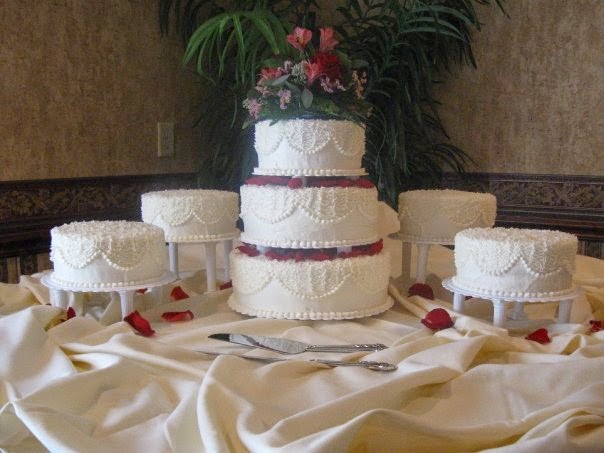
Here I am working on my brother's wedding cake!
I’m Matt Baird (a.k.a. Matt the Butcher; a.k.a. Cake Daddy), a member of 37 cooks. I was flattered to have been asked to write a guest post for our blog! While I love to cook, I’m a butcher by trade and I love answering some of the meat-related questions from my fellow 37 Cooks. I’m also known in some of my food circles as “Cake Daddy”, as I like to decorate cakes (mostly for my family now) but, I used to sell them as a side business. I was asked about how “Cake Daddy” came to be. Most people seem pretty surprised when they discover that I decorate cakes! A big, bald, old guy, covered in tattoos, ridin’ his Harley, that bakes cakes???

I started baking birthday cakes about 35 years ago, when my kids were toddlers. They were just plain, round, two-layer cakes from a boxed mix with canned icing. Of course, when the kids were toddlers they loved that I made their birthday cakes! As they got older and learned to read, they would pick out a special cake that they wanted for their birthday, from the cake decorating books I had lying around. So, I had to practice…a lot! Eventually, as I got to be fairly good at baking and decorating cakes, word got around the small town that we lived in. I started making cakes for friends, and the cakes kept getting a little more fancier (for lack of a better word.) I had a friend that was getting married and he didn’t have a lot of money, so we made a deal. I would make his wedding cake if he bought all of the pans and let me keep them in exchange for the cake. The cake turned out pretty nice, if I do say so myself, and I decided to start selling them to make a little extra money.

Fast forward to my daughter Chrissy’s wedding. I knew that I was gonna make her wedding cake, and I also knew that it would have to be spectacular, no ifs, ands, or buts! Talk about stress! We decided on a nice three-tier cake, but Chrissy was worried that there wasn’t gonna be enough cake for all of her guests (that was the Italian in her coming out…lol.) So, we decided to make a few extra cakes.


Chrissy's Wedding Cake
Here comes the “Cake Daddy” part! Since her wedding was gonna be here in Florida in April, and it was gonna be 85 degrees out, I was worried about the icing melting and running offa the cake. I went onto a popular food site, Serious Eats, where I’ve spent a lotta time chatting with other foodies, and I asked if anyone had a recipe for an icing that would hold up in the hot weather. Well, my screen name obviously gave no clue as to whether I was male or female and a lady on the chat board asked how I, as the mother of the bride, was gonna get the wedding cake done, go to the beauty parlor, get my hair and nails done, all on the morning of the wedding! We had a good laugh when I told her that I was the father of the bride! And so, “Cake Daddy” was born!


Thanks so much for taking the time to read this and I hope yous guys enjoyed my rambling!

P.S. When my daughter Chrissy was little, she had a great imagination and she used to like to sprinkle imaginary Fairy Dust all over the place. When I made her wedding cake, I sprinkled glittery sugar crystals (edible Fairy Dust) all over her cake!

Stuffed and Slapped Beef Heart

The fine folks at Slap Ya Mama have issued all of us at 37 Cooks an unusual challenge! They provided up with some of their products, and asked us to devise recipes, but we had to improvise, as we weren't allowed to use the recipe that the product was intended for! For instance, they sent me a box of Red Beans and Rice, which obviously, were meant to be served as Red Beans and Rice, but I had to come up with something different. I love using unusual ingredients in my cooking so I decided to use some of the beef heart that I had in the freezer, and make some kind of stuffing with the Red Beans and Rice! I doubt that there's too many people with a nice beef heart in their freezer, so you could substitute a boneless boston butt, which would work great. The fattiness of the pork would put this dish over the top. IF you decide to use the pork, you don't need to make any other changes to this recipe. I served this with whiskey glazed carrots, broccoli, gravy, and a little onion garlic 'jam' on the side. Here we go!

Friday, November 29, 2013

Grandpa Baird's Peach 'n Onion Hot Sauce


Matt's popular hot sauce makes an excellent hostess gift or stocking stuffer! - 37 Cooks

Wednesday, September 25, 2013

Guinness Steak and Onion Pie

When the kind folks at Kary's Roux sent all of us 37 Cooks generous samples of both their Dry Roux and their "Original" Roux, we were challenged to come up with two recipes, one for each roux. One of the first things that came to mind was some sort of a pot pie. My wife is originally from London and when I was there visiting she took me to a pie shop. I was thinking it was a bakery being that it was called a pie shop, but it was more of a luncheonette selling all kinds of meat pies and I had a steak and kidney pie. With all that being said, I thought my wife would enjoy a meat pie, but I hadda leave the kidneys out as she don't care for them. I thought Kary's "Original" Roux would be a great base for a meat pie. I decided to add a lotta onions and, of course, some of that delicious Guinness! I didn't use a bottom crust here, just a puff pastry top. And I had some awesome little crocks that my daughter gave me that worked very well! Here's the recipe!

Kentucky Hot Brown Sandwiches

Kentucky Hot Brown Sandwiches
by Matt

3 slices Texas Toast, lightly toasted
12 ounces thinly sliced smoked turkey breast from the deli
1 large very ripe tomato, thinly sliced
6 slices bacon, cooked

Thursday, August 15, 2013

Pina Colada Crumble Cupcakes with Chocolate Ganache

Thanks to the nice folks at Tropical Traditions for the generous samples they sent to us at 37 Cooks!! We had several different choices of their products to choose from and I chose their Organic Dried Coconut! They also make Gold Label Virgin Coconut Oil! I decided on the dried organic shredded coconut, as I had a specific recipe in mind! And here it is, for your eating pleasure!!

Wednesday, June 26, 2013

Spaghetti alla Puttanesca

First off, I'd like to thank the generous folks at Nick Sciabica and Sons for their delicious olive oils!  I've been on a personal quest looking for some really good olive oil, and this oil is superb.  Not only did I use Sciabica's olive oil for this recipe, I also use it for dipping, adding some fresh garlic, basil, crushed red pepper flakes and some salt.  
Sciabica's sent all of us at 37 Cooks two bottles each of any flavor oil that we wanted.  For this recipe, I chose their Manzanillo Variety Fall Harvest Extra Virgin Olive Oil.  I had decided to make Spaghetti alla Puttanesca, well, because of it's rather colorful history!  I've never had puttanesca sauce before and didn't know what to expect.  This dish was absolutely delicious!  I don't know if it was 'authentic' or not, because I used a white wine reduction in it.  All of the recipes I read didn't have the wine in them.  Most all of the recipes I read were pretty much the same, so I just mixed a lotta the recipes together and came up with my own, which we will be making on a regular basis!

Monday, June 17, 2013

Happy Birthday, 37 Cooks! We are ONE!


It’s our birthday! Or some would say it’s our anniversary! Perhaps all but me would say it’s our anniversary, but 37 Cooks is like a baby to me so I’m sticking with birthday! We are one. One year old and still going, indeed thriving. It’s hard to believe, considering where we came from.


Tuesday, June 11, 2013

Grilled Rack of Lamb with Pan Seared Brussels Sprouts and Roasted Garlic Couscous

First off, I'd like to thank Sciabica's Olive Oil Company for their generosity, providing all of us at 37 Cooks with two bottles each of their incredible oils to cook with. I picked their Fall Mission Variety Spring Harvest and their Jalapeno Olive Oils. Both were some of the best olive oils I've ever had.  I understand that in making the jalapeno oil, they actually press the jalapeno peppers in with the olives, which I found pretty impressive. We, as the 37 Cooks, agreed to make two different recipes each, and to submit them for posting on our blog