Especially in cold weather, I love to start the day with a bowl of great oatmeal. I love Bob's Red Mill's steel cut oats - they cook into a hearty porridge. It does take longer to cook than rolled oats, so I tend to make a large batch and then keep leftovers ready to heat throughout the week.
Sometimes, though, I want a change from my morning oatmeal. I love to use leftover oatmeal as the basis for bread. Three cups of leftover oatmeal will give you two large loaves of some of the best bread available. I'll confess that sometimes I go out of my way to make a batch of oatmeal especially to use for this bread. Toast made from this bread is absolutely the best!
Steel Cut Oatmeal Bread
by Maurita Plouff blogging at Get the Good Stuff!
Makes 2 loaves
3 cups leftover cooked oatmeal (I like to use Bob's Red Mill Steel Cut Oats)
2 cups warm water
1/4 cup honey
2 teaspoons instant yeast
2 teaspoons kosher salt
4+ cups all-purpose OR bread flour
If you make oatmeal especially for the bread, let it cool until just a little warm to your hand. If you're using leftover oatmeal, warm it up a bit and stir it around, so it's not stone cold and has no hot spots. Measurements are approximate, and you should feel free to add a bit more of this, or a bit less of that, to your personal taste.
In a large mixing bowl, stir together the oatmeal, water, honey, and yeast; stir i.e. enough to break up the oatmeal. Let it sit on the counter for 15 minutes or so.
Add the salt and 2 cups of the flour, and mix very well. Don’t be afraid to beat it hard; you’re developing gluten that will help the bread rise. Add additional flour, mixing well after each addition, until the dough just comes together – it may take 2 more cups, or it may take a lot more, it depends on the weather, the humidity, and the moisture content in the leftover oatmeal.
When the dough will just hold together in a shaggy mass, turn it out onto a well-floured surface. Knead, adding more flour as needed, for 2 to 3 minutes. Cover with a tea towel and let the dough rest for 20 minutes or so.
After the dough rests, knead it another 5 minutes, adding more flour as needed. It takes a bit of experience to know when you’ve kneaded enough. It will no longer be sucking up flour, the surface will be smooth and a bit less sticky, and it will feel alive under your hands.
Put the dough in an oiled clean bowl, turn it so that all surfaces are greased, then cover with a tea towel and let the dough rise until doubled in bulk - 1 to 2 hours.
Turn out onto a floured surface and gently punch it down. Shape into 2 loaves, put into greased bread pans, and let rise, covered with a tea towel, until doubled in bulk again.
Preheat oven to 375°F. Slash the loaves if you prefer, and bake 30 minutes. Check for doneness: each loaf will look done, and will sound hollow when turned out of the pan and thumped on the bottom. The internal temperature is 190-200°F.
Let the bread loaves cool for at least an hour before slicing.
Showing posts with label Maurita. Show all posts
Thursday, January 12, 2017
Steel Cut Oatmeal Bread
37 Cooks members receive products from our sponsors to work with to create their posts; no other compensation is given. All content is solely the opinions of our members. Members also write non-sponsored posts that do not feature any products. These are not compensated in any way..
Monday, October 10, 2016
Sausage Cheese Scones
My family loves scones. I love them too, but it's partly because they're so darned easy and quick. They're versatile, too! We had some leftover Italian sausage, which I thought to put into a scone with some cheese and seasonings. I could imagine these with pepperoni and mozzarella, or dried tomatoes, or perhaps bits of olive and feta. The Spice House's seasonings make a terrific impact on a simple scone.
Sausage Cheese Scones
by Maurita Plouff blogging at Get the Good Stuff!
Makes 1 dozen
2 cups self-rising flour
1-2 teaspoons The Spice House Greek Oregano
1/4 teaspoon The Spice House Granulated Organic Garlic Powder
2-3 ounces cooked Italian sausage, crumbled or chopped fine
4 ounces cheddar cheese, shredded (makes 1 cup grated cheese)
8-10 ounces heavy cream plus a bit more to brush on top
Preheat oven to 400°F/200°C.
In a medium bowl, mix the self-rising flour, seasonings, crumbled sausage, and cheese. Toss the mixture a bit so that everything is evenly distributed and has a light coating of flour. Mix in the heavy cream with a sturdy kitchen fork. You may need a bit more than 10 ounces, depending on the humidity. Just mix until the dough sticks together with no dry crumbles left out.
Turn the dough out onto a floured surface and knead two or three turns to make sure everything holds together. Divide the dough into two equal portions.
For each portion, pat the dough into a circle about 6 inches in diameter, and about an inch thick. Cut the circle into 6 wedges, and put each wedge on a parchment-lined baking sheet, leaving about an inch between.
Lightly brush the tops of the wedges with cream, to help make a browner crust. Bake 15 minutes or so, until the scones are risen, nicely browned, and cooked through.
Sausage Cheese Scones
by Maurita Plouff blogging at Get the Good Stuff!
Makes 1 dozen
2 cups self-rising flour
1-2 teaspoons The Spice House Greek Oregano
1/4 teaspoon The Spice House Granulated Organic Garlic Powder
2-3 ounces cooked Italian sausage, crumbled or chopped fine
4 ounces cheddar cheese, shredded (makes 1 cup grated cheese)
8-10 ounces heavy cream plus a bit more to brush on top
Preheat oven to 400°F/200°C.
In a medium bowl, mix the self-rising flour, seasonings, crumbled sausage, and cheese. Toss the mixture a bit so that everything is evenly distributed and has a light coating of flour. Mix in the heavy cream with a sturdy kitchen fork. You may need a bit more than 10 ounces, depending on the humidity. Just mix until the dough sticks together with no dry crumbles left out.
Turn the dough out onto a floured surface and knead two or three turns to make sure everything holds together. Divide the dough into two equal portions.
For each portion, pat the dough into a circle about 6 inches in diameter, and about an inch thick. Cut the circle into 6 wedges, and put each wedge on a parchment-lined baking sheet, leaving about an inch between.
Lightly brush the tops of the wedges with cream, to help make a browner crust. Bake 15 minutes or so, until the scones are risen, nicely browned, and cooked through.
37 Cooks members receive products from our sponsors to work with to create their posts; no other compensation is given. All content is solely the opinions of our members. Members also write non-sponsored posts that do not feature any products. These are not compensated in any way..
Thursday, September 29, 2016
Lavender-Vanilla Tea Cakes
There are times when only something fancy will do - but if you're clever, you don't have to work hard as well. These lovely tea cakes are a case in point: As easy to make as plain sugar cookies, but as fancy as all get out. Tea cakes are perfect with tea, of course, but these also pair well with chocolate mousse or ice cream. Best of all, the dough needs to chill, so they are a make-ahead delight.
Lavender-Vanilla Tea Cakes
by Maurita Plouff blogging at Get the Good Stuff!
Makes 3 dozen
3 cups all-purpose flour
1 teaspoon salt
1/2 teaspoon baking soda
1 cup (2 sticks) unsalted butter, at room temperature
1 cup granulated sugar
2 eggs
1 Tablespoon vanilla extract
2 Tablespoons The Spice House Lavender Vanilla Sugar
In a medium bowl, mix the flour, salt, and baking soda. Set them aside.
Cream the butter using an electric mixer for about a minute until it turns a pale yellow color. Scrape it down from the sides of the bowl, add the sugar, and beat again about 2 minutes, until it is very soft and almost white. Add the eggs and vanilla, and beat at medium speed about a minute, until it is fluffy and smooth. Stop the mixer and scrape again.
Slowly beat in the mixed dry ingredients, a little at a time. Mix only until the dough sticks together and there are no streaks of unblended flour. Don't overbeat - you don't want the tea cakes to be tough. Wrap the dough and chill it overnight (and up to one week). Note that the dough may be frozen up to a month if wrapped well and zipped into a plastic zip bag. Thaw the dough in the refrigerator before using.
On baking day, preheat oven to 375°F/190°C and set out a small bowl of lavender-vanilla sugar. Divide the chilled dough into 36 equal portions, and roll each into a ball. Dip each ball into the sugar, making sure that the top half is well coated. Place the sugared balls 2 inches apart on a parchment-lined baking sheet.
Bake 13-15 minutes, until the edges just barely start to brown. Slide the parchment right off the pans and let the tea cakes cool on a rack.
Lavender-Vanilla Tea Cakes
by Maurita Plouff blogging at Get the Good Stuff!
Makes 3 dozen
3 cups all-purpose flour
1 teaspoon salt
1/2 teaspoon baking soda
1 cup (2 sticks) unsalted butter, at room temperature
1 cup granulated sugar
2 eggs
1 Tablespoon vanilla extract
2 Tablespoons The Spice House Lavender Vanilla Sugar
In a medium bowl, mix the flour, salt, and baking soda. Set them aside.
Cream the butter using an electric mixer for about a minute until it turns a pale yellow color. Scrape it down from the sides of the bowl, add the sugar, and beat again about 2 minutes, until it is very soft and almost white. Add the eggs and vanilla, and beat at medium speed about a minute, until it is fluffy and smooth. Stop the mixer and scrape again.
Slowly beat in the mixed dry ingredients, a little at a time. Mix only until the dough sticks together and there are no streaks of unblended flour. Don't overbeat - you don't want the tea cakes to be tough. Wrap the dough and chill it overnight (and up to one week). Note that the dough may be frozen up to a month if wrapped well and zipped into a plastic zip bag. Thaw the dough in the refrigerator before using.
On baking day, preheat oven to 375°F/190°C and set out a small bowl of lavender-vanilla sugar. Divide the chilled dough into 36 equal portions, and roll each into a ball. Dip each ball into the sugar, making sure that the top half is well coated. Place the sugared balls 2 inches apart on a parchment-lined baking sheet.
Bake 13-15 minutes, until the edges just barely start to brown. Slide the parchment right off the pans and let the tea cakes cool on a rack.
37 Cooks members receive products from our sponsors to work with to create their posts; no other compensation is given. All content is solely the opinions of our members. Members also write non-sponsored posts that do not feature any products. These are not compensated in any way..
Friday, September 9, 2016
Sweet Peach Tea Jam
What do you do when someone sends you fabulous barbecue sauce? Mine is made by Jay Ducote, who you may recognize as a runner-up on Season 11 of the reality show Food Network Star. The man's from Louisiana, and his barbecue sauce is spicy and full of sass.
Of course I tasted the sauce in a lot of ways. Grilled chicken slathered with the stuff is great, by the way, truly great. Meatloaf sandwiches with BBQ-mayo got thumbs-up from my hubby. But what could I do to bring that BBQ taste to something non-traditional?
There I was, sipping peach iced tea, nibbling the last BBQ chicken leg, and suddenly the idea arrived - what about a BBQ-peach tea jam? It would be a little sweet, a little spicy, and have all the flavors of summer. What would a jam be like? Or if I didn't put in extra fruit, would it be a jelly?
I call it jam, and it's fabulous. It's dark and thick, with a texture like apple butter. You can't call this stuff a jelly, it's just too robust and opaque for that. And the taste - wow! It goes well with any sharp cheese, with pork from chops to roast to cold ham. Make a sandwich with ham, sharp aged Cheddar, thin slivers of apple, and this jam, and your tastebuds will sing to you.
This makes a quite small batch of jam: you'll most likely end up with 2 8-ounce jars (seal these) and about half a jar (stick that in the refrigerator and use it first!) You'll find that a small batch goes together amazingly quickly.
Sweet Peach Tea Jam
by Maurita Plouff blogging at Get the Good Stuff!
Makes 2 8-ounce jars, plus a bit extra
1 cup peach iced tea (I used Snapple)
1 cup Jay D's Louisiana Barbecue Sauce
1 Tablespoon lemon juice
Of course I tasted the sauce in a lot of ways. Grilled chicken slathered with the stuff is great, by the way, truly great. Meatloaf sandwiches with BBQ-mayo got thumbs-up from my hubby. But what could I do to bring that BBQ taste to something non-traditional?
There I was, sipping peach iced tea, nibbling the last BBQ chicken leg, and suddenly the idea arrived - what about a BBQ-peach tea jam? It would be a little sweet, a little spicy, and have all the flavors of summer. What would a jam be like? Or if I didn't put in extra fruit, would it be a jelly?
I call it jam, and it's fabulous. It's dark and thick, with a texture like apple butter. You can't call this stuff a jelly, it's just too robust and opaque for that. And the taste - wow! It goes well with any sharp cheese, with pork from chops to roast to cold ham. Make a sandwich with ham, sharp aged Cheddar, thin slivers of apple, and this jam, and your tastebuds will sing to you.
This makes a quite small batch of jam: you'll most likely end up with 2 8-ounce jars (seal these) and about half a jar (stick that in the refrigerator and use it first!) You'll find that a small batch goes together amazingly quickly.
Sweet Peach Tea Jam
by Maurita Plouff blogging at Get the Good Stuff!
Makes 2 8-ounce jars, plus a bit extra
1 cup peach iced tea (I used Snapple)
1 cup Jay D's Louisiana Barbecue Sauce
1 Tablespoon lemon juice
2 Tablespoons powdered pectin
1 cup sugar
Prepare the jars:
First, prepare 3 8-ounce jars. They need to be super clean, so if you have a dishwasher with a "sterilize" cycle use that, otherwise, put clean jars in a pot of hot water, making sure to cover the jars by 2 inches. Bring the water to a big rolling boil, and keep it boiling for 10 minutes. Turn off the heat. Carefully take the jars from the hot water, and set them upside down on a clean kitchen towel. Cover the pot of hot water, you'll need it again.
Make the jam:
Now for the jam itself: Combine the peach tea, BBQ sauce, lemon juice, and pectin in 2 quart pot, and set it over high heat. Bring this mixture to a full rolling boil, stirring often. A full boil is so strong that you can't make the bubbles go away no matter how much you stir.
Add all the sugar at once, stirring to dissolve it. Return the pot to a full rolling boil. Boil hard 1 minute, stirring constantly, then remove from heat.
1 cup sugar
Prepare the jars:
First, prepare 3 8-ounce jars. They need to be super clean, so if you have a dishwasher with a "sterilize" cycle use that, otherwise, put clean jars in a pot of hot water, making sure to cover the jars by 2 inches. Bring the water to a big rolling boil, and keep it boiling for 10 minutes. Turn off the heat. Carefully take the jars from the hot water, and set them upside down on a clean kitchen towel. Cover the pot of hot water, you'll need it again.
Make the jam:
Now for the jam itself: Combine the peach tea, BBQ sauce, lemon juice, and pectin in 2 quart pot, and set it over high heat. Bring this mixture to a full rolling boil, stirring often. A full boil is so strong that you can't make the bubbles go away no matter how much you stir.
Add all the sugar at once, stirring to dissolve it. Return the pot to a full rolling boil. Boil hard 1 minute, stirring constantly, then remove from heat.
Ladle the hot jam into the jars, leaving one-half inch space at the top. You'll probably have 2 full jars and one partway filled. Wipe off the jar rims and put on lids. Screw on bands finger tight. Set aside the partly filled jar to cool; this one will go into the refrigerator. The others will be sealed in a waterbath process.
Seal the jars:
Carefully lower the closed jars back into the pot of hot water, and bring the pot back to a full boil. Boil the filled jars for 10 minutes (set a timer!) Remove the jars and let stand on that folded kitchen towel again. As the jars cool, you'll hear a cheerful ping! sound when the lids snap into a seal.
That's it! Your sealed jars will keep in a cool dark cupboard for 6-9 months, but I predict you'll eat it all up long before that.
Seal the jars:
Carefully lower the closed jars back into the pot of hot water, and bring the pot back to a full boil. Boil the filled jars for 10 minutes (set a timer!) Remove the jars and let stand on that folded kitchen towel again. As the jars cool, you'll hear a cheerful ping! sound when the lids snap into a seal.
That's it! Your sealed jars will keep in a cool dark cupboard for 6-9 months, but I predict you'll eat it all up long before that.
37 Cooks members receive products from our sponsors to work with to create their posts; no other compensation is given. All content is solely the opinions of our members. Members also write non-sponsored posts that do not feature any products. These are not compensated in any way..
Thursday, May 12, 2016
Instant Pot Risotto with Butternut Squash and Dried Mushrooms

I was full of skeptical curiosity the day my Instant Pot arrived. It's a big thing on the cooking-related Internet, and you can read all kinds of glowing recommendations, just as I did. It's an electric pressure cooker, sure. But, it does so much more than that! It steams, sautés, slow-cooks, keeps warm. It knows how to make rice and yogurt. It has pre-programmed routines for poultry, soups, porridge, and stews. Now I tend to be an old-fashioned cook. Would this new-fangled machine really make me love it?
I unpacked my new 6-quart Instant Pot IP-DUO machine, washed it, made it welcome, and tried the necessary first pressure test with plain water. Yes, it gets to pressure; yes, seems to work fine. Now it was on to cooking!
I love risotto. It's both luxury and comfort in a bowl. What I don't love about it is standing at the stove, constantly stirring, so the texture is perfect. So I tried a savory risotto made with butternut squash, dried mushrooms, and saffron.
Wow! What a taste, and so easy! While my recipe instructs you to check the consistency at the end, and simmer again if the squash was watery, my risotto didn't need this at all. It was perfect just as it was.
Instant Pot Risotto with Butternut Squash and Dried Mushrooms
by Maurita Plouff blogging at Get the Good Stuff!
Serves 6
1 medium leek, white and pale green parts only, halved lengthwise and washed free of dirt
1 small butternut squash (to yield 2 cups peeled and chopped)
I love risotto. It's both luxury and comfort in a bowl. What I don't love about it is standing at the stove, constantly stirring, so the texture is perfect. So I tried a savory risotto made with butternut squash, dried mushrooms, and saffron.
Wow! What a taste, and so easy! While my recipe instructs you to check the consistency at the end, and simmer again if the squash was watery, my risotto didn't need this at all. It was perfect just as it was.
Instant Pot Risotto with Butternut Squash and Dried Mushrooms
by Maurita Plouff blogging at Get the Good Stuff!
Serves 6
1 medium leek, white and pale green parts only, halved lengthwise and washed free of dirt
1 small butternut squash (to yield 2 cups peeled and chopped)
1 ounce dried mushrooms (you can use as little as half an ounce of dried porcini, morels, or a mixture)
2 Tablespoons unsalted butter
1 1/2 cups white Arborio rice
1/4 cup dry white wine (I used vermouth)
4 cups (1 quart) chicken or vegetable broth
1 teaspoon dried thyme
A generous pinch saffron threads
1/2 cup finely grated Parmesan cheese (about 1 ounce)
Slice the white and pale green parts of the leek into thin slices. Peel and chop a small butternut squash, so that you have about 2 cups of squash in half-inch cubes. If you're using prepared pre-cut squash, cut it into smaller pieces, so it will get tender. Crumble the dried mushrooms so they're in fairly small bits.
Put the liner in the Instant Pot - always make sure that the liner's in there! Push the "sauté' button, and melt the butter. Add the leek and cook, stirring often, until softened - about 2 minutes. Add the rice and stir until it is coated in the butter. Pour in the wine and stir over the heat until fully absorbed into the grains, 1 to 2 minutes. Add the broth, squash, dried mushrooms, thyme, and saffron.
1/4 cup dry white wine (I used vermouth)
4 cups (1 quart) chicken or vegetable broth
1 teaspoon dried thyme
A generous pinch saffron threads
1/2 cup finely grated Parmesan cheese (about 1 ounce)
Slice the white and pale green parts of the leek into thin slices. Peel and chop a small butternut squash, so that you have about 2 cups of squash in half-inch cubes. If you're using prepared pre-cut squash, cut it into smaller pieces, so it will get tender. Crumble the dried mushrooms so they're in fairly small bits.
Put the liner in the Instant Pot - always make sure that the liner's in there! Push the "sauté' button, and melt the butter. Add the leek and cook, stirring often, until softened - about 2 minutes. Add the rice and stir until it is coated in the butter. Pour in the wine and stir over the heat until fully absorbed into the grains, 1 to 2 minutes. Add the broth, squash, dried mushrooms, thyme, and saffron.
Lock the lid onto the pot. Use the manual mode, and set the machine to cook at high pressure for 10 minutes.
At the end of these 10 minutes, use the quick-release method to bring the pot’s pressure back to normal. Unlock and open the cooker. Stir the risotto gently to check its consistency. Sometimes the squash will have released lots of moisture, and if it has, a quick simmer-and-stir at the end will fix it. Push the 'sauté' button again, and bring the risotto to a gentle simmer. Stir until it's thickened, about 2 minutes, then turn off.
If you will be using cheese, stir in the Parmesan now. Replace the lid onto the cooker without locking it in place. Set aside for 5 minutes to melt the cheese and blend the flavors. Stir again before serving.
At the end of these 10 minutes, use the quick-release method to bring the pot’s pressure back to normal. Unlock and open the cooker. Stir the risotto gently to check its consistency. Sometimes the squash will have released lots of moisture, and if it has, a quick simmer-and-stir at the end will fix it. Push the 'sauté' button again, and bring the risotto to a gentle simmer. Stir until it's thickened, about 2 minutes, then turn off.
If you will be using cheese, stir in the Parmesan now. Replace the lid onto the cooker without locking it in place. Set aside for 5 minutes to melt the cheese and blend the flavors. Stir again before serving.
37 Cooks members receive products from our sponsors to work with to create their posts; no other compensation is given. All content is solely the opinions of our members. Members also write non-sponsored posts that do not feature any products. These are not compensated in any way..
Monday, April 11, 2016
No-Bake Caramel Cheerio Bites
General Mills has new cereals - well, they're old favorite cereals, only better, with no artificial colors or flavors. Our challenge: Come up with new and delicious ways to use the cereals. I was drawn to the Chocolate Cheerios, and tasted them. I noticed the crunch immediately, of course - but then also a mild oaty chocolate flavor. Hm, what could I do with these?
After several false starts, I produced this simple variation on never-fail caramels. I pour the hot caramel mixture over the cereal in a prepared pan, so there's no time to soften or become soggy. These no-bake caramel bites have a pleasing crunch, and the chocolate adds depth to their flavor. Stir some up today!
No-Bake Caramel Cheerio Bites
by Maurita Plouff blogging at Get the Good Stuff!
Makes about 2 1/2 pounds caramels
2 to 3 cups Chocolate Cheerios
1 cup (2 sticks, or 1/2 pound) salted butter
2 1/2 cups brown sugar, packed (I used a combination of dark and light brown)
1 cup Karo light corn syrup
1 14-ounce can sweetened condensed milk
2 teaspoon vanilla extract
Line a 9 x 9 inch pan with aluminum foil or crossed strips of parchment paper. Allow edges to hang over sides of pan. Liberally butter the foil or parchment. Put 2 to 3 cups of Chocolate Cheerios in the pan, shaking them so they form an even layer about three-quarters of an inch thick.
In a large microwave-safe bowl, combine butter, brown sugar, corn syrup and condensed milk. Cover loosely with parchment paper. Microwave on high for 4 or 5 minutes*, until the butter starts to melt. Whisk to blend.
Cover again, and microwave on high for 4 or 5* minutes more. Whisk well.
Cover again, and microwave on high a third and final time, for the same 4 or 5 minutes*. Remove parchment cover, take bowl from microwave, and set on a stable surface. Add vanilla - expect that the mixture will bubble fiercely - and whisk gently until thoroughly blended.
Pour caramel mixture over the Cheerios in the prepared pan. Chill for 1 to 3 hours or until just firm.
Using the foil or parchment that lined the pan, lift the entire block of caramel from the pan. Use a buttered knife to cut caramel into 1-inch squares. Wrap individually in waxed paper or place in paper candy cups. Store in an airtight container for up to 2 weeks.
After several false starts, I produced this simple variation on never-fail caramels. I pour the hot caramel mixture over the cereal in a prepared pan, so there's no time to soften or become soggy. These no-bake caramel bites have a pleasing crunch, and the chocolate adds depth to their flavor. Stir some up today!
No-Bake Caramel Cheerio Bites
by Maurita Plouff blogging at Get the Good Stuff!
Makes about 2 1/2 pounds caramels
2 to 3 cups Chocolate Cheerios
1 cup (2 sticks, or 1/2 pound) salted butter
2 1/2 cups brown sugar, packed (I used a combination of dark and light brown)
1 cup Karo light corn syrup
1 14-ounce can sweetened condensed milk
2 teaspoon vanilla extract
Line a 9 x 9 inch pan with aluminum foil or crossed strips of parchment paper. Allow edges to hang over sides of pan. Liberally butter the foil or parchment. Put 2 to 3 cups of Chocolate Cheerios in the pan, shaking them so they form an even layer about three-quarters of an inch thick.
In a large microwave-safe bowl, combine butter, brown sugar, corn syrup and condensed milk. Cover loosely with parchment paper. Microwave on high for 4 or 5 minutes*, until the butter starts to melt. Whisk to blend.
Cover again, and microwave on high for 4 or 5* minutes more. Whisk well.
Cover again, and microwave on high a third and final time, for the same 4 or 5 minutes*. Remove parchment cover, take bowl from microwave, and set on a stable surface. Add vanilla - expect that the mixture will bubble fiercely - and whisk gently until thoroughly blended.
Pour caramel mixture over the Cheerios in the prepared pan. Chill for 1 to 3 hours or until just firm.
Using the foil or parchment that lined the pan, lift the entire block of caramel from the pan. Use a buttered knife to cut caramel into 1-inch squares. Wrap individually in waxed paper or place in paper candy cups. Store in an airtight container for up to 2 weeks.
Makes approximately 2 1/2 pounds of caramel bites.
*NOTE ON TIMING: Microwave ovens vary; use the 4-minute timings for higher wattage microwave ovens (1100-1200 watts) and 5 minute timings for lower wattage ovens. Be careful handling the bowl full of hot caramel: Use potholders or oven mitts.
*NOTE ON QUANTITY: Of course you could cut the recipe in half - if you do, use a smaller pan - 5 by 8 would work well.
*NOTE ON TIMING: Microwave ovens vary; use the 4-minute timings for higher wattage microwave ovens (1100-1200 watts) and 5 minute timings for lower wattage ovens. Be careful handling the bowl full of hot caramel: Use potholders or oven mitts.
*NOTE ON QUANTITY: Of course you could cut the recipe in half - if you do, use a smaller pan - 5 by 8 would work well.
37 Cooks members receive products from our sponsors to work with to create their posts; no other compensation is given. All content is solely the opinions of our members. Members also write non-sponsored posts that do not feature any products. These are not compensated in any way..
Tuesday, March 15, 2016
Meatball and Orzo Soup
You may be familiar with the situation: Ohmygosh, it's six o'clock, and I have to have supper on the table! What do I do now? Aviva Goldfarb has your back, she's been there. She is a cook, author, and founder of the website The Six O'Clock Scramble, a weekly meal planning system. I was sent a copy of her latest book, written in cooperation with the American Diabetes Association. The Six O'Clock Scramble Meal Planner: A Year of Quick, Delicious Meals to Help You Prevent and Manage Diabetes presents 32 weekly menu plans, complete with main dishes and sides, with a grocery list for each week. All the recipes are diabetes-friendly, whether you're managing the disease or trying to prevent it.
Before I get to the recipe, I recognize I'm not one of the author's targeted audience. I'm not the parent and resident cook of a busy family - hubby and I are retirees, so I have plenty of time, when I choose to spend it. I like a quick, easy supper just as much as anybody else, though. So I chose Meatball and Orzo Soup, and have made it twice now. The first time, I followed the recipe, and the second time, I tweaked it to my own taste. Here's how it went:
Meatball and Orzo Soup (adapted from Aviva Goldfarb)
by Maurita Plouff blogging at Get the Good Stuff!
Makes about 3 quarts
1 Tablespoon extra-virgin olive oil
1/2 yellow onion, finely diced (about 1 cup) I have used white or yellow onion, can't tell a difference
2 large carrots, peeled and finely diced (about 2 cups)
1 1/2 teaspoons minced garlic (about 3 cloves)
4 cups low-sodium chicken or vegetable stock I used homemade chicken stock
1 cup water
15 ounces no-salt-added petite-diced tomatoes, with their liquid
1 teaspoon dried Italian seasoning blend
- farfalle with artichoke hearts, baby spinach, and lemon ricotta
- zucchini, white bean, and tomato gratin
- chicken marsala with mushrooms & garlic
While I don't live with the six o'clock scramble day in and day out, I'm glad to know I've a resource to turn to.
Before I get to the recipe, I recognize I'm not one of the author's targeted audience. I'm not the parent and resident cook of a busy family - hubby and I are retirees, so I have plenty of time, when I choose to spend it. I like a quick, easy supper just as much as anybody else, though. So I chose Meatball and Orzo Soup, and have made it twice now. The first time, I followed the recipe, and the second time, I tweaked it to my own taste. Here's how it went:
Meatball and Orzo Soup (adapted from Aviva Goldfarb)
by Maurita Plouff blogging at Get the Good Stuff!
Makes about 3 quarts
1 Tablespoon extra-virgin olive oil
1/2 yellow onion, finely diced (about 1 cup) I have used white or yellow onion, can't tell a difference
2 large carrots, peeled and finely diced (about 2 cups)
1 1/2 teaspoons minced garlic (about 3 cloves)
4 cups low-sodium chicken or vegetable stock I used homemade chicken stock
1 cup water
15 ounces no-salt-added petite-diced tomatoes, with their liquid
1 teaspoon dried Italian seasoning blend
1/2 cup orzo or ditalini noodles I did not have whole wheat pasta, used regular orzo
12 ounces precooked meatless mini meatballs (often sold frozen), or use beef or turkey meatballs I couldn't find 12-ounce packages of meatballs, so I used 1 lb Italian meatballs from Trader Joe's. I thawed them in the microwave and then cut them in half.
3 cups fresh spinach, coarsely chopped I used all of a bunch - may have been up to 41/2 cups chopped
Grated Parmesan cheese
In a large stockpot, heat oil over medium heat. Add the onions, carrots, and garlic; sauté, stirring occasionally, until the vegetables are tender, about 5 minutes.
Add the stock, water, and tomatoes; cover and bring to a boil. Add the Italian seasoning blend, the orzo and the meatballs (if they are large, cut them in half or quarters) and stir frequently for a minute or two, so the pasta doesn't stick to the bottom of the pot. Reduce heat and simmer, partially covered, for 15 minutes. Stir in the spinach and let it wilt.
The author recommends that you serve immediately, seasoned with salt and pepper as desired. I
completely disagree. While this soup tastes good right when it's made per instructions, it's SO MUCH BETTER the next day or even the day after, when the flavors have had time to meld. My advice is to put this soup together when you're making some other day's supper - and then just stick it in the refrigerator for tomorrow. You'll thank me for this; you'll have an amazingly wonderful soup and all you have to do is heat and eat. If the pasta has thickened the soup too much, which it can do, just add some V8 or tomato juice to bring it back to your ideal soup-like texture.
We also loved the soup garnished with a sprinkling of grated Parmesan cheese.
It's wonderful to have a whole book of quick (and easy) recipes. I've found them to be diverse and appealing, and am especially looking forward to trying:
12 ounces precooked meatless mini meatballs (often sold frozen), or use beef or turkey meatballs I couldn't find 12-ounce packages of meatballs, so I used 1 lb Italian meatballs from Trader Joe's. I thawed them in the microwave and then cut them in half.
3 cups fresh spinach, coarsely chopped I used all of a bunch - may have been up to 41/2 cups chopped
Grated Parmesan cheese
In a large stockpot, heat oil over medium heat. Add the onions, carrots, and garlic; sauté, stirring occasionally, until the vegetables are tender, about 5 minutes.
Add the stock, water, and tomatoes; cover and bring to a boil. Add the Italian seasoning blend, the orzo and the meatballs (if they are large, cut them in half or quarters) and stir frequently for a minute or two, so the pasta doesn't stick to the bottom of the pot. Reduce heat and simmer, partially covered, for 15 minutes. Stir in the spinach and let it wilt.
The author recommends that you serve immediately, seasoned with salt and pepper as desired. I
completely disagree. While this soup tastes good right when it's made per instructions, it's SO MUCH BETTER the next day or even the day after, when the flavors have had time to meld. My advice is to put this soup together when you're making some other day's supper - and then just stick it in the refrigerator for tomorrow. You'll thank me for this; you'll have an amazingly wonderful soup and all you have to do is heat and eat. If the pasta has thickened the soup too much, which it can do, just add some V8 or tomato juice to bring it back to your ideal soup-like texture.
We also loved the soup garnished with a sprinkling of grated Parmesan cheese.
It's wonderful to have a whole book of quick (and easy) recipes. I've found them to be diverse and appealing, and am especially looking forward to trying:
- farfalle with artichoke hearts, baby spinach, and lemon ricotta
- zucchini, white bean, and tomato gratin
- chicken marsala with mushrooms & garlic
While I don't live with the six o'clock scramble day in and day out, I'm glad to know I've a resource to turn to.
37 Cooks members receive products from our sponsors to work with to create their posts; no other compensation is given. All content is solely the opinions of our members. Members also write non-sponsored posts that do not feature any products. These are not compensated in any way..
Tuesday, February 16, 2016
Gyudon
For most of my cooking, I don't use recipes. That doesn't mean I don't read cookbooks - I do! I have a large collection and love to dream over the pages or recipes and photos. Mostly, though, I take the ideas from these books and let them influence what I make in my kitchen.
That's not at all true, though, when I'm trying to learn to produce things that are far outside my cooking experience. I adore Japanese food, and wanted to learn to make it at home. Not the beautiful and precise kaiseki restaurant showpieces, but ordinary family-type food - the sort of book that, if it were a US cookbook, would give advice on grilled cheese, PBJ, scrambled eggs, BLTs, burgers, spaghetti...you know the type, right? A book on humble home cooking.
I found it! Japanese Home-Style Cooking by Mihoko Yoshino is presented by the Better Home Association of Japan. It's a splendid little volume with 60 or so recipes. I like to think it's what I might have learned from my grandmother, if she were Japenese: How to cook rice, how to make quick pickles, how to make soup. It's all accessible and clearly explained. There are photos and explanations about unfamiliar ingredients; there are explanations of techniques; there are even special tips on how to make something easier, or how to take a shortcut.
Among its recipes is one that's become an absolute family favorite. Gyudon - short for gyuniku donburi, meaning, literally, beef bowl - is, at its simplest, a bowl of rice topped with glass noodles and thin slices of onion and beef braised in a sweetened soy sauce. This is everyday food of the sort served at home, in family restaurants, or diners - I'd guess it's the Japanese equivalent of a hamburger, in that you'll find it everywhere. It's both fast food and comfort food.
That's not at all true, though, when I'm trying to learn to produce things that are far outside my cooking experience. I adore Japanese food, and wanted to learn to make it at home. Not the beautiful and precise kaiseki restaurant showpieces, but ordinary family-type food - the sort of book that, if it were a US cookbook, would give advice on grilled cheese, PBJ, scrambled eggs, BLTs, burgers, spaghetti...you know the type, right? A book on humble home cooking.
I found it! Japanese Home-Style Cooking by Mihoko Yoshino is presented by the Better Home Association of Japan. It's a splendid little volume with 60 or so recipes. I like to think it's what I might have learned from my grandmother, if she were Japenese: How to cook rice, how to make quick pickles, how to make soup. It's all accessible and clearly explained. There are photos and explanations about unfamiliar ingredients; there are explanations of techniques; there are even special tips on how to make something easier, or how to take a shortcut.
Among its recipes is one that's become an absolute family favorite. Gyudon - short for gyuniku donburi, meaning, literally, beef bowl - is, at its simplest, a bowl of rice topped with glass noodles and thin slices of onion and beef braised in a sweetened soy sauce. This is everyday food of the sort served at home, in family restaurants, or diners - I'd guess it's the Japanese equivalent of a hamburger, in that you'll find it everywhere. It's both fast food and comfort food.
We keep the ingredients handy in the pantry (and freezer, in the case of the sliced beef). The beef topping mixture can be made in the time it takes to cook the rice - I'd guess 20 minutes tops. I've altered the recipe somewhat from this book, in that sometimes I like to add thinly sliced mushrooms.
Gyudon
by Maurita Plouff blogging at Get the Good Stuff!
Serves 4
2 bunches bean threads (also called glass noodles or cellophane noodles)
2/3 cup soy sauce
1/4 cup mirin wine
3 Tablespoons sugar
1 onion, thinly sliced in meridians
1 cup thinly sliced mushrooms (optional)
1 pound beef, sliced paper thin
Red pickled ginger (beni shoga)
4 bowls of cooked rice
Cook the rice: I always use a rice cooker, which makes this even easier. Start the rice first, and then turn to the beef and onions.
Put 2 bunches bean thread in a deep heat-proof bowl, and pour boiling water over them. Cover the
bowl, and let soak at least 10 minutes.
In a saucepan, put the soy sauce, mirin, and sugar. Bring this to a boil, then add the sliced onion and reduce the heat. Let the onions cook until just barely translucent. Add in the mushrooms, if you’re using them, and let them cook through. Now add the sliced beef, stir, and let simmer until the slices lose their red color. Note: if you're using frozen sliced beef, you don't need to bother thawing it first. Add right to the pot and stir more often.
Drain the bean thread, and add these noodles into the pot. Stir to
combine, and serve over rice. Top each bowl of gyudon with red pickled ginger (beni shoga).
Notes on special ingredients:
Bean thread, glass noodles, cellophane noodles are a transparent noodle made from starch from mung beans, yams, or potato starch. They're sold in dried form, in little nests.
Mirin is a sort of rice wine. It has less alcohol than sake and is sweeter. It's used to add sweetness and a touch of brightness to dishes.
Gyudon
by Maurita Plouff blogging at Get the Good Stuff!
Serves 4
2 bunches bean threads (also called glass noodles or cellophane noodles)
2/3 cup soy sauce
1/4 cup mirin wine
3 Tablespoons sugar
1 onion, thinly sliced in meridians
1 cup thinly sliced mushrooms (optional)
1 pound beef, sliced paper thin
Red pickled ginger (beni shoga)
4 bowls of cooked rice
Cook the rice: I always use a rice cooker, which makes this even easier. Start the rice first, and then turn to the beef and onions.
Put 2 bunches bean thread in a deep heat-proof bowl, and pour boiling water over them. Cover the
bowl, and let soak at least 10 minutes.
In a saucepan, put the soy sauce, mirin, and sugar. Bring this to a boil, then add the sliced onion and reduce the heat. Let the onions cook until just barely translucent. Add in the mushrooms, if you’re using them, and let them cook through. Now add the sliced beef, stir, and let simmer until the slices lose their red color. Note: if you're using frozen sliced beef, you don't need to bother thawing it first. Add right to the pot and stir more often.
Drain the bean thread, and add these noodles into the pot. Stir to
combine, and serve over rice. Top each bowl of gyudon with red pickled ginger (beni shoga).
Notes on special ingredients:
Bean thread, glass noodles, cellophane noodles are a transparent noodle made from starch from mung beans, yams, or potato starch. They're sold in dried form, in little nests. Mirin is a sort of rice wine. It has less alcohol than sake and is sweeter. It's used to add sweetness and a touch of brightness to dishes.
37 Cooks members receive products from our sponsors to work with to create their posts; no other compensation is given. All content is solely the opinions of our members. Members also write non-sponsored posts that do not feature any products. These are not compensated in any way..
Friday, January 29, 2016
Hibiscus Swirl Pound Cake
I use Hibiscus Flower Extracts here, from the Wild Hibiscus Flower Company, who were kind enough to send some to me for recipe development. It gives a faint pink color (which I have enhanced with food dye) and a lovely subtle flavor. To form a beautiful and edible garnish, I rolled preserved Wild Hibiscus Flowers in Syrup in granulated sugar, and let them dry for several hours.
Hibiscus Swirl Pound Cake
by Maurita Plouff
Blogging at Get the Good Stuff!
One 9 x 5 loaf
5 large eggs
2 cups all-purpose flour
1/2 teaspoon salt
2 sticks (1 cup) unsalted butter, softened
1 1/2 cups sugar
2 teaspoons vanilla extra
1 teaspoon wild hibiscus flower extract
Pink or red food dye, optional
Preheat oven to 325°F. Grease and flour a 9 x 5 x 3 loaf pan.
Warm the eggs: Place the uncracked eggs in a bowl, and pour hot water over them. Let stand while you prepare the other ingredients.
Combine flour and salt, and sift them together onto a sheet of waxed paper.
Put the butter in a large mixing bowl, and beat until smooth and creamy. Slowly add the sugar, beating constantly, until the mixture is well blended. Crack the warmed eggs into the batter, one at a time, beating well after each addition. Stir in the vanilla. Continue beating, as you gradually sprinkle in the flour mixture, and continue to beat until the batter is smooth and well blended.
Remove about half the batter to a separate bowl. Into the remaining batter, add 1 teaspoon wild hibiscus extract, and beat well. If you wish, add food dye to make a pleasing shade.
Put both batters in the prepared pan, alternating large spoonfuls, until all the batter has been added. Swirl a long-bladed table knife through the batter in a random pattern, mixing the two colors around a bit.
Smooth the top of the cake with a rubber spatula. Bake at 325°F about an hour, until a wooden skewer inserted in the center of the cake comes out clean. Remove from the oven, place the pan on a rack, and let cool at least 15 minutes. Turn the cake out of the pan and cool it completely on the rack.
Wrap well to store the cake.
Pink Hibiscus Glaze:
Note: Glaze cake at serving time; the cake stores better unglazed.
1 cup confectioners sugar, sifted
2 Tablespoons melted butter
1 Tablespoon milk
3/4 teaspoon wild hibiscus flower extract
Sift confectioners sugar. Add melted butter, milk and extract; beat until smooth and creamy. Add more milk drop by drop if needed until desired texture is achieved. Pour over cooled cake.
Sugared Hibiscus Flower Garnish:
Put about 1/2 cup granulated sugar on a plate. Gently take hibiscus flower(s) out of the jar, shaking bits of syrup off. Roll the flower in granulated sugar, coating both outside and inside petals. Let stand several hours.
37 Cooks members receive products from our sponsors to work with to create their posts; no other compensation is given. All content is solely the opinions of our members. Members also write non-sponsored posts that do not feature any products. These are not compensated in any way..
Monday, November 30, 2015
Random Chance Pasta
Do you have trouble coming up with a menu plan? Stumped about what to cook? That was my situation, lately. Recipe Dice from Leafcutter Designs came to my rescue!
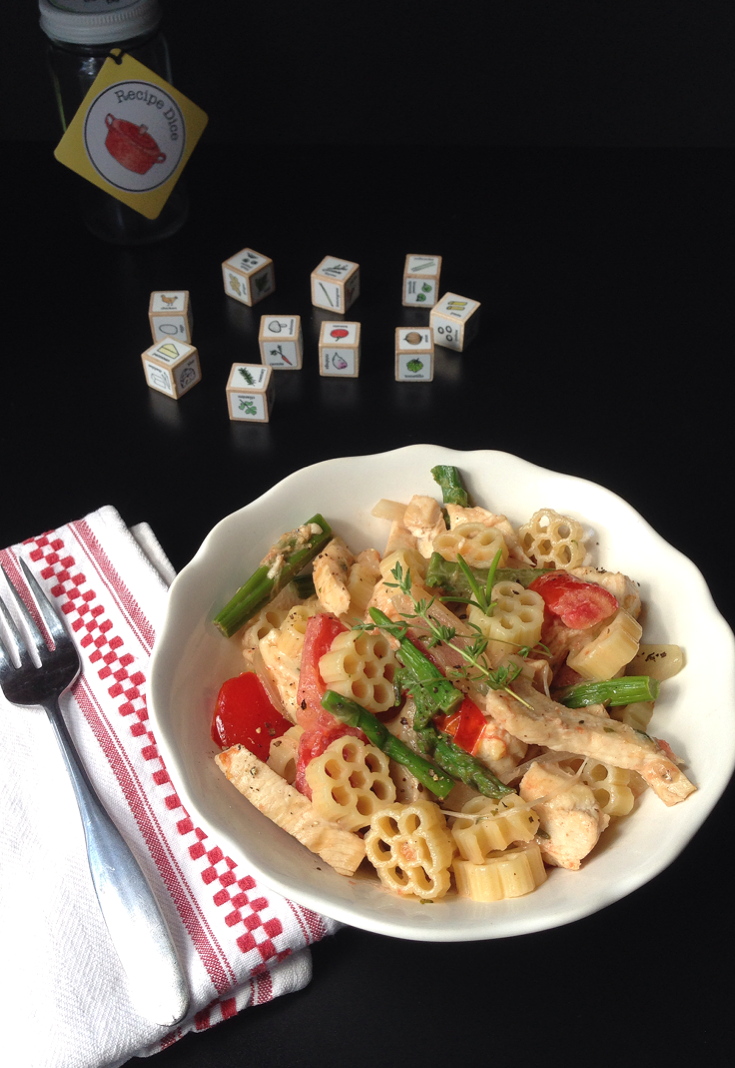
Designed to be playful and whimsical, I found the dice surprisingly practical. I'm keeping them on the kitchen counter now, and frequently roll the dice to see what combinations might fall, which sparks some kitchen creativity. Here's how one dice roll worked for me. First, I put the dice in a larger jar, so they would have room to jiggle and turn while I shook them well. The twelve dice hit the table in a nice scatter.
Oh, look! I see pasta and chicken, a great start. Onions, mushrooms, tomatoes, thyme. Yes to all those. Black pepper? Sure, a grind or three of pepper is always a good idea. We're on a roll here (oh, dear, a pun). The rules of this game let me put five dice back into the jar to shake again. Shake, shake, shake. Sprinkle them on the table. Oh! Parmesan and rosemary, I got lucky there. Now I have...eggplant, spinach, and asparagus.
So my ingredients are set. I'm allowed to discard two dice, if I wish, leaving 10 ingredients. I can add other ingredients like cooking oil, salt, cream. I could make several dishes - main and sides - or try for an all-in-one. I set the dice for eggplant and spinach to one side, added asparagus to my 'go' pile, and made this wonderful pasta supper.
Random Chance Pasta
by Maurita Plouff
Serves 4
2 Tablespoons olive oil, divided
1 half skinless boneless chicken breast, or 2 cups cooked shredded chicken
1 cup frozen asparagus tips
1 medium onion, sliced
8 ounces mushrooms, sliced
1 teaspoon fresh rosemary, chopped
1 teaspoon fresh thyme
6 ounces heavy cream
So my ingredients are set. I'm allowed to discard two dice, if I wish, leaving 10 ingredients. I can add other ingredients like cooking oil, salt, cream. I could make several dishes - main and sides - or try for an all-in-one. I set the dice for eggplant and spinach to one side, added asparagus to my 'go' pile, and made this wonderful pasta supper.
Random Chance Pasta
by Maurita Plouff
Serves 4
2 Tablespoons olive oil, divided
1 half skinless boneless chicken breast, or 2 cups cooked shredded chicken
1 cup frozen asparagus tips
1 medium onion, sliced
8 ounces mushrooms, sliced
1 teaspoon fresh rosemary, chopped
1 teaspoon fresh thyme
6 ounces heavy cream
8 ounces pasta, any shape you like
1 cup grated Parmesan cheese
1 large ripe tomato, roughly chopped
Heat 1 Tablespoon oil in a large skillet. If you are using raw chicken, slice it thinly crosswise, and saute the chicken , stirring often, until it's just cooked through - 3 to minutes. Remove chicken and set aside. Briefly zap the asparagus tips in the microwave, until they are barely tender, and set aside.
Return the skillet to the heat. Add a bit more oil, then add the onions to the pan, and cook until they begin to be translucent. Add the mushrooms and cook 5 minutes or so, stirring occasionally, until the mushrooms and onions are thoroughly cooked. Add chopped herbs and cream, bring to a boil, then reduce heat to low.
Cook pasta in a large pot of boiling salted water until tender, but still firm to the bite. Drain, reserving a bit of the cooking liquid. Return the pasta to the pot.
Add the chicken and mushroom in herbed cream sauce to the pasta, along with the Parmesan cheese, the cooked asparagus tips and the chunks of ripe tomato. Toss well to combine, and to melt the cheese.
Serve with a few grinds of fresh black pepper.
1 cup grated Parmesan cheese
1 large ripe tomato, roughly chopped
Heat 1 Tablespoon oil in a large skillet. If you are using raw chicken, slice it thinly crosswise, and saute the chicken , stirring often, until it's just cooked through - 3 to minutes. Remove chicken and set aside. Briefly zap the asparagus tips in the microwave, until they are barely tender, and set aside.
Return the skillet to the heat. Add a bit more oil, then add the onions to the pan, and cook until they begin to be translucent. Add the mushrooms and cook 5 minutes or so, stirring occasionally, until the mushrooms and onions are thoroughly cooked. Add chopped herbs and cream, bring to a boil, then reduce heat to low.
Cook pasta in a large pot of boiling salted water until tender, but still firm to the bite. Drain, reserving a bit of the cooking liquid. Return the pasta to the pot.
Add the chicken and mushroom in herbed cream sauce to the pasta, along with the Parmesan cheese, the cooked asparagus tips and the chunks of ripe tomato. Toss well to combine, and to melt the cheese.
Serve with a few grinds of fresh black pepper.
37 Cooks members receive products from our sponsors to work with to create their posts; no other compensation is given. All content is solely the opinions of our members. Members also write non-sponsored posts that do not feature any products. These are not compensated in any way..
Thursday, September 24, 2015
Blueberry Bran Loaf with Praline Pecans
by Maurita Plouff, Good Stuff Recipes
Makes 3 small loaves
2 eggs
1 1/2 cups buttermilk
1/2 cup coconut oil, melted and slightly cooled
1 1/2 teaspoons kosher salt
2 teaspoons baking soda
2 teaspoons vanilla extract
3/4 cup sugar
2 cups bran cereal (like All-Bran)
3 1/4 cups flour
2 cups fresh blueberries
1 1/2 cups Praline Pecans
Butter to grease the pans
Preheat oven to 350°F. Grease 3 small (3 x 5 x 2-inch) loaf pans.
Whisk together the eggs, buttermilk, coconut oil, salt, baking soda, vanilla extract, and sugar. Stir in the bran cereal and flour and mix well to combine thoroughly. The batter should be fairly stiff at this point. Gently fold in the blueberries.
Fill each loaf pan nearly to the top. Scatter Praline Pecans over the tops, pressing them in slightly. Bake 35-45 minutes, until the tops are firm and slightly browned, and a toothpick carefully inserted and removed shows no streaks of uncooked batter.
Let cool in the pans on a rack for 20 minutes, then carefully turn the loaves out and cool completely.
37 Cooks members receive products from our sponsors to work with to create their posts; no other compensation is given. All content is solely the opinions of our members. Members also write non-sponsored posts that do not feature any products. These are not compensated in any way..
Wednesday, September 9, 2015
Pork Chops with Honey Balsamic Vinegar and Orange Pan Sauce
by Maurita, Good Stuff Recipes
Makes 4 chops
4 boneless pork chops, 1-inch thick or a bit less
Salt and pepper
1 Tablespoon oil
Several sprigs fresh thyme or 1 teaspoon dried thyme
2 Tablespoons Honey Ridge Farms Balsamic Honey Vinegar
Juice of one orange
1 Tablespoon unsalted butter (optional)
Trim the pork chops and cut through the fat and silver skin to keep the meat from curling. Make 2 cuts about 2 inches apart on the sides of each chop. Pat the chops dry, and season them with salt and pepper. Mix honey balsamic vinegar and orange juice in a small bowl.
Heat oil in a large skillet until medium-high heat, until just barely smoking. Add the pork chops and cook until well browned, 4-5 minutes. Turn the chops, scatter thyme sprigs or dried thyme around them and add the balsamic vinegar/juice to the pan. Turn the heat to medium-low and cook until the internal temperature of the pork registers 140°F, 5 to 8 minutes. Remove the chops to a plate and tent with foil, leaving the juices in the pan. Remove any thyme sprigs and discard.
Return the skillet to medium heat, and reduce the juices until they are syrupy. If you wish to use the butter, swirl it into the reduced sauce and whisk to combine. Pour the glaze over the chops, and serve.
by Maurita, Good Stuff Recipes
Makes 4 chops
4 boneless pork chops, 1-inch thick or a bit less
Salt and pepper
1 Tablespoon oil
Several sprigs fresh thyme or 1 teaspoon dried thyme
2 Tablespoons Honey Ridge Farms Balsamic Honey Vinegar
Juice of one orange
1 Tablespoon unsalted butter (optional)
Trim the pork chops and cut through the fat and silver skin to keep the meat from curling. Make 2 cuts about 2 inches apart on the sides of each chop. Pat the chops dry, and season them with salt and pepper. Mix honey balsamic vinegar and orange juice in a small bowl.
Heat oil in a large skillet until medium-high heat, until just barely smoking. Add the pork chops and cook until well browned, 4-5 minutes. Turn the chops, scatter thyme sprigs or dried thyme around them and add the balsamic vinegar/juice to the pan. Turn the heat to medium-low and cook until the internal temperature of the pork registers 140°F, 5 to 8 minutes. Remove the chops to a plate and tent with foil, leaving the juices in the pan. Remove any thyme sprigs and discard.
Return the skillet to medium heat, and reduce the juices until they are syrupy. If you wish to use the butter, swirl it into the reduced sauce and whisk to combine. Pour the glaze over the chops, and serve.
37 Cooks members receive products from our sponsors to work with to create their posts; no other compensation is given. All content is solely the opinions of our members. Members also write non-sponsored posts that do not feature any products. These are not compensated in any way..
Thursday, August 13, 2015
Honey Blossoms with Candied Orange Peel
When Honey Ridge Farms sent me a jar of uncooked honey creme, I knew I could make something wonderful. I wanted to highlight the flavor and texture. My kitchen buddy, Tiffany Lamb, suggested I tinker with her sensuous Mascarpone Flowers, and this is the splendid result. I used creme made from clover honey for these simple blossoms; other flavors of the creme are blackberry, blood orange and lemon/lavender. Any of them would work well in this recipe.
Honey Blossoms with Candied Orange Peel
by Maurita
Makes 24 flowers
24 wonton wrappers
6 ounces mascarpone cheese
1/3 cup Honey Ridge Farms Clover Honey Creme
1 teaspoon dried orange peel OR 1 Tablespoon freshly grated orange zest
Pinch salt
1 egg
1/3 cup heavy (whipping) cream
Preheat oven to 425°F. Spray mini-muffin tin, or grease it. Press one wonton wrapper into each of the 24 wells of the prepared tin, letting the points stick out.
In a medium bowl, beat the mascarpone, honey creme, orange peel/zest and salt until thoroughly blended.
In a separate bowl, lightly beat the egg with the heavy cream, then pour that mixture into the cheese/honey and stir to combine.
Put a spoonful of the filling into each of the wontons; there should be just enough to fill each one.
Bake for 5 minutes, then remove from oven and let stand,
undisturbed, at least 10 minutes. Carefully remove from the tin and let the blossoms cool on a rack.
Garnish as desired - I used candied orange peel (recipe below.)
To make candied orange peel:
Peel of 1 orange
1 1/2 cups sugar, divided
1 cup water
Peel the orange and remove the white pith from the inside of the peel. Cut the peel into thin strips.
Put 1 cup sugar and water in a small saucepan, and bring to a boil. Add the orange peel, return to a boil. Reduce the heat and simmer until peel is very soft, then drain.
Toss the peel and the reserved sugar on a plate, separating the strips.
Honey Blossoms with Candied Orange Peel
by Maurita
Makes 24 flowers
24 wonton wrappers
6 ounces mascarpone cheese
1/3 cup Honey Ridge Farms Clover Honey Creme
1 teaspoon dried orange peel OR 1 Tablespoon freshly grated orange zest
Pinch salt
1 egg
1/3 cup heavy (whipping) cream
Preheat oven to 425°F. Spray mini-muffin tin, or grease it. Press one wonton wrapper into each of the 24 wells of the prepared tin, letting the points stick out.
In a medium bowl, beat the mascarpone, honey creme, orange peel/zest and salt until thoroughly blended.
In a separate bowl, lightly beat the egg with the heavy cream, then pour that mixture into the cheese/honey and stir to combine.
Put a spoonful of the filling into each of the wontons; there should be just enough to fill each one.
Bake for 5 minutes, then remove from oven and let stand,
Garnish as desired - I used candied orange peel (recipe below.)
To make candied orange peel:
Peel of 1 orange
1 1/2 cups sugar, divided
1 cup water
Peel the orange and remove the white pith from the inside of the peel. Cut the peel into thin strips.
Put 1 cup sugar and water in a small saucepan, and bring to a boil. Add the orange peel, return to a boil. Reduce the heat and simmer until peel is very soft, then drain.
Toss the peel and the reserved sugar on a plate, separating the strips.
37 Cooks members receive products from our sponsors to work with to create their posts; no other compensation is given. All content is solely the opinions of our members. Members also write non-sponsored posts that do not feature any products. These are not compensated in any way..
Tuesday, June 9, 2015
Saratoga Spuds
The 1940's food writers Cora, Rose and Bob Brown wrote in their book "America Cooks": “A century ago, when Saratoga Springs was in its heyday as a fashionable resort, specialties from there swept the country, and one of them, Saratoga Chips, will endure as long as there are spuds left to slice.”
Is the name not ringing any bells? How about potato chips? The craze for thin crispy potato chips began in 1840's Saratoga Springs, New York. There are lots of stories about just who was the customer who wanted pan-fried potatoes sliced even thinner, to get even crispier - but let's not fuss about that. Let's get right to making fresh chips at home - right in the oven, using very little oil. That makes these chips healthy spuds!
Saratoga Spuds
by Maurita
3 large white potatoes, peeled
1-2 Tablespoons olive oil
Salt and freshly ground pepper
Preheat oven to 450˚F.
Slice potatoes very very thinly: I used my mandoline and cut them in even 3-mm slices, or about 1/8" thick. Toss the potato slices gently with olive oil, making sure to separate and turn the slices. Place the sliced potatoes on a baking sheet covered with parchment or the new Mrs. Anderson's Baking Mat from Harold Import Company. The potato slices should not overlap, but you don't have to worry about spacing them; they don't expand.
Sprinkle the potato slices with salt and pepper.
Bake uncovered about 10 minutes, then turn them and bake until they are golden and browned in spots, about 10 more minutes. Blot on absorbent paper and serve while still warm.
Variations:
Herby Saratoga Spuds - season before baking with your choice of chopped fresh or dried herbs
Saratoga Devil Spuds - season before baking with a liberal helping of crushed red pepper flakes
Saratoga Sweets - use peeled sweet potato. I like these dusted before baking with a bit of cumin and Aleppo pepper.
Is the name not ringing any bells? How about potato chips? The craze for thin crispy potato chips began in 1840's Saratoga Springs, New York. There are lots of stories about just who was the customer who wanted pan-fried potatoes sliced even thinner, to get even crispier - but let's not fuss about that. Let's get right to making fresh chips at home - right in the oven, using very little oil. That makes these chips healthy spuds!
Saratoga Spuds
by Maurita
Serves 4 to 6 as a side dish
3 large white potatoes, peeled
1-2 Tablespoons olive oil
Salt and freshly ground pepper
Preheat oven to 450˚F.
Slice potatoes very very thinly: I used my mandoline and cut them in even 3-mm slices, or about 1/8" thick. Toss the potato slices gently with olive oil, making sure to separate and turn the slices. Place the sliced potatoes on a baking sheet covered with parchment or the new Mrs. Anderson's Baking Mat from Harold Import Company. The potato slices should not overlap, but you don't have to worry about spacing them; they don't expand.
Sprinkle the potato slices with salt and pepper.
Bake uncovered about 10 minutes, then turn them and bake until they are golden and browned in spots, about 10 more minutes. Blot on absorbent paper and serve while still warm.
Variations:
Herby Saratoga Spuds - season before baking with your choice of chopped fresh or dried herbs
Saratoga Devil Spuds - season before baking with a liberal helping of crushed red pepper flakes
Saratoga Sweets - use peeled sweet potato. I like these dusted before baking with a bit of cumin and Aleppo pepper.
37 Cooks members receive products from our sponsors to work with to create their posts; no other compensation is given. All content is solely the opinions of our members. Members also write non-sponsored posts that do not feature any products. These are not compensated in any way..
Thursday, June 4, 2015
Sourdough Bread on the Crisper Mat
I like to make bread, and love to make sourdough bread. I usually have a culture going, sometimes two or three different ones. When the Harold Import Co. sent me a Mrs. Anderson's Bread Crisping Mat, I was eager to try it. Would I get a crispy bottom crust?
And the answer is - yes, indeed I did. I let a free-form loaf and half a dozen rolls rise in place on the mat, then slashed and baked them. I ended up with bread whose bottom crusts are just as crackly as the tops. Look at the second photo - a closeup of the bottom crust. See the little pebbly bits? This is wonderful texture.
You can use your favorite bread recipe, or even use this mat to crisp up a store-bought loaf. If you'd like my blueprint for sourdough bread, I've included it here - though, of course, you can swap water or beer for the milk, sugar for honey, toss in a handful of chopped herbs or maybe olives and walnuts...you get the idea. Once you start baking, you never know quite where you'll end up.
If you like crust, though - this mat's for you.
Sourdough Bread on the Crisping Mat
by Maurita
Maurita's Sourdough Bread Blueprint
1. Prepare your sourdough culture for use - wake it up
Remove culture from fridge. Add 1 cup white bread flour and 3/4 cup (6 ounces) warm water to the jar; mix briefly. It need not be lump-free. Let stand at 70-85°F for 3 to 8 hours (this will vary) until the culture is actively fermenting, as shown by bubbles on the surface.
2. Mix in more flour and water and let rise
Transfer the active culture (should be 2 cups now) to a large (4-quart) mixing bowl, and mix it with 3 cups flour and 2 cups warm water. Again, it need not be lump-free. Cover with a clean towel, and let rise at room temperature for 12 hours or so.
3. Save a bit for next time
Save and refrigerate 1 cup culture from the 1st proof, before proceeding. I keep the sourdough starter in a glass jar in my refrigerator.
4. Now use the rest to make bread
4 cups culture (that's what's left in the bowl after step 3)
2 Tablespoons melted butter or oil
1 cup milk (2% or whole, doesn't matter)
2 teaspoons kosher salt
2 Tablespoons honey
Up to 6 more cups bread flour
NOTE: You can substitute 1 cup wheat germ for 1 cup of this flour, or up to 2 cups whole wheat flour for 2 cups of the flour.
Assuming the rest of the culture is in a large mixing bowl, now you're ready to go.
Melt butter, add milk to butter and warm briefly (to 75-85°F) then add the salt and honey, and stir until dissolved. Add this mixture to the culture and mix well.
Add the flour (if by hand, 1 cup at a time; if using a KitchenAid mixer, 5 cups at once) and mix well. Let rest 15 minutes before adding in the last 1 cup of flour. Turn the dough out onto a floured board and knead until smooth and satiny.
Divide the dough and shape into loaves or rolls. Put into greased pans, and let rise, covered with a towel, 1.5-3 hours. When the dough crowns over the pan rims, it’s ready to bake. (Poke gently: if the indentation stays, it's risen enough.) At the last minute, slash the loaves or rolls using a lame or straight razor.
Bake in preheated 375°F oven 35-40 minutes. Loaves and rolls should sound hollow when the bottoms are tapped.
NOTE on pans: If you use 1-pound loaf pans, expect to use 3; if you use 1.5-pound pans, expect to use 2. This makes terrific free-form loaves and rolls.
4. Now use the rest to make bread
4 cups culture (that's what's left in the bowl after step 3)
2 Tablespoons melted butter or oil
1 cup milk (2% or whole, doesn't matter)
2 teaspoons kosher salt
2 Tablespoons honey
Up to 6 more cups bread flour
NOTE: You can substitute 1 cup wheat germ for 1 cup of this flour, or up to 2 cups whole wheat flour for 2 cups of the flour.
Assuming the rest of the culture is in a large mixing bowl, now you're ready to go.
Melt butter, add milk to butter and warm briefly (to 75-85°F) then add the salt and honey, and stir until dissolved. Add this mixture to the culture and mix well.
Add the flour (if by hand, 1 cup at a time; if using a KitchenAid mixer, 5 cups at once) and mix well. Let rest 15 minutes before adding in the last 1 cup of flour. Turn the dough out onto a floured board and knead until smooth and satiny.
Divide the dough and shape into loaves or rolls. Put into greased pans, and let rise, covered with a towel, 1.5-3 hours. When the dough crowns over the pan rims, it’s ready to bake. (Poke gently: if the indentation stays, it's risen enough.) At the last minute, slash the loaves or rolls using a lame or straight razor.
Bake in preheated 375°F oven 35-40 minutes. Loaves and rolls should sound hollow when the bottoms are tapped.
NOTE on pans: If you use 1-pound loaf pans, expect to use 3; if you use 1.5-pound pans, expect to use 2. This makes terrific free-form loaves and rolls.
37 Cooks members receive products from our sponsors to work with to create their posts; no other compensation is given. All content is solely the opinions of our members. Members also write non-sponsored posts that do not feature any products. These are not compensated in any way..
Tuesday, April 14, 2015
Cherry Amore
I've had enough of winter already! It's been colder and snowier than usual here (I'm in Michigan) and I'm just about ready to declare it's time for sun, summer breezes and fruity drinks.
This is so simple, I almost hesitate to dignify it with a recipe. To make up for it, I'll list instructions for making the cherry cordial that forms the base of the drink. Plan ahead, you'll need fresh sour cherries in season to make it, and six months to age it properly. Once that's done, though, you're all set for an unseasonal sip of summer whenever you've had enough of cold, nasty weather.
Cherry Amore
by Maurita (Good Stuff Recipes)
Makes one - as large or as small as you like. Play around!
1 part cherry cordial (see below)
1 part Amaretto liqueur (I like Lazzaroni Amaretto, with the orange label)
Splash fresh lime juice, to taste
Combine all ingredients, pour over 1 or 2 ice cubes, garnish with a lime twist.
Summer's Harvest Cherry Cordial
This is so simple, I almost hesitate to dignify it with a recipe. To make up for it, I'll list instructions for making the cherry cordial that forms the base of the drink. Plan ahead, you'll need fresh sour cherries in season to make it, and six months to age it properly. Once that's done, though, you're all set for an unseasonal sip of summer whenever you've had enough of cold, nasty weather.
Cherry Amore
by Maurita (Good Stuff Recipes)
Makes one - as large or as small as you like. Play around!
1 part cherry cordial (see below)
1 part Amaretto liqueur (I like Lazzaroni Amaretto, with the orange label)
Splash fresh lime juice, to taste
Combine all ingredients, pour over 1 or 2 ice cubes, garnish with a lime twist.
Summer's Harvest Cherry Cordial
by Maurita
You can use this method to make a cordial from just about any fruit. Have fun!
Start with a sparkling-clean one-quart Mason jar. To this jar, add 1 pound fresh sour cherries, sliced to expose the pits. This should fill the jar about three-quarters full. Pour in a couple handsful granulated sugar (oh, if you must measure it, this is about one-half cup.)
Now completely fill the jar with a decent, but completely neutral, vodka. My brand of choice is Sobieski.
Cover the jar tightly, shake it a few times, and store it in a cool, dark cupboard for 6 months or so. Strain and save the cordial in a fancy bottle with a good cork - and if you like boozy fruit, eat the cherries over ice cream.
Start with a sparkling-clean one-quart Mason jar. To this jar, add 1 pound fresh sour cherries, sliced to expose the pits. This should fill the jar about three-quarters full. Pour in a couple handsful granulated sugar (oh, if you must measure it, this is about one-half cup.)
Now completely fill the jar with a decent, but completely neutral, vodka. My brand of choice is Sobieski.
Cover the jar tightly, shake it a few times, and store it in a cool, dark cupboard for 6 months or so. Strain and save the cordial in a fancy bottle with a good cork - and if you like boozy fruit, eat the cherries over ice cream.
37 Cooks members receive products from our sponsors to work with to create their posts; no other compensation is given. All content is solely the opinions of our members. Members also write non-sponsored posts that do not feature any products. These are not compensated in any way..
Thursday, March 26, 2015
Cheesy Sausage Rolls
Sometimes you want something quick, snack-ish, yet still healthy. Let's say you're going to hang with your hubby watching a game, or you have kids who are roaringly hungry and need to eat right now! You need to make something simple, but good.
That was the situation I imagined for myself when challenged to use Bilinski's Kale Balsamic Chicken Sausage. This fully-cooked sausage needs only a quick dash through a hot oven to be ready to serve. I combined it with a quick variation on cheese biscuits, and ta-da! Simple, healthy, quick and satisfying.
Ultra-quick cheese biscuit dough:
1 cup (4 ounces) self-rising flour, plus a bit more for rolling out the biscuit dough
That was the situation I imagined for myself when challenged to use Bilinski's Kale Balsamic Chicken Sausage. This fully-cooked sausage needs only a quick dash through a hot oven to be ready to serve. I combined it with a quick variation on cheese biscuits, and ta-da! Simple, healthy, quick and satisfying.
Cheesy Sausage Rolls
by Maurita (www.goodstuff.recipes)
Will make 5 perfect little rolls
1 12-ounce package Bilinski's Kale Balsamic Chicken Sausage
by Maurita (www.goodstuff.recipes)
Will make 5 perfect little rolls
1 12-ounce package Bilinski's Kale Balsamic Chicken Sausage
Ultra-quick cheese biscuit dough:
1 cup (4 ounces) self-rising flour, plus a bit more for rolling out the biscuit dough
1/2 cup grated cheese (I used Gruyere)
1/2 cup heavy or whipping cream
NOTE: You could flavor the biscuits just about any way you wish! Omit the cheese, add herbs, have fun.
Preheat the oven to 400°F - by the time the sausage rolls are ready to bake, the oven should be ready. Place a rack in the upper one-third of the oven.
Put the self-rising flour and the grated cheese in a bowl, and toss it to coat the cheese bits with the flour. Mix in the cream until a shaggy dough forms. If it's too dry, add in a bit more cream or milk; the humidity can affect how biscuit dough comes together. You should be able to squeeze the dough into a cohesive ball without it being sticky or oozy.
On a floured board, pat or roll the dough 3/4 of an inch thick and cut the dough into strips.
Wrap each sausage with strips of dough in a spiral. Place the dough-wrapped sausages on an ungreased baking sheet.
Bake in the top third of the oven about 15 minutes, until the biscuits are golden and the sausages are hot.
Preheat the oven to 400°F - by the time the sausage rolls are ready to bake, the oven should be ready. Place a rack in the upper one-third of the oven.
Put the self-rising flour and the grated cheese in a bowl, and toss it to coat the cheese bits with the flour. Mix in the cream until a shaggy dough forms. If it's too dry, add in a bit more cream or milk; the humidity can affect how biscuit dough comes together. You should be able to squeeze the dough into a cohesive ball without it being sticky or oozy.
On a floured board, pat or roll the dough 3/4 of an inch thick and cut the dough into strips.
Wrap each sausage with strips of dough in a spiral. Place the dough-wrapped sausages on an ungreased baking sheet.
Bake in the top third of the oven about 15 minutes, until the biscuits are golden and the sausages are hot.
37 Cooks members receive products from our sponsors to work with to create their posts; no other compensation is given. All content is solely the opinions of our members. Members also write non-sponsored posts that do not feature any products. These are not compensated in any way..
Monday, February 2, 2015
Make-Ahead Hand Pies
Yes, I know that I could buy frozen puff pastry - or pie crust in a box. Lots of people do. What if I want a homemade all-butter laminated dough that I could just pull out of the fridge to use in all kinds of creative ways?
Donna Currie showed me how in her book Make-Ahead-Bread: 100 Recipes for Melt in Your Mouth Fresh Bread Every Day. It's not just about breads (though the ones in there are absolutely fantastic!) - no, Donna ventures into pizza, English muffins, and, yes, all-butter laminated pastry that's actually easy to do.
I took Donna's cherry turnovers in a different direction, making little hand pies with homemade jam. Use a jam or fruit spread that's full of fruit, preferably homemade and not super-sweet, and you'll be very happy with the result.
Make-Ahead Hand Pies
by Maurita
Adapted from Cherry Turnovers in Make-Ahead-Bread: 100 Recipes for Melt in Your Mouth Fresh Bread Every Day by Donna Currie
Make-Ahead Hand Pies
by Maurita
Adapted from Cherry Turnovers in Make-Ahead-Bread: 100 Recipes for Melt in Your Mouth Fresh Bread Every Day by Donna Currie
Will make 18 little hand pies
2 1/4 teaspoons active dry yeast
3/4 cup milk, plus more as needed
1 large egg
1/3 cup sugar
1 teaspoon pure vanilla extract
1/2 teaspoon almond extract
2 1/2 cups bread flour, plus more as needed
1/2 cup (2 ounces) almond meal
1 teaspoon kosher salt
2 sticks butter, cold (1 salted, 1 unsalted)
Jam - about half a jar in your choice of flavour, best if homemade and not too sweet
Egg wash (1 large egg beaten with 1 Tablespoon water)
Coarse sugar, for sprinkling
On prep day 1 - mix it all together:
Put the yeast, milk, egg, sugar, and extracts in a medium bowl. Whisk to combine, then set aside.
Put the flour, almond meal, and salt into a food processor and pulse a few times to distribute the salt. Cut the butter into a few pieces and add to the food processor. Pulse until the butter pieces are no larger than a lima bean. It’s fine if some pieces (or most of them) are smaller.
Add the flour-butter mixture to the bowl with the liquid. Stir gently until combined. The mixture should be wet, so don’t worry if it seems loose. If it’s not a wet mixture or if you see dry spots in the flour, drizzle in more milk, 1 Tablespoon at a time, to moisten the dough. Cover the bowl and refrigerate overnight.
On prep day 2 - roll and fold, then back in the fridge:
Flour your work surface and turn out the dough. It will still be sticky. Flour the top of the dough, then pat it into a rough square. Using a rolling pin, roll the dough to about 18 inches square, though the shape doesn't matter so much. The point is to flatten the bits of butter that will make the buttery, flaky layers, but you don’t want the butter to soften so much that it starts to mix with the flour, so work as quickly as possible. Flour your work surface and the top of the dough as needed to keep the dough from sticking.
Take the left third of the dough and fold it over the middle, then fold the right side over the middle, like you would fold a letter. Use a dough scraper under the dough to help lift it and fold it over. It’s fine if the dough is sloppy and wants to break apart. Now, fold the top third down over the middle, then fold the bottom third up. You should have a fat square of dough.
Roll this fat square of dough to about 16 inches square, then fold following the same process as above. This time the dough should be easier to roll and fold.
Roll out the dough to 16 inches square one more time and fold as before. If at any time during the roll-and-fold process you feel that the butter is getting soft and squishy, put the dough in the refrigerator for 10 minutes or so to firm up the butter—you don’t want it to mix with the flour.
After three repeats of rolling and folding, flour the fat dough square, wrap it in plastic, and put it in a clean zip-top plastic bag. Refrigerate overnight or up to 2 days.
On baking day - roll the dough, bake the pies:
Line two large baking sheets with parchment paper. Remove the dough from the refrigerator, divide it in half, and re-wrap half and return to the refrigerator – you will work with only half the dough at a time.
Flour your work surface and roll the dough to 12 inches square. Cut the dough into three 4-inch rows, both horizontally and vertically, so you end up with 9 even squares (each about 4 x 4 inches.)
Spoon a generous teaspoon of the jam into the center of each square. Put some water in a small bowl and use your finger or a pastry brush to lightly moisten the edges of the squares. Fold each square into a triangle—you’ll need to stretch the dough a bit to cover the filling. Press a fork along the joined edges of the pastry to help seal it. Place the filled pastries on the prepared baking sheet, leaving an inch or so of space between them to rise. Continue making hand pies with the second half of the dough and the rest of the pie filling, or leave the dough refrigerated for another day.
Cover the pan with plastic wrap and set aside for 20 to 30 minutes. Meanwhile, heat the oven to 400°F. After 20 to 30 minutes, the dough won’t seem to have risen, but it should feel puffy rather than firm.
Remove the plastic, brush the top of the turnovers with egg wash, and sprinkle with coarse sugar. Use a sharp knife or a pair of kitchen shears to snip a few slits in the top of the pastries. Bake the hand pies until they’re nicely browned, 15 to 20 minutes. Be careful with hot little pies - that jam can burn your mouth! Transfer to a rack to cool before serving.
3/4 cup milk, plus more as needed
1 large egg
1/3 cup sugar
1 teaspoon pure vanilla extract
1/2 teaspoon almond extract
2 1/2 cups bread flour, plus more as needed
1/2 cup (2 ounces) almond meal
1 teaspoon kosher salt
2 sticks butter, cold (1 salted, 1 unsalted)
Jam - about half a jar in your choice of flavour, best if homemade and not too sweet
Egg wash (1 large egg beaten with 1 Tablespoon water)
Coarse sugar, for sprinkling
On prep day 1 - mix it all together:
Put the yeast, milk, egg, sugar, and extracts in a medium bowl. Whisk to combine, then set aside.
Put the flour, almond meal, and salt into a food processor and pulse a few times to distribute the salt. Cut the butter into a few pieces and add to the food processor. Pulse until the butter pieces are no larger than a lima bean. It’s fine if some pieces (or most of them) are smaller.
Add the flour-butter mixture to the bowl with the liquid. Stir gently until combined. The mixture should be wet, so don’t worry if it seems loose. If it’s not a wet mixture or if you see dry spots in the flour, drizzle in more milk, 1 Tablespoon at a time, to moisten the dough. Cover the bowl and refrigerate overnight.
On prep day 2 - roll and fold, then back in the fridge:
Flour your work surface and turn out the dough. It will still be sticky. Flour the top of the dough, then pat it into a rough square. Using a rolling pin, roll the dough to about 18 inches square, though the shape doesn't matter so much. The point is to flatten the bits of butter that will make the buttery, flaky layers, but you don’t want the butter to soften so much that it starts to mix with the flour, so work as quickly as possible. Flour your work surface and the top of the dough as needed to keep the dough from sticking.
Take the left third of the dough and fold it over the middle, then fold the right side over the middle, like you would fold a letter. Use a dough scraper under the dough to help lift it and fold it over. It’s fine if the dough is sloppy and wants to break apart. Now, fold the top third down over the middle, then fold the bottom third up. You should have a fat square of dough.
Roll this fat square of dough to about 16 inches square, then fold following the same process as above. This time the dough should be easier to roll and fold.
Roll out the dough to 16 inches square one more time and fold as before. If at any time during the roll-and-fold process you feel that the butter is getting soft and squishy, put the dough in the refrigerator for 10 minutes or so to firm up the butter—you don’t want it to mix with the flour.
After three repeats of rolling and folding, flour the fat dough square, wrap it in plastic, and put it in a clean zip-top plastic bag. Refrigerate overnight or up to 2 days.
On baking day - roll the dough, bake the pies:
Line two large baking sheets with parchment paper. Remove the dough from the refrigerator, divide it in half, and re-wrap half and return to the refrigerator – you will work with only half the dough at a time.
Flour your work surface and roll the dough to 12 inches square. Cut the dough into three 4-inch rows, both horizontally and vertically, so you end up with 9 even squares (each about 4 x 4 inches.)
Spoon a generous teaspoon of the jam into the center of each square. Put some water in a small bowl and use your finger or a pastry brush to lightly moisten the edges of the squares. Fold each square into a triangle—you’ll need to stretch the dough a bit to cover the filling. Press a fork along the joined edges of the pastry to help seal it. Place the filled pastries on the prepared baking sheet, leaving an inch or so of space between them to rise. Continue making hand pies with the second half of the dough and the rest of the pie filling, or leave the dough refrigerated for another day.
Cover the pan with plastic wrap and set aside for 20 to 30 minutes. Meanwhile, heat the oven to 400°F. After 20 to 30 minutes, the dough won’t seem to have risen, but it should feel puffy rather than firm.
Remove the plastic, brush the top of the turnovers with egg wash, and sprinkle with coarse sugar. Use a sharp knife or a pair of kitchen shears to snip a few slits in the top of the pastries. Bake the hand pies until they’re nicely browned, 15 to 20 minutes. Be careful with hot little pies - that jam can burn your mouth! Transfer to a rack to cool before serving.
37 Cooks members receive products from our sponsors to work with to create their posts; no other compensation is given. All content is solely the opinions of our members. Members also write non-sponsored posts that do not feature any products. These are not compensated in any way..
Subscribe to:
Posts (Atom)