Thursday, July 31, 2014

Chili Basil Chicken

When I signed up for this challenge, I was very intrigued by the Spices & Seasons cookbook! I’ve always been a very sense-oriented person and knew this book would suit me well. The aroma that came from this dish was outstanding. The taste equally outstanding.

Chili Basil Chicken
by Debbie
Adapted from Spices & Seasons: Simple, Sustainable Indian Flavors by Rinku Bhattacharya

Prep Time: 10 minutes, plus 30 minutes to marinate. Cook time: 25 minutes. Serves 4 to 6

2 pounds boneless skinless chicken, cut into 1 1/2” pieces ( I left mine as a whole breast)
1 teaspoon salt
1 teaspoon turmeric
1 large lime, halved and seeded
3 Tablespoons oil (I used a Persian Lime olive oil by my local oil and vinegar specialty store)
1 teaspoon cumin seeds
1 medium red onion, finely chopped (about 3/4 cup)
3 Tablespoons very finely chopped fresh ginger
10 green chiles, slit lengthwise (I only used 4 because they were quite large)
1/2 cup finely chopped basil leaves, plus 8 to 10 leaves for garnish
3 or 4 dried red chilies (I used 1 Tablespoon of crushed red pepper)

Rub the chicken with the salt and turmeric. Squeeze the lime juice over it and set aside to marinate for about 30 minutes.

Heat the oil in a skillet or wok. Add the cumin seeds and when they sizzle, add the onion and ginger and cook over medium-high heat, stirring frequently, until the onions wilt and soften.

Add the seasoned chicken and cook for 12 minutes, stirring frequently, until the chicken is turning fairly brown. (Since I left the chicken breast whole, I cooked it for 8-9 minutes on each side.)

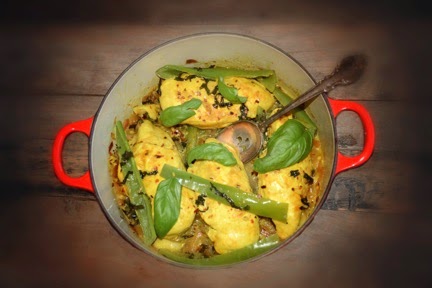
Stir in the green chilies and basil leaves and cook until the leaves are wilted. Lightly crush the red chilies and stir in and cook for 2 to 3 minutes. (I sprinkled the crushed red pepper at this point.)

Sprinkle with the whole basil leaves and serve.

Lentil and Quinoa Pilaf

I really liked this dish because it was healthy, yet filling, and delicious! I am usually not a big fan of lentils, but this dish really has great flavor. I served it as a side with Chicken Tikka Masala and Sandra's Naan.

Lentil and Quinoa Pilaf
by Rachael
Adapted from Spices & Seasons: Simple, Sustainable Indian Flavors by Rinku Bhattacharya

1/3 cup olive oil
4 medium red onions, thinly sliced
1 teaspoon sugar
2 teaspoons freshly grated ginger
2 cloves garlic
4 cups vegetable broth or water
1 cup brown lentils
1 cup quinoa
1/2 cup pine nuts or walnuts (optional)
1 teaspoon freshly ground cumin seeds
2 (2-inch) cinnamon sticks
2 bay leaves
1 teaspoon salt, or to taste
Plenty of freshly ground black pepper
6 slices bacon, crumbled

For the garnish:
1 lime, cut in half
2 Tablespoons fresh cilantro

In a large saucepan, heat the olive oil, then add in the onions. Cook for about 5 minutes, then add in sugar and cook, stirring often, until nicely browned. Set aside 1/3 of the onions for use later in the recipe.

Add the ginger, garlic, broth or water, lentils, quinoa, pine nuts or walnuts, cumin, cinnamon sticks, bay leaves and salt to the remaining mixture.


Cover, and cook on low for about 40 minutes.

The pilaf is ready when the water is fully absorbed and grains are tender. When ready to serve, stir in the black pepper, bacon pieces, lime juice and cilantro. Top with the caramelized onions and enjoy!

Chipotle Twice-Baked Sweet Potatoes

I recently received a copy of The New Southwest Cookbook by Meagan Micozzi, as part of the new feature in 37 Cooks. Check out the new tab on our blog, Cookbook Reviews, to read about all the books and recipes being reviewed.

Meagan is from the East Coast and moved to Arizona, where she was "smitten" with the flavors of the new Southwest. She describes the new Southwest as a fusion of flavors, "a blend of classic desert ingredients and new, fresh additives." One example was "Native American breads and stews bring a whole new meaning to tacos and tortas." In this cookbook, Meagan takes it one step further by combining favorite East Coast comfort foods with the flavors of the new Southwest.

Meagan makes no assumption that everyone who picks up the book knows about the new Southwest. She gives detailed descriptions about the spices, herbs, chiles, produce, dairy, baking ingredients and pantry staples that are needed. She even recommends essential equipment to make your journey into the new Southwest easier.

Meagan started a blog, Scarletta Bakes, as a diary of her culinary adventures in her Arizona kitchen. This cookbook evolved from that passion. You will find it unique, full of flavorful recipes to enjoy. The recipe I have chosen to share is the Chipotle Twice-Baked Sweet Potatoes. They were delicious and SPICY. Enjoy!

Chipotle Twice-Baked Sweet Potatoes
by Linda
Adapted from The New Southwest Cookbook: Classic Flavors with a Modern Twist by Meagan Micozzi, page 129

1/2 cup walnuts, coarsely chopped
4 large sweet potatoes
1/4 cup unsalted butter, melted
1/4 cup firmly packed brown sugar
2 teaspoons ground chipotle chile*
1 teaspoon ground ancho chile
1 teaspoon ground cinnamon
Salt to taste
Extra virgin olive oil
4 walnut halves and a handful of chopped cilantro for garnish

Preheat the oven to 375°F.

Spread walnuts on baking sheet and toast in oven for about 5 minutes, until light golden brown.

Wash sweet potatoes and pierce the tops several times with a fork. Pat dry.

Place sweet potatoes on a baking sheet and bake in oven for approximately one hour or until tender.

Once potatoes have cooled, make a small slit on the top of potato and carefully scoop the flesh out into a bowl.

Add the butter, brown sugar and spices to bowl. Gently stir to completely mix in with the potato.

Fold in the walnuts.

Carefully refill the four potato skins with the potato mixture.

Top each potato with a walnut half.

Return to oven for 10-15 minutes until tops are golden brown.

After you remove from oven, lightly brush the outside skins with olive oil.

Sprinkle with the cilantro.

Serve immediately.

Tip: The original recipe called for 1 Tablespoon of ground chipotle chile. I cut the amount back to 2 teaspoons. I would suggest adding 1 teaspoon. Once everything has been incorporated, taste. If you want it spicier, add an additional 1-2 teaspoons. My husband and I felt the 2 teaspoons made it very spicy!

Fried Avocado Quesadillas with Sweetest Pico de Gallo

Frying avocado? Crisping up the delicious, rich green-fleshed fruit with oil might seem like gilding the lily, a cooking act similar to wrapping bacon around rich shrimp or deep-frying cheese. Such were my thoughts when perusing the new cookbook, The New Southwest: Classic Flavors with a Modern Twist by Meagan Micozzi of Scarletta Bakes, which includes this lovely recipe for Fried Avocado Quesadillas.

Since both fried cheese and bacon-wrapped shrimp are downright delicious, frying avocado like hash to create the filling of a meatless quesadilla seemed like a straight-forward slamdunk of decadence. And yep. Oh, yes. Indeed. These were rich, cheesy, tasty decadence.

While the recipe makes two quesadillas, those will be thick and filling beasts. Feel free to make three quesadillas with the filling and pico if you'd like to stretch the meal.

Fried Avocado Quesadillas with Sweetest Pico de Gallo
Yield: 2 very large quesadillas, 8 wedges

For the sweetest pico de gallo:
1 cup quartered seedless green grapes
1 cup quartered grape tomatoes
1/2 cup diced sweet onion
1 large jalapeno, minced (seeded or not, your choice)
2 stems parsley, minced
2 Tablespoons freshly squeezed orange juice

For the quesadillas:
6 large avocados, peeled and pitted
1/4 cup freshly squeezed lime juice
2/3 cup plain, dry breadcrumbs
2 teaspoons salt
2 teaspoons ground white pepper
Canola oil
4 (9 or 10-inch) flour tortillas (or 6, see note above)
2 cups shredded Chihuahua cheese (or mild Cheddar)

To make the salsa: 
Mix all the ingredients together in a large bowl. Set aside.

To prepare the filling: 
Place the avocados in a large bowl and mash into chunks. (Over-mashing the avocados makes the frying more difficult. Think about it like frying a hash, which always has a chunky consistency.)
Stir in the lime juice, breadcrumbs, salt and pepper until evenly distributed. Heat 1 Tablespoon of canola oil over medium heat in a 10-inch, heavy-bottomed skillet, preferably cast iron. Once the oil is hot, add about half of the avocado mixture and spread loosely over the bottom. Cook for 2-3 minutes, until the underside of the avocado is crisp and golden. Flip the avocado and cook for another 2-3 minutes. Remove fried avocado to a paper towel-lined plate or baking sheet. Repeat with the second half of the mixture.

To assemble and cook: 
Remove the skillet from heat and line with a tortilla. Top with even layers of half the avocado mixture, half of the salsa and half the cheese. Top with a second tortilla. Using a sharp knife, carefully slice the quesadilla through into quarters. (This great technique really helps with flipping.) Return the skillet to the stove and cook over medium heat, pressing on the top of the quesadilla a bit as it cooks. Fry until the edges of the tortilla are crisp and golden, about 3-4 minutes. Flip each quarter and cook for approximately 4 more minutes. Remove cooked the wedges and repeat with remaining ingredients.

Serve immediately and enjoy!

Wednesday, July 30, 2014

Snap, Crackle, Pop, and Chocolate!

This recipe is a true “pantry raid.” If you bake regularly, it’s likely you have many ingredients in your baker’s pantry that can be used in this recipe. Depending upon the last-minute guests you’re expecting, use semi-sweet for adults or milk chocolate for kids. Nearly any morsels or bits you have on hand can be stirred into these treats – be creative and raid the pantry!

Tuesday, July 29, 2014

Chipotle Garlic Cheddar Mini Beer Loaves

Chipotle Garlic Cheddar Mini Beer Loaves
by Lesia

2 teaspoons olive oil
2 cloves garlic, minced
3 cups self-rising flour
2 Tablespoons sugar
1/2 teaspoon chipotle chili powder
12-ounce can of beer
4 Tablespoons plus 2 Tablespoons butter
1 cup sharp cheddar cheese, shredded

Preheat oven to 375ºF.

Using a small skillet, heat olive oil over medium-high heat and sauté garlic until just fragrant. Set aside. 

Using the Good Cook mixing bowl, mix together flour, sugar, chili powder, beer, and 4 Tablespoons of melted butter until smooth. Using the Good Cook Silicone Spatula, stir in garlic and cheese until combined well. 

Spray the Good Cook 4 Cup Loaf Pan with non-stick cooking spray and evenly distribute batter into pan. Bake for 20 minutes, insert knife in the middle of the thickest loaf. If knife comes out clean, the bread is done. Brush tops of loaves with remaining 2 Tablespoons of melted butter. Return to oven for 5 minutes.

Monday, July 28, 2014

Magic Cake

Pantry cooking may seem simple. There's no need to go to the store, after all, if you cook with whatever you have on hand. This cake recipe, however, is far, far, far from simple. In fact, it's a miniature chemistry experiment, though it's way more fun to think of it as MAGIC than science. Calling it magic makes it way more fun to clean up the mess, because wow, I went through four mixing bowls. (Don't be like me!)

Using the power of butter, eggs and sugar, this slowly baked cake cooks firm on the top and bottom but remains custardy in the center -- meaning it's certain to impress, even if you didn't need to grocery shop.

Friday, July 25, 2014

King Ranch Chicken Casserole

This recipe, adapted from a recipe on the Homesick Texan blog, is one of our favorite casseroles and I usually have the needed ingredients on hand. When the Good Cook Potluck Pantry Panic Challenge was presented, I knew immediately this was my pantry panic go-to recipe. Before discovering this recipe, I made King Ranch Casserole the old way, with the two different kinds of soup. It was good. It’s what I was used to. Once I found this recipe, though, I have never made it any other way. This is a spicy dish. The freshness of the peppers, cilantro and fresh lime juice, make this dish pop with flavor. Save yourself the regrets and double this recipe so you have plenty for leftovers and to freeze.

Bengali Potato & Zucchini Curry

We love Indian food and when the opportunity arose to prepare a dish from Silk Road Vegetarian, I was excited! The delightful fragrance of the spices had my mouth watering while I was cooking this dish, and the final result was delicious. I would suggest preparing the Raita several hours prior to cooking the curry, so it will be nice and chilled. The ingredients are all easily obtainable and the recipe not too complex; however, it all comes together in a wonderful melange of flavors that will please anyone craving a tasty Indian dish!

Bengali Potato & Zucchini Curry 
by Judy
adapted from Silk Road Vegetarian by Dahlia Abraham-Klein

Prep time: 30 minutes, plus 10 minutes for standing
Cook time: 50 minutes
Serves 4

2 zucchini, sliced into 1/4-inch rounds
2 large baking potatoes, peeled and cubed
1/2 teaspoon ground turmeric
1/2 teaspoon garlic salt
2 Tablespoons oil
4 cloves garlic, minced
1 teaspoon fresh ginger, minced
1/2 teaspoon ground ginger
3 teaspoons curry powder
1 teaspoon ground cumin
2 tomatoes, peeled and chopped
4 Tablespoons water
1 teaspoon granulated sugar
1 teaspoon salt
Basmati rice for serving
Raita (recipe below)

Combine the zucchini, potatoes, turmeric, and garlic salt in a large bowl and toss gently. Set aside for 10 minutes.

Heat the oil in a large skillet set over medium heat, saute the zucchini and potato mixture for about 7 minutes or until slightly golden.

Remove the zucchini and potato mixture with a slotted spoon, keeping as much oil in the pan as possible. Set mixture aside on a platter.

Return the same skillet to the stove and reduce heat to medium. Saute the garlic, ginger, ground ginger, curry powder and cumin, stirring for 2 to 3 minutes, or until fragrant.

Add the tomatoes, water, sugar, and salt. Increase heat to medium-high and cook until boiling. Add the zucchini and potato mixture, reduce heat and simmer covered for 25 to 30 minutes, or until potatoes are tender. Serve over rice and with Raita.

Raita 
by Judy
adapted from Silk Road Vegetarian by Dahlia Abraham-Klein

1 teaspoon cumin seeds

2 cucumbers, peeled, seeded and finely chopped
2 cups plain whole-milk yogurt
2 green onions, chopped
1 Tablespoon lemon juice
Salt, to taste
Freshly ground black pepper, to taste
Fresh mint, for garnish

Dry roast the cumin seeds in a skillet for about 5 minutes, stirring constantly, until fragrant. Combine cucumber, yogurt, onions, lemon juice, salt and pepper in a medium-sized bowl. Crush cumin seeds with a mallet or the back of a large spoon and add to cucumber-yogurt mixture. Serve chilled, garnished with mint.

Thursday, July 24, 2014

Saffron and Cardamom Rice Pudding

If you are looking to experiment with Indian flavors, this is your book. The author, Rinku Bhattacharya, provides the general population with delicious and easy to prepare dishes packed with flavor and sustainable ingredients. In Spices & Seasons, each recipe is carefully labeled as vegan/vegetarian and/or gluten-free. The index in the back of the book is also separated as such; gluten-free index, vegan/vegetarian index, vegetarian index, and recipe index! I found this to be extremely helpful when trying to pick which dish to make.

It was very difficult to pick a dish due to the large selection of recipes included in the book and how many of them were gluten-free. I finally decided on the Saffron Pistachio Rice Pudding on page 333, with a few minor changes/substitutions. I am in the process of packing up my life and putting most of my belongings in storage for a year as I start my next adventure in NYC, so I wanted to use what I had on hand instead of going out to buy things. Rice pudding can be a fairly simple recipe, but this one was packed with flavor! Oh my goodness...it is delicious and I promise you, you will want to make this. Here are my substitutions: Instead of half and half, I used unsweetened coconut milk, for the white rice I used short grain brown rice, and I did not have pistachios around (trust me those do not last long around me), so instead I diced up some granny smith apple (it added such a delicious, fresh crispness to it). And yes...I do have saffron lying around. :)

I've seen rice pudding be super creamy and I've also seen it where there is some creamy liquid remaining, which is how I prefer to enjoy it (as you can see by the picture below.) If you like more of the liquid, then just cook it for a bit less time, or simply add additional liquid.


Saffron and Cardamom Rice Pudding
by Jenny

Adapted from Spices & Seasons Simple Sustainable Indian Flavors by Rinku Bhattacharya, page 333

4 cups unsweetened coconut milk
whole cardamom pods
1/4 cinnamon stick
1/3 cup organic short grain brown rice
1/2 cup organic sugar
1 teaspoon saffron threads
1/2 cup diced Granny Smith apple


In a medium pot, add coconut milk, whole cardamom pods, cinnamon stick, rice, and sugar and bring to a boil.

Reduce heat to a simmer, uncovered, and stir frequently until it begins to thicken, about 35 minutes.

Remove and discard the whole cardamom pods and cinnamon stick.


Stir in the saffron threads and granny smith apples, cook for an additional 5 minutes.


Serve with sliced of granny smith apple on top - enjoy!


This is a great cookbook to have in your collection, especially if you or someone you know is either gluten-free, vegetarian, and/or vegan! So many delicious recipes and flavors to experiment with.  

Note: The cookbook was provided to me from the publisher for this review. All comments and opinions are 100% my own.

Almond-Crusted Pear Tres Leches Cake

Meagan Micozzi’s The New Southwest: Classic Flavors with a Modern Twist presents not only a book full of terrific Southwestern recipes, but also a compendium of classic Southwestern elements, ingredients, and techniques, updated for the modern kitchen. There is a whole section devoted to “The Southwestern Pantry” which describes appropriate spices & herbs, produce, dairy, pantry staples, and more. There is even a whole section devoted to chile peppers.

Micozzi presents the building blocks needed to create your own authentic Southwestern menu. From basic condiments (Salsa Verde, Agave Ancho Butter, Roasted Crema) to menu staples (Corn Tortillas, Navajo Fry Bread, Chorizo), you will be equipped to make a simple Southwestern-inspired breakfast (Mushroom & Leek Migas, Pinyon Butter Oatmeal), or even a complex, multi-course dinner, complete with beverages (Sangrita, Cucumber & Melon Agua Fresca), appetizers (such as Salsa Bandera Chicharrones or Black Bean & Corn Quesaditas), main courses (like Picadillo Meatloaf with Habanero Ketchup, or Citrus & Herb Red Snapper), and desserts (try the Brown Butter Coyotas, or even Grilled Apple Pie). Speaking of desserts, I was inspired to try the Almond-Crusted Tres Leches Cake. The addition of almonds and pear were perfect updates to the classic dessert, and I opted to add touches of canela, or Mexican cinnamon, after reading about its authenticity in the Southwestern pantry. The almond/graham crust was rich and nutty, and the subtle addition of pear blended perfectly with the creamy milks.

The New Southwest is a very informative book, with lots of inspired recipes to try. The recipes are well-written, concise, and easy to follow.

Almond-Crusted Pear Tres Leches Cake
by Gary
Adapted from The New Southwest by Meagan Micozzi

Serves 8-10

For the crust:
9 whole graham crackers
1/2 cup whole almonds
1/2 cup almond meal (may be made by pulverizing whole or slivered almonds)
8 Tablespoons unsalted butter, melted

For the cake:
1 1/2 cups all-purpose flour
1 Tablespoon baking soda
4 large eggs
1 1/2 cups granulated white sugar
1/2 cup whole buttermilk
1 can (15-ounce size) light sliced pears, drained and liquid reserved

For the soak:
1/4 cup whole milk
1 can (14-ounce size) sweetened condensed milk
1 can (12-ounce size) can evaporated milk
1 cup pear juice (from the can of light sliced pears)
1 pinch canela

Preheat oven to 350°F.

Line a 9-inch springform pan with a depth of at least 3 inches with parchment and set aside.

To make the crust: Break the graham crackers into large pieces and place with the whole almonds in the bowl of a food processor fitted with a steel blade. Process to a coarse meal. Remove to a large bowl and toss together with the almond meal and melted butter. Spread the very damp mixture over the bottom of the prepared pan and bake for 10 minutes. Remove and set aside to cool.

Meanwhile, to prepare the cake: Whisk the flour and baking soda together in a large bowl, and set aside. In another large bowl, beat together the eggs and sugar. Slowly beat in the dry ingredients, alternating with the buttermilk in approximately four portions. Mix just until you have a uniform batter. Pour the batter over the crust and bake for 45 to 50 minutes, or until a cake tester inserted into the center comes out clean. Remove cake from oven and set aside to cool at least 10 minutes before unmolding.

To prepare the soak: Whisk the whole milk, condensed milk, evaporated milk, pear juice, and canela together in a large bowl. Once the cake has cooled, release it from the pan, remove the parchment paper, and set the cake on a rimmed platter. Using a wooden skewer, poke a series of holes through the top of the cake and pour the soak over the top. Set the cake aside to allow the soak to be absorbed. Serve cake either chilled from the refrigerator or at room temperature. Garnish with reserved pear slices.

Many thanks to the publisher for providing copies of The New Southwest to 37 Cooks for review.

Black Forest Honey Streusel Coffee Cake

First, I want to say how excited and privileged I felt to be able to receive 'The New Southwest' cookbook by Meagan Micozzi. It's truly a stunning book. I'm a graphic designer by trade (for over 25 years now) and love the fact that there are pictures with every recipe. I had difficulty picking just one, but decided on the coffee cake since I've never made one with honey.

I changed the title to just 'honey' and not Sonoran honey, since I live in Colorado. I used local unfiltered raw honey from Black Forest, Colorado. I substituted almond-coconut milk for the buttermilk simply because I just prefer it. I also could not find ground canela and used ground cinnamon like Meagan suggested. I felt there was too much streusel topping and ended up using only about 2/3 of what is recommended in the recipe and I added some pumpkin pie spice to give it some zing!

I recommend serving this cake warm with a dusting of powdered sugar, but it's equally great at room temperature with a good cup of coffee.

Black Forest Honey Streusel Coffee Cake
by Holly
Adapted from The New Southwest: Classic Flavors with a Modern Twist

For the cake:
2 cups unbleached all-purpose flour
1 teaspoon baking powder
1 teaspoon ground cinnamon
1/2 teaspoon kosher salt
1/2 cup unsalted butter, at room temperature
1 cup sugar
2 large eggs, at room temperature
1 teaspoon pure vanilla extract
2/3 cup local honey
2/3 cup almond-coconut milk, unsweetened
Powdered sugar (optional), to dust on top

For the topping:
4 Tablespoons unsalted butter, chilled and cubed
2/3 cup packed light brown sugar
1/6 cup flour
1/2 teaspoon pumpkin pie spice

Heat oven to 350˚F. Coat a 9 x 9" baking pan with cooking spray and dust with flour.

For the cake, in a large bowl, add the flour, baking powder, cinnamon and salt, whisk until blended.

In a stand mixer, cream the butter and sugar until fluffy, about 3 minutes. Add eggs, one at a time until blended. Add the vanilla extract.

Add the flour mixture, honey and milk, alternating by thirds until completely incorporated. Pour the batter in the pan.

For the topping, combine the butter, sugar, flour and spice, using a fork until pea-sized crumbles are formed. Spread on top of the batter.

Bake the cake for 40-42 minutes on center rack. Test with a toothpick for doneness. Remove from oven and cool pan on rack for 10 minutes before serving. Dust with powdered sugar and enjoy warm.

Three Sisters Hush Puppies

Did y'all know Indiana is famous for its corn? No? Well, it's true. We get amazing sweet corn at the farmer's markets every summer. Maybe it's so good because it's so fresh. Maybe it's the soil and climate. Or maybe it's the people who grow it. I don't know. I do know I buy fresh corn practically every week and I will add fresh corn to any dish that I want to add a bit of texture and sweetness. These hush puppies originally call for the corn to be cooked prior to adding to the batter, but Indiana sweet corn is so good fresh that I just cut the kernels right off the cob and into the batter. (If your fresh corn isn't delicious raw, consider moving to Indiana and be my neighbor!)  

Three Sisters Hush Puppies
by Woo

1 1/2 cups of cornmeal
1/2 cup of all-purpose flour
2 1/4 teaspoons baking powder
1 teaspoons salt
1 teaspoons ground black pepper
2 eggs
1 cup buttermilk
1/4 cup diced yellow onion
1/2 cup cooked black beans
1/2 cup fresh whole corn kernels cut from the cob
1/2 cup grated zucchini
1 fresh jalapeno, finely diced (optional)
6 cups peanut oil for frying.

Preheat deep fryer to 360°F. In a medium mixing bowl, whisk together all the dry ingredients. In a small bowl, beat the two eggs and add the buttermilk, mixing well. Add the egg mixture to the dry ingredients and mix until well blended. Stir in the onion, beans, corn, zucchini, and jalapeno until well distributed throughout the batter.

Using a small cookie scoop, gently slide a scoop of batter into the hot oil. The hush puppy will puff and begin floating within one minute. Flip the hush puppy so it cooks and browns evenly. Allow to cook for about 5 minutes. Drain on paper towels. Serve immediately.

The cookbook author recommends serving these with her recipe for Roasted Crema on page 54. I think that would be an excellent sauce for these hush puppies.  

Apple Fritter Donut Holes

I was so excited when we were given the opportunity to review cookbooks! My choice was “Sweet Debbie’s Organic Treats” by Debbie Adler. This book is filled with delicious sounding treats and what makes the book really special is that all of the recipes are allergy-free, gluten-free, sugar-free and vegan. For anyone who has a friend or family member with food allergy challenges, or a friend or family member who has made the decision to follow a vegan lifestyle, "Sweet Debbie's Organic Treats" would be a wonderful addition to your cookbook collection!

My husband absolutely adores apple fritters but, let’s face it, they’re not exactly healthy, right? When I came across Debbie’s recipe for Apple Fritter Donut Holes I knew right away this would be my recipe. I did a little investigating and found a couple of websites that suggested making a slurry of flaxseed meal and hot water as a substitute for guar gum. Great! I have flaxseed meal in the house all the time! For the erythritol in the glaze, I made the decision to go ahead and use powdered sugar. I did make my own sunflower butter from the recipe in Debbie’s book, and imagine my happiness when I discovered this as my new substitute for peanut butter, which I love but cannot eat, so I've avoided it for years. Sunflower butter is super easy and so delicious. If you get Debbie’s book, be sure to give her recipe a try!

Even though my recipe is not gluten- or sugar-free, or vegan (because I used honey), I do appreciate that I was able to make a healthier version of apple fritters. So here’s my twist on Debbie’s Apple Fritter Donut Holes!

Apple Fritter Donut Holes
by Susan
Adapted from Sweet Debbie's Organic Treats by Debbie Adler


Donut Holes:
1 1/2 cups organic all-purpose white flour
1/4 cup organic wheat flour (in place of buckwheat flour)
1/2 teaspoon cinnamon
1/4 teaspoon baking powder
1/4 teaspoon salt
1/4 teaspoon flaxseed meal + 1/2 teaspoon hot water, made into a slurry (substituted in place of guar gum)
1/4 cup plain rice milk (I made my own…lots of recipes online)
1/4 cup organic honey (in place of coconut nectar)
2 Tablespoons sunflower seed butter

1 Tablespoon fresh lemon juice
1 teaspoon vanilla
1/3 cup grated, peeled apple (I used Fuji and I used a little bit more than 1/3 cup)

Glaze:
1 1/2 cups powdered sugar (in place of erythritol)
1 Tablespoon organic honey
1 Tablespoon cream of coconut (used in place of coconut nectar and coconut oil)
1/2 teaspoon vanilla
2 Tablespoons apple cider
1 teaspoon fresh lemon juice

Preheat oven to 325°F. In a large mixing bowl, whisk together the dry ingredients (flours, cinnamon, baking powder and salt.) In a medium bowl, whisk together the flaxseed meal slurry, rice mile, honey, sunflower seed butter, lemon juice and vanilla. Mix together until just combined (don’t overmix.) Fold in the grated apple.

Roll the dough into about 1 1/4-inch balls and place on a baking sheet lined with parchment paper. Bake donut holes for about 12 to 13 minutes, or until they are light golden brown (mine took about 15 minutes.) Rotate the baking sheet halfway through baking. Remove baking sheet from oven and let cool for about 10 minutes before transferring donut holes to a wire rack to cool. Do not glaze until they are completely cooled.

Once the donut holes are completely cooled, whisk the glaze ingredients together in a mixing bowl. With a regular teaspoon, drizzle a little bit of the glaze over each donut hole and let sit for a few minutes. I repeated this process (drizzling and letting them sit for a few minutes) until all of the glaze was gone. Enjoy immediately! If there are any leftover be sure to refrigerate, or Debbie says they can be frozen for up to 3 months.

Sunflower Buttercup Brownies

I've recently done some vegan cooking, but I've never done any gluten-free and allergy-free baking so I was not surprised to find some ingredients in this cookbook that I'd never heard of. I am always up for a challenge and I am so glad I took this one! I now love coconut nectar, which I did not find to taste like coconut at all. It has the same consistency as honey or molasses, is mildly sweet, but has some extra depth to it. I used Pamela's Artisan Flour Blend (gluten-free) but there is a recipe in Sweet Debbie's cookbook so you can make your own if you want. I made this recipe twice. The first time I omitted the guar gum just to see what would happen. Guar gum is expensive and I was trying to save a little money. Sweet Debbie also has a recipe for sunflower seed butter and chocolate chips in her book. I bought both at the grocery store and my chocolate chips were dairy, nut, and soy free and they were mighty tasty!

So which version did we enjoy more, with guar gum or without? They were both a good treat for someone with food limitations who wants a sweet treat. We enjoyed the version with the guar gum a little more, though. My guess is if you are cooking from this book, having guar gum on hand is a necessity anyway and I recommend taking Sweet Debbie's advice on ingredients. She's done all of the research and the trial and error. Why not follow her lead?

As I read through the cookbook I found that two things stood out. Love for her son (he's the reason she started on this allergy-free, vegan, gluten-free, sugar-free, soy-free, and nut-free journey) and some delicious sounding recipes. The next time I have a house guest with any of these culinary restrictions, I will most certainly cook from this book!

Sunflower Buttercup Brownies

by Sandra
Adapted from Sweet Debbie's Organic Treats

48 mini paper baking cups
2 cups all-purpose gluten free flour
2 1/2 teaspoons sodium-free baking powder
1/2 teaspoon guar gum
1/2 teaspoon fine sea salt
1/3 cup grapeseed oil
1/2 cup unsweetened applesauce
1/3 cup coconut nectar
1 teaspoon vanilla extract
3/8 teaspoon stevia powder (I omitted)
1 cup sunflower seed butter
1 1/4 cups chocolate chips

Preheat the oven to 325°F. Add the paper cups to your mini muffin baking pan(s). Whisk the dry ingredients (flour, baking powder, salt) together. Whisk the wet ingredients (oil, applesauce, nectar, vanilla) together. Add the wet ingredients to the dry ingredients and stir until combined. Add the sunflower seed butter and stir until combined and then do the same with 1 cup of the chocolate chips. Fill the paper cups 2/3 of the way full with brownie batter and top with a sprinkle of chocolate chips. Bake for 18 minutes. Cool completely. Enjoy!

P.S. I started a group on Facebook called "Leftovers!" for my neighbors. Because of all of the recipe developing my husband and I are involved in, we often cannot eat all of what we cook and I don't like to waste food! I had some leftover Sunflower Buttercup Brownies and also had some leftover dough, so I posted them in the group. This was actually the first post in the group and I wondered, would I have any takers? Well, I did! And not only did my neighbor come and pick up these treats and the dough in seconds flat, but I ended up getting texts about how great they are! The following day I got texts with photos of the newly baked treats with the dough I sent. And accolades galore! Honestly, it might have been just as much fun for me to hear about the leftovers as it was to cook in the first place! So if you are wondering if these treats are delicious - my neighbor says, absolutely!


Comforting Slow-Cooked Chickpeas with Tomatoes and Ginger

Spices and Seasons is a beautifully written cookbook that really does attempt to bring Indian cooking to the average American kitchen. The author, Rinku Bhattacharya, is attempting to live "greener" and cook in a more sustainable manner. I love some of the advice that she gives in the introduction, and I also like how the recipes are labeled as a "vegetarian", "gluten-free", etc. This is very helpful to a home cook.

I actually had to read through the book about five times before deciding on a recipe to make and review for this post. There are honestly about 40 recipes that I want to try as soon as possible. But sadly, I live in an area without many ethnic markets or stores, and I did have difficulty finding a few of the key spices recommended for many of the recipes (I'm in a suburb of Houston.) I have ordered them from Amazon, but they will not be here in time to complete my review.

So, I needed to choose a recipe that included completely local and locally found ingredients. My family members and housemates have also been wanting to try more "meatless" meals, so I felt that this would be a great time to experiment with one of Rinku's favorite chick pea dishes as a main course. I doubled her original recipe (for four men and myself) and ended up substituting some of the green chili peppers with green bell peppers (a substitution that she approves of, page 30.) I did not want to scare anyone off with excess heat!

Aside from that modification, I simply doubled everything else. I did sauté my onions and ginger in two small batches (the original size), so as not to lose the integrity of the recipe. I also served with both chopped scallions and fresh red onions (another recommendation), in order to get feedback with the slight modifications.

Overall this recipe was very easy to prepare. It did have a nice heat level, but the spice that lingered afterwards was the more dominant flavor. The ginger also mixed well with the peppers and lended the dish a sweet type of heat. I served a green salad beforehand, and then we ate the chickpeas with naan, raita and harissa. This would be a great dish to serve on a cool, rainy day. It is very filling and comforting, so I can see why it is one of the author's favorites. I will be making this dish again, and I am excited to try many more from this book!

This recipe did make a lot of food, but it refrigerated very well and it tasted great the next day. In fact, it held up very well in the refrigerator for 2 to 3 days and was a great dish to come home to after a weekend vacation. We served ours with a simple green salad and some naan bread. If you would like, top each serving of the chickpeas with chopped red onion or scallions. It makes a very pretty plate, and tastes delicious. Enjoy!

Comforting Slow-Cooked Chickpeas with Tomatoes and Ginger
by Chris
Adapted from "Comforting Slow-Cooked Chickpeas with Tomatoes and Ginger", Spices & Seasons by Rinku Bhattacharya

1 1/2 cups dried garbanzo beans (chick peas), sorted
6 Tablespoons grapeseed oil, divided (3 Tablespoons and 3 Tablespoons)
4 cups yellow onion (about 4 medium-large onions), diced and divided (2 cups and 2 cups)
12 Dorot crushed ginger cubes, divided (6 and 6)
2 teaspoons salt
6 cups water
2 jalapenos, chopped (de-stem and de-seed for less heat, if desired)
1 serrano, chopped (de-stem and de-seed for less heat, if desired)
5 Tablespoons green bell pepper, chopped
1 cup cilantro, de-stemmed and chopped
6 tomatoes, cut into quarters
1 Tablespoon plus 1 teaspoon cumin, ground
Chopped red onion and/or chopped scallions, to serve (optional)

Rinse the dried chickpeas 2 to 3 times and then place in a bowl of water. Allow to stand in the water for about 1 hour. While the chickpeas are soaking, heat 3 Tablespoons of the grapeseed oil over medium heat for 1 minute in a large skillet. When the oil is heated, add 2 cups of onion and 6 cubes of ginger. Let the onions and ginger cook for about 7 minutes, over medium heat, stirring often. Remove the onions and ginger from the stovetop, and set aside. Repeat the process with the remaining grapeseed oil, onions, and ginger.

When both batches of onions and ginger have been cooked, drain the chickpeas from the water, and place in a slow cooker. Add the 2 teaspoons of salt and the 6 cups of water to the slow cooker with the chickpeas. Also add all of the onions and ginger to the slow cooker. Stir to combine well. Place the slow cooker on low heat and allow to cook for 6 hours without removing the lid. While the chickpeas are cooking, make your pepper mixture that will be added later.

To make the pepper mixture, simply place the jalapeño, serrano, green bell pepper, cilantro, tomatoes, and cumin in a blender. Blend well until all of the large chunks have been reduced, and you like the texture of the sauce. 

After the chickpeas,onions, and ginger have cooked on low for 6 hours, uncover the slow cooker, add the pepper sauce, and mix well. Place the slow cooker back on low heat for 2 more hours. After the 2 hours on low, check the mixture and see if the chickpeas are done. I turned my slow cooker up to the high setting and continued to cook for 1 more hour. After the hour on high heat, I uncovered my slow cooker and allowed it to continue cooking for 1 more hour on high heat, in order to reduce the liquids in the pot. I believe that my batch of chickpeas took longer to cook because I did double the recipe.


Mini Pineapple Upside Down Cakes

I love being a part of both 37 Cooks and Good Cook Blogger/Kitchen Experts – and I love that they have combined forces for this event.

This was no ordinary challenge, though – this was the Good Cook Potluck Pantry Challenge. The key word in that name is PANTRY, meaning we had to cook or bake with whatever we had in our pantry (including fridge) and not buy anything at the store. Thankfully my pantry is pretty well stocked and happened to have a fresh pineapple on hand! We had to use two of the Good Cook items – one from the core items received and the second item was whichever pan we choose.

I knew right away that I wanted to make pineapple upside down cakes – this was my favorite cake growing up because it did not have frosting on it! I kid you not…to this day I still do not really like frosting unless it’s my own frosting, which I do not sweeten much. My sweet tooth is not that strong I guess. This goes perfectly with a little dollop of lightly sweetened fresh whipped cream. Even though I chose to do a sweet recipe, this pan can be used for so much more than desserts – you can bake cornbread, risotto (yes risotto squares!), meatloaf, etc. The possibilities are pretty endless – you just need to be creative.

I used the following items to create my Mini Pineapple Upside Down Cakes: Pineapple Corer/Slicer, Silicone Spatula, Chopping Mats, and Dessert Bar Pan. I loved using the pineapple corer/slicer – super easy to use, say good-bye to canned pineapple rings!

The recipe is below, however, here are a few substitutions that can be made:
If you are not gluten-free, feel free to use a “regular” cake mix
The recipe is gluten-free, dairy-free, soy-free, and nut-free – the picture does show whipped cream, but you can omit that.
Don’t like pineapple? Use a different fruit…raspberries, cherries, etc.
I used Earth Balance sticks – feel free to use whatever butter or butter alternative you want…I haven’t tried anything besides this and butter so I can not guarantee any results


Mini Pineapple Upside Down Cakes
by Jenny

1 package of gluten-free white cake mix (follow package instructions*)
2-3 Tablespoons Earth Balance baking sticks (this is in addition to whatever your box mix calls for)
1/4 cup dark brown sugar (Wholesome Sweeteners) 
1 small-medium pineapple, cored and sliced, and cut into 1/2 chunks – reserve any juice
12 natural maraschino cherries without stems, drained

Preheat oven to 350°F.

Prepare cake mix according to package instructions (use the spatula to scrape down the sides of the bowl every so often if using a stand mixer.)

Evenly divide up the 2-3 Tablespoons of earth balance into the 12 wells of the dessert pan. Place pan in preheated oven to melt the butter – once melted, remove from oven and sprinkle the brown sugar evenly into the wells of the pan.

Top the brown sugar and melted butter with one 1/2 chunk of pineapple and 1 natural maraschino cherry (halved or whole is fine.)
 
Pour prepared cake batter evenly into wells of pan – leave about 1/4-inch room to let the cake rise in the oven.

Bake for 25-30 minutes or until golden brown and a toothpick comes out clean. 

Remove from oven and using a heatproof serving plate or cutting board upside down onto pan, turn plate and pan over. 

Leave pan over cake 5 minutes so brown sugar topping can drizzle over cake; remove pan. 

Cool 30 minutes. 

Can be served either warm or cool with either ice cream (dairy free alternatives available), or whipped cream (or coconut cream.)
 
Store covered in refrigerator.

Good Cook provided us with these products free of charge – all opinions are 100% my own.