Dear Lauren,
I handed your dad a cookbook last night and said, hey, take a look and see what looks good to you for the weekend. So he chose five recipes and marked them with those little 3m page stickers I like. Then he said, carne guisada sounds good.
Oh? Was that one of the recipes in the book?
No, I marked chicken fried steak, Iowa skinnies, biscuits and sausage gravy, Chicago-style Italian beef sandwiches and funeral potatoes. But carne guisada sounds good.
I decided to come up with a recipe for the Instant Pot. Why Not? It's summer and who wants to heat up the kitchen with a stew on the stove or a braise in the oven? Not me.
This recipe is adapted from one I found early on in my internet research. Reading over it, I knew the complexity of flavor would be there. I made a few changes, including to the cooking method. We loved it. Serve this over rice, in a tortilla, or simply as what it is, a stew - a spicy, Tex-Mex stew. You can garnish it with chopped onion, chopped cilantro, avocado, or anything else you like.
P.S. While I was cooking, my phone broke! I'm heartbroken! I have no photo for you. Dad has one photo on his phone of the very last bite. I'm not sure that's worthy of posting on this blog lol! I will be making this again soon, no doubt abut that, so I will update with a photo later.
1 teaspoon cumin
2 Tablespoons avocado oil, divided
1.5 pounds top sirloin, trimmed, cut in 1 inch pieces
1 small onion, sliced
1 jalapeno, seeded, diced
1 garlic clove, minced
1/4 teaspoon Mexican oregano
1 teaspoon sea salt
1 teaspoon freshly ground black pepper
1 teaspoon Hungarian paprika
1 Tablespoon chili powder
1 tomato, (seeded over a strainer and bowl, tomato juice reserved), peeled, diced
1 cup water
1/2 cup tomato sauce
reserved tomato juice
1 teaspoon beef Better than Bouillon, optional
2 Tablespoons avocado oil
2Tablespoons all purpose flour
Toast the cumin in a small skillet for 5 minutes on medium-low heat, stirring occasionally. Remove from the heat and place the cumin in a bowl or plate to cool completely.
Set the Instant Pot to Saute. Add 1 Tablespoon avocado oil. When the indicator shows Hot, add around 10 pieces of the beef and sear them, making sure not to crowd the pan or the beef will steam. Remove each batch of the beef to a plate when seared and add 10 or so more pieces until you've seared all of the beef.
Add the sliced onion and jalapeno with a little splash of the water if needed. Stir the onion and jalapeno into the bottom of the pan to deglaze the pan. Cook about 1 minute. Add the garlic, stir about 30 seconds. Add the remaining tablespoon avocado oil, stir, add all spices (cumin, oregano, salt, pepper, paprika, and chili powder) and stir. Add the diced tomato, water, tomato sauce, reserved tomato juice, and Better than Bouillon, if using. Stir well. Return the beef and any accumulated juices to the Instant Pot liner.
Place the lid on the Instant Pot and set on Sealing, Manual, 40 minutes. While the stew cooks, make the roux.
In a small skillet over medium-low hear, add the avocado oil to the pan. When the oil is very hot, add the flour a bit at a time and stir well and constantly with a small whisk. Continue to add the flour, continually whisking, until all the flour is incorporated and the roux is a golden color which will take about 2 minutes. You are not looking for a dark roux like when you make gumbo, this roux is simply to be used as a thickener for the stew. Remove from heat and set aside.
When the carne guisada has finished cooking, do a Quick Release, and reset the Instant Pot to Saute.* Once the stew comes to a simmer, stir in half the roux. Check the thickness of your gravy. Add more roux until you reach the desired thickness.** Stir and cook for 1-2 minutes.Turn off the Instant Pot. Serve.
*Quickly taste the beef to make sure it is very tender. If it isn't, you can place it back under pressure for 10 minutes. I don't believe that step will be necessary.
**I used about 1/2 to 2/3 of the roux.
Love,
Mom
Friday, June 15, 2018
Instant Pot Carne Guisada
37 Cooks members receive products from our sponsors to work with to create their posts; no other compensation is given. All content is solely the opinions of our members. Members also write non-sponsored posts that do not feature any products. These are not compensated in any way..

Friday, January 20, 2017
Cajun Seven Layer Dip

Cajun Seven Layer Dip
by Linda Mire
12 ounces peeled and cleaned, frozen crawfish tails, thawed
1 Tablespoon unsalted butter
1 cube Dorot garlic or 2 cloves of garlic, minced
Juice from 1/2 lemon
1/4 cup of
1 8-ounce brick Philadelphia cream cheese, softened
1 8-ounce container of mascarpone
1/2 link andouille sausage, chopped into bit size pieces
1 15.5-ounce can small red beans (I used Goya)
Lettuce, shredded (about 1/2 cup), just for a little green
Tomato, diced into bite-sized pieces
1 bunch of green onions, dice whites and part of the greens
1/2 pound pepper cheese (jalapeno or hatch), grated
Black olives
Layer 1
1. Melt butter in large saute pan, medium heat. Add thawed crawfish tails, garlic and lemon juice. Saute for 2-3 minutes until crawfish fully cooked.
2. Turn off heat and add the 1/4 cup of Jay D’s Molasses Mustard. Coat crawfish tails. Set aside.
3. Cream together cream cheese and mascarpone.
4. Strain crawfish tails, then fold into cream cheese/mascarpone mixture.
5. Spread mixture into small shallow serving dish.
Layer 2
1. Grab another saute pan and brown andouille sausage.
2. Drain and rinse can of small red beans. Add to andouille sausage and cook for 1 minutes.
2. Turn off heat and add the 1/4 cup of Jay D’s Molasses Mustard. Coat crawfish tails. Set aside.
3. Cream together cream cheese and mascarpone.
4. Strain crawfish tails, then fold into cream cheese/mascarpone mixture.
5. Spread mixture into small shallow serving dish.
Layer 2
1. Grab another saute pan and brown andouille sausage.
2. Drain and rinse can of small red beans. Add to andouille sausage and cook for 1 minutes.
3. Place sausage/bean mixture on top of cream cheese/mascarpone mixture.
Layer 3
Add layer of shredded lettuce.
Layer 4
Add layer of diced tomatoes.
Layer 5
Add layer of green onions
Layer 6
Add layer of shredded cheese
Layer 7
Last layer, black olives. I just scatter a few.
Garnish top with additional Jay D’s Molasses Mustard.
Chill for 1 to 2 hours.
Enjoy with your favorite cracker, corn chip or veggie!
Layer 3
Add layer of shredded lettuce.
Layer 4
Add layer of diced tomatoes.
Layer 5
Add layer of green onions
Layer 6
Add layer of shredded cheese
Layer 7
Last layer, black olives. I just scatter a few.
Garnish top with additional Jay D’s Molasses Mustard.
Chill for 1 to 2 hours.
Enjoy with your favorite cracker, corn chip or veggie!
37 Cooks members receive products from our sponsors to work with to create their posts; no other compensation is given. All content is solely the opinions of our members. Members also write non-sponsored posts that do not feature any products. These are not compensated in any way..
Thursday, January 19, 2017
Guava Pastries

My box contained some really great stuff from Brazil and as soon as I saw the guava paste, I knew I was gonna make guava/cream cheese turnovers. The recipe follows, and the turnovers were delicious!
Guava Pastries
by Matt the Butcher
1 package Guava paste
1 box frozen puff pastry dough
1 8 ounces package cream cheese
Preheat oven to 425°F.
Follow package directions for rolling out puff pastry, and cut each sheet into 4 squares. Cut cream cheese and guava paste into 8 pieces each. Lay one piece of cream cheese and guava on a square of dough and sprinkle with a little sugar. Fold and seal the dough and place pastries on a sheet of parchment paper on a sheet pan. Bake for 20-25 minutes till golden brown.
Follow package directions for rolling out puff pastry, and cut each sheet into 4 squares. Cut cream cheese and guava paste into 8 pieces each. Lay one piece of cream cheese and guava on a square of dough and sprinkle with a little sugar. Fold and seal the dough and place pastries on a sheet of parchment paper on a sheet pan. Bake for 20-25 minutes till golden brown.
37 Cooks members receive products from our sponsors to work with to create their posts; no other compensation is given. All content is solely the opinions of our members. Members also write non-sponsored posts that do not feature any products. These are not compensated in any way..
Wednesday, January 18, 2017
Mini Zucchini Banana Bread

For our last garden harvest this year, we had a large amount of zucchini. Since fall is a time of year that we love to bake in our house, I thought about combining our garden harvest with some other ingredients for a yummy but healthy snack. I immediately thought back to the delicious and nutritious coconut flour from Tropical Traditions and how great it was as a flour substitute or supplement. This recipe got the thumbs up from the whole family with an immediate request for a second batch! Always a good sign.
Mini Zucchini Banana Bread
by Lori
Wet ingredients:
1/2 cup unsalted butter softened to room temp
3/4 cup brown sugar
1 teaspoon Tahitian vanilla
3 tablespoons Greek yogurt
1 1/2 cup zucchini (grated)
1 cup bananas (about 3 very ripe)
3 eggs (medium)
Dry ingredients:
2 cups King Arthur Whole Wheat Flour
1/2 cup Tropical Traditions Coconut Flour
2 teaspoons baking powder
1 cup walnuts pieces
1/2 cup thick rolled oats
3/4 teaspoons Himalayan pink salt
2 1/2 teaspoons cinnamon
Streusel Topping:
1/4 cup walnuts pieces
4 Tablespoons melted butter
3/4 cup thick rolled oats
1/3 cup brown sugar
1 Tablespoon of flour
Mix wet ingredients:
Begin by creaming butter, sugar and vanilla to a large mixing bowl. Gently incorporate with yogurt and set aside.
In a food processor, add zucchini and pulse until finely chopped. Place processed zucchini in a cheese cloth and press to remove as much liquid as possible. Mash ripe bananas, then add processed zucchini and bananas to the large mixing bowl of yogurt, butter, sugar and vanilla. Whip three eggs - do not over beat. Gently incorporate all wet ingredients and set aside.
Mix Dry ingredients:
In a medium bowl, add wheat flour, coconut flour, baking powder, walnuts, oats, salt and cinnamon. Mix thoroughly. Then add dry ingredients to large mixing bowl of wet ingredients and gently incorporate. Do not over mix.
Liberally coat pans with butter and place mixture into them. I used 6 mini ceramic loaf pans (approximately 5 inches x 3 inches - 2 inches deep) which I bought at Michael's Crafts for a couple of dollars each (brand is Celebrate It).
Make Streusel Topping by mixing ingredients and then place this mixture on top of each loaf - cover each top completely and press down gently.
Bake 35 to 40 minutes at 350°F. Remove and let cool on a wire baking rack.
Enjoy with a cup of great coffee or a yummy latte.
37 Cooks members receive products from our sponsors to work with to create their posts; no other compensation is given. All content is solely the opinions of our members. Members also write non-sponsored posts that do not feature any products. These are not compensated in any way..
Tuesday, January 17, 2017
Savory Rye Gougeres

Bob's Red Mill makes some of the best flours out there to bake with. I love these savory little puffs that are made with Bob's Dark Rye Flour.
Savory Rye Gougeres
by Diana
Yields 24 smallish puffs
1 cup water
1 Tablespoon buttermilk powder
1/2 cup butter
1/2 cup bread flour
1/2 cup Bob's Red Mill Dark Rye Flour
5 eggs
1 teaspoon caraway seeds
1 Tablespoon dried onion flakes
1 1/2 ounces grated Asiago cheese
Preheat oven to 425°F degrees. Line a couple of baking sheets with parchment paper.
Bring the water, buttermilk powder and butter to a simmer in a medium sauce pot. Add the flours and reduce the heat to low while stirring constantly for 2-3 minutes. The mixture should form a ball. Take off the heat and let the flour mixture cool to room temperature.
Add the eggs, one at a time, beating well after each addition. Add the remaining ingredients.
Drop by the heaping tablespoon onto parchment paper lined baking sheets. Place in 425°F degree oven for 15 minutes and then reduce the oven temperature to 375°F degrees and continue baking for 7-10 minutes, until lightly puffed, cracked and golden brown. Remove from the oven and place on a cooling rack. Pierce each puff with a knife to release the steam.
Serve warm on their own or with your favorite soup, or split and fill with spinach dip, warm pastrami, Swiss cheese and mustard, roast turkey, onion and provolone cheese or whatever else tickles your fancy.
37 Cooks members receive products from our sponsors to work with to create their posts; no other compensation is given. All content is solely the opinions of our members. Members also write non-sponsored posts that do not feature any products. These are not compensated in any way..
Monday, January 16, 2017
Fried Catfish So Good You Will Wanna Slap Ya Mama
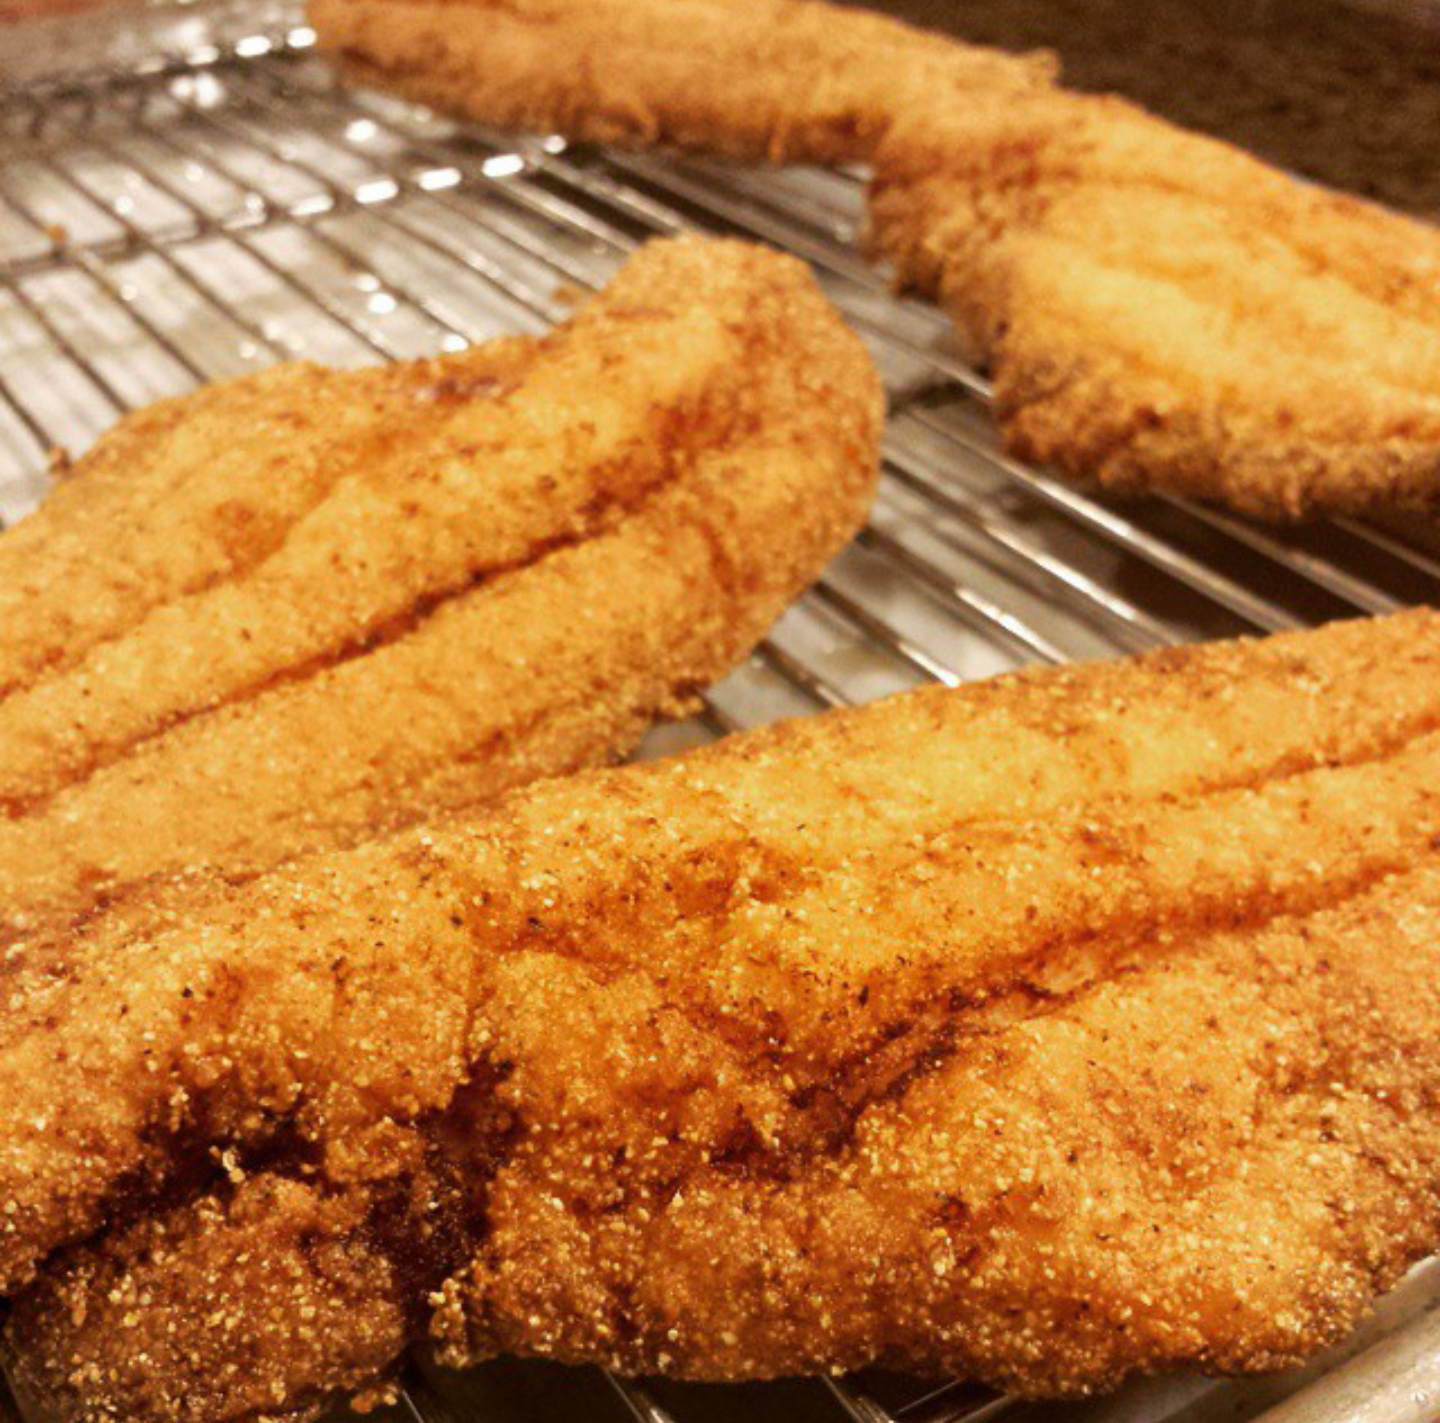
When we started 37 Cooks with 2 gallons of Slap Ya Mama seasonings I had already fallen in love with the hot seasoning and was using it for everything. For some reason I never replaced the seasoning in my fish batter but when I did, wow! It gave the fish an attitude! It can be used for other fish but Mississippi farm raised catfish is so good!
by Willie Simmons
4 large Mississippi farm raised or fresh caught catfish filets
4 large Mississippi farm raised or fresh caught catfish filets
1 quart buttermilk
2 cups all-purpose flour
1 cup corn meal (fine)
4 Tablespoons Slap Ya Mama Hot
Peanut oil
Start by putting the fish in a gallon zip-top bag or a deep baking pan with the buttermilk and soak for at least 2 hours.
Whisk the flour, corn meal and SYM together and place in a shallow dish.
Use a deep cast iron skillet. Pour in enough oil to cover the thickness of the filet. Preheat the oil to 325°F.
Drag the filets through the flour/corn meal and place on a baking rack for a 5-10 minutes.
Place 1 or 2 filets into the oil, depending on size of skillet. Fry 2-3 minutes on each side, or until crust becomes golden brown. I prefer to fry them a little longer, as I like crispier fish. We usually make more than we can eat and use the filets the next day to made unbelievable po-boy sandwiches. Enjoy!
2 cups all-purpose flour
1 cup corn meal (fine)
4 Tablespoons Slap Ya Mama Hot
Peanut oil
Start by putting the fish in a gallon zip-top bag or a deep baking pan with the buttermilk and soak for at least 2 hours.
Whisk the flour, corn meal and SYM together and place in a shallow dish.
Use a deep cast iron skillet. Pour in enough oil to cover the thickness of the filet. Preheat the oil to 325°F.
Drag the filets through the flour/corn meal and place on a baking rack for a 5-10 minutes.
Place 1 or 2 filets into the oil, depending on size of skillet. Fry 2-3 minutes on each side, or until crust becomes golden brown. I prefer to fry them a little longer, as I like crispier fish. We usually make more than we can eat and use the filets the next day to made unbelievable po-boy sandwiches. Enjoy!
37 Cooks members receive products from our sponsors to work with to create their posts; no other compensation is given. All content is solely the opinions of our members. Members also write non-sponsored posts that do not feature any products. These are not compensated in any way..
Friday, January 13, 2017
Pressure Cooker Chunky Applesauce

Our past sponsor, Instant Pot, gave us the opportunity to play and revel in this fantastic new electric pressure cooker. This beauty does it all: 7-in-1 Multi-Functional Cooker: Pressure cooker, Slow cooker, Rice Cooker/Porridge Maker, Steamer, Sauté/Browning, Yogurt Maker & Warmer. For our Past Sponsor Challenge, I decided to make something I hadn’t made before. I decided on applesauce, since its fall. I gave some of this batch to my MIL, and she raved about it. She warmed it, and put in on top of vanilla ice cream, and topped it with crumbled lemon cookies. The next morning she put it on pancakes. She and her friend were in applesauce heaven! I don't think I'm going overboard to call the Instant Pot, the Magic Pot. I have made cheesecake in the Instant Pot. It may have been the best cheesecake I have ever made. I have cooked rice at the snap of my fingers. I could go on forever about the eggs that practically peel themselves, and the “poached” eggs I have made. Give the Instant Pot a try, and join the rest of us who continue to be amazed by it’s capabilities.
Pressure Cooker Chunky Applesauce
by Sharyl W.
8 medium to large apples (I used an assortment of Granny Smith, Honeycrisp and Gala)
1 cup of water
1 tablespoon fresh lemon juice
1/4 teaspoon nutmeg
1 teaspoon cinnamon
1/4 cup of sugar (I used white, but one could also use brown sugar)
Add the water and lemon juice to the Instant Pot liner pot. Peel, core and slice, or chop the apples. Add the apples, nutmeg, cinnamon and sugar, to the pot. Set high pressure manual for 6 minutes and then NPR (natural pressure release) until pressure drops and lid can be removed. For smoother applesauce, blend with an immersion blender or mixer. I like ours to be chunky, so I didn't do this step.
Note: I discovered later that most don't peel their apples. Peeling apples is a step I detest, so I will never again peel my apples, for applesauce! I didn't want real sweet applesauce, so I didn't use much sugar. Adjust to personal taste.
37 Cooks members receive products from our sponsors to work with to create their posts; no other compensation is given. All content is solely the opinions of our members. Members also write non-sponsored posts that do not feature any products. These are not compensated in any way..
Thursday, January 12, 2017
Steel Cut Oatmeal Bread

Sometimes, though, I want a change from my morning oatmeal. I love to use leftover oatmeal as the basis for bread. Three cups of leftover oatmeal will give you two large loaves of some of the best bread available. I'll confess that sometimes I go out of my way to make a batch of oatmeal especially to use for this bread. Toast made from this bread is absolutely the best!
Steel Cut Oatmeal Bread
by Maurita Plouff blogging at Get the Good Stuff!
Makes 2 loaves
3 cups leftover cooked oatmeal (I like to use Bob's Red Mill Steel Cut Oats)
2 cups warm water
1/4 cup honey
2 teaspoons instant yeast
2 teaspoons kosher salt
4+ cups all-purpose OR bread flour
If you make oatmeal especially for the bread, let it cool until just a little warm to your hand. If you're using leftover oatmeal, warm it up a bit and stir it around, so it's not stone cold and has no hot spots. Measurements are approximate, and you should feel free to add a bit more of this, or a bit less of that, to your personal taste.
In a large mixing bowl, stir together the oatmeal, water, honey, and yeast; stir i.e. enough to break up the oatmeal. Let it sit on the counter for 15 minutes or so.
Add the salt and 2 cups of the flour, and mix very well. Don’t be afraid to beat it hard; you’re developing gluten that will help the bread rise. Add additional flour, mixing well after each addition, until the dough just comes together – it may take 2 more cups, or it may take a lot more, it depends on the weather, the humidity, and the moisture content in the leftover oatmeal.
When the dough will just hold together in a shaggy mass, turn it out onto a well-floured surface. Knead, adding more flour as needed, for 2 to 3 minutes. Cover with a tea towel and let the dough rest for 20 minutes or so.
After the dough rests, knead it another 5 minutes, adding more flour as needed. It takes a bit of experience to know when you’ve kneaded enough. It will no longer be sucking up flour, the surface will be smooth and a bit less sticky, and it will feel alive under your hands.
Put the dough in an oiled clean bowl, turn it so that all surfaces are greased, then cover with a tea towel and let the dough rise until doubled in bulk - 1 to 2 hours.
Turn out onto a floured surface and gently punch it down. Shape into 2 loaves, put into greased bread pans, and let rise, covered with a tea towel, until doubled in bulk again.

Let the bread loaves cool for at least an hour before slicing.
37 Cooks members receive products from our sponsors to work with to create their posts; no other compensation is given. All content is solely the opinions of our members. Members also write non-sponsored posts that do not feature any products. These are not compensated in any way..
Wednesday, January 11, 2017
Hamilton Beach Slow Cooker Fudgy Pudgy Cake

by Holly K of Holly's Table
Adapted from Baked Fudge Pudding Cake
Cooking spray
6 Tablespoons unsweetened cocoa powder
1/4 cup flour
1/4 teaspoon kosher salt
4 large eggs, room temperature
1 1/2 cups sugar
1 cup unsalted butter, melted and cooled
1 teaspoon pure vanilla extract
1/2 teaspoon dried orange peel, or 1 teaspoon freshly grated
1/4 teaspoon freshly grated nutmeg
1/2 cup heavy whipping cream + 1/2 cup whipped, for serving
1/4 cup crushed pistachios, for serving
1/4 favorite berries, for serving
Spray the inside of the Hamilton Beach Set & Forget® 6 Qt. Programmable Slow Cooker with cooking spray and set on low to heat.
Combine the cocoa powder, flour and salt in a small bowl, set aside.
 In a medium bowl, beat the eggs on medium-high until thickened. Sprinkle in the sugar slowly and continue to beat until very thick. Drizzle in the butter. Add the vanilla. Keep mixing. Add in the orange peel, nutmeg and cocoa mixture. On low, stir in the cream.
Pour the batter into the slow cooker. Line the lid with paper towels to prevent condensation. Cook on low 3 hours.
 In a medium bowl, beat the eggs on medium-high until thickened. Sprinkle in the sugar slowly and continue to beat until very thick. Drizzle in the butter. Add the vanilla. Keep mixing. Add in the orange peel, nutmeg and cocoa mixture. On low, stir in the cream.
Pour the batter into the slow cooker. Line the lid with paper towels to prevent condensation. Cook on low 3 hours.
Top with nuts, berries and whipped cream. Serve warm.
37 Cooks members receive products from our sponsors to work with to create their posts; no other compensation is given. All content is solely the opinions of our members. Members also write non-sponsored posts that do not feature any products. These are not compensated in any way..
Monday, December 19, 2016
Slow Cooked Ropa Vieja

This recipe calls for many herbs and spices, but they are simple ones that you will have on hand. They create a hearty dish filled with so many layers of flavor. Simply served over a bed of white rice with a side of sautéed plantains makes a perfect Cuban meal.
Slow Cooked Ropa Vieja
By Tonda
Adapted from Authentic Cuban Shredded Beef "Ropa Vieja" Cubana from Just a Pinch
2 medium yellow onions, diced small
1 medium red bell pepper, sliced thin
1 medium yellow bell pepper, sliced thin
1 medium jar of fire roasted red peppers, sliced thin
20 jalapeno stuffed olives
3-4 pounds rump roast
8 cloves of garlic
1 handful curly parsley
6 sprigs cilantro
1 teaspoon dried oregano
1 teaspoon ground cumin
1 teaspoon garlic powder
1 packet Sazon Goya seasoning with Culantro and Achiote
1 teaspoon salt
1/2 teaspoon black pepper
2 Tablespoons apple cider vinegar
2 Tablespoons fresh lime juice
1 teaspoon Worcestershire sauce
1/4 cup white wine
1/4 Cup ketchup
1 small can tomato paste
2 large bay leaves
Layer the onions, peppers and olives in the bottom of the slow cooker. Add the roast on top. Add garlic, parsley, cilantro to a small food processor and process until chopped fine. Add oregano, cumin, garlic powder, Goya seasoning, salt pepper, apple cider vinegar, lime juice, Worcestershire, and white wine. Process to blend all of the dry spices with the fresh herbs and garlic. Add ketchup, tomato paste and beef broth. Process again to blend. Pour mixture over the roast. Add 2 bay leaves. Set the Hamilton Beach slow cooker to low for 8 hours. Once the roast is ready, shred the beef in the cooking liquid. Serve over rice.
Enjoy!
37 Cooks members receive products from our sponsors to work with to create their posts; no other compensation is given. All content is solely the opinions of our members. Members also write non-sponsored posts that do not feature any products. These are not compensated in any way..
Thursday, December 15, 2016
Golden Graham Cereal Butter

Golden Graham Cereal Butter

Inspired by Trader Joe's
1 1/2 cups Golden Grahams cereal
2 cups cashews – I used lightly salted
1/2 cup white chocolate chips
Salt as needed
1. Place Golden Grahams cereal in food processor. Process for 15 seconds or until the cereal has become powder, remove the powder to a bowl and set aside.
2. Add cashews and process until completely smooth and loose, scraping down the bowl as needed. It can take up to ten minutes, depending on your machine. You might think it won’t work, but it will. First the cashews will be sandy, the oils will start to release, then it will turn into a ball in your processor. Once it hits the ball stage you are only a few minutes away from perfect cashew butter. Take a look at the picture above to see the stages your cashews will go through.

4. Add the powdered cereal and process until it is incorporated into your cashew butter. Taste and add salt if needed.
37 Cooks members receive products from our sponsors to work with to create their posts; no other compensation is given. All content is solely the opinions of our members. Members also write non-sponsored posts that do not feature any products. These are not compensated in any way..
Wednesday, December 14, 2016
Grilled Shrimp And Pineapple Skewers, With A Warm Coconut “Cocktail” Sauce!

Back in 2013, 37 Cooks started a group discussion about coconut oil. We realized we all had quite a bit to learn about coconut oil and many of the other coconut based products available. We had the opportunity to work with products from Tropical Traditions. We began experimenting and ultimately conquering our fear of cooking with coconut. When I received my jar of Tropical Traditions Coconut Cream Concentrate, I stared at it for several days before I had the courage to remove the lid and sample the coconut cream. I was amazed at the delightful flavor! My immediate thought was to stick with a “Tropical” themed recipe. What pairs well with coconut? Pineapple! I can’t resist grilled shrimp in the summer, so it was an easy decision once I realized how versatile the coconut cream could be. I am confident once you try this delicious recipe for grilled shrimp, you will be ready to start your own coconut journey.
Grilled Shrimp And Pineapple Skewers, With A Warm Coconut “Cocktail” Sauce!
By Susan Ritchie-Hubbard
1 1/2 pounds jumbo shrimp, peeled and deveined, tail on
1 fresh pineapple peeled, cored and cut into at least 1” chunks (reserving any juice)
1/3 cup Tropical Traditions Coconut Cream Concentrate (with a very rich coconut flavor, 1/3 cup is plenty!)
1/4 cup sour cream
1/4 cup good quality mayonnaise
1 Tablespoon sambal oelek
3 Tablespoons pineapple juice (I had enough pineapple juice from preparing the pineapple, but store bought is fine)
1/2 teaspoon sea salt
Metal or bamboo skewers (If using bamboo skewers, soak them in water for at least 30 minutes prior to grilling)
For the warm coconut cream cocktail sauce:
The coconut cream concentrate is just that. Concentrated! I warmed the coconut cream slightly on a low temperature in the microwave. Microwaves vary, but I did 20 seconds at 50% power. This resulted in a creamy consistency. Combine the coconut cream, sour cream, mayonnaise, sambal oelek, pineapple juice and sea salt in a bowl. It will solidify somewhat because of the coconut cream. Cover and refrigerate until you are ready to serve. This sweet and spicy cocktail sauce beautifully showcases the fresh, intense flavor of the coconut cream concentrate!
For the grilled shrimp:
Preheat the grill to high. Medium-high if you have WeberQ. Grilling at a high temperature helps caramelize the pineapple and gives the shrimp a very flavorful char. Alternate the shrimp and pineapple chunks on the skewers (I had enough pineapple to make an additional pineapple skewer). Grill the skewers until the shrimp are barely opaque, approximately 1-2 minutes per side. Transfer the shrimp and pineapple skewers to a clean plate and loosely cover with foil. Gently heat the coconut cream cocktail sauce in a small saucepan (over medium low heat) or in the microwave (at 50 % power), until it melts into a creamy sauce. If using the microwave, stir the coconut cream sauce every 30 seconds.
To serve:
Remove the shrimp and pineapple chucks from the skewers and arrange on a serving plate. (I happened to have some small bamboo cocktail picks, so I put 1 shrimp and 1 pineapple chunk on each pick.) Drizzle the coconut cream cocktail sauce over the shrimp and pineapple. If desired, garnish with additional chopped pineapple. Enjoy!
37 Cooks members receive products from our sponsors to work with to create their posts; no other compensation is given. All content is solely the opinions of our members. Members also write non-sponsored posts that do not feature any products. These are not compensated in any way..
Tuesday, December 13, 2016
The Past Sponsors Challenge

Since 37 Cooks first started on this fun journey back in 2012, we've had the chance to work with some wonderful sponsors. The Spice House, Bob’s Red Mill, Dorot, Teet’s, Lock-n-Load Java, Sciabica, Honey Ridge Farms, Wild Hibiscus, Marx Foods, Slap Ya Mama, and so many more. We even got to work with a couple of our sponsors twice!
For our last challenge of 2016, we thought it would be fun to do a Past Sponsors Challenge. We asked our cooks to share a favorite product from one of our many previous sponsors. Something that they absolutely love and still use today. We also told the cooks that if they had more ideas for a particular challenge, but had already submitted the maximum number of recipes at that time, this challenge was a great opportunity to share another dish! Sweet, savory, baked, fried, grilled. We told the gang, anything goes!
Enjoy these delicious creations from our cooks, featuring products from some of our favorite past sponsors!
37 Cooks members receive products from our sponsors to work with to create their posts; no other compensation is given. All content is solely the opinions of our members. Members also write non-sponsored posts that do not feature any products. These are not compensated in any way..
Monday, December 12, 2016
Prosciutto, Fig Jam and Goat Cheese Pizza

At home I cook for my kids and my frequently-vegetarian sometimes-deployed spouse, as well as baking for my book group and donating to the PTO-sponsored teacher luncheons. I work as a prep cook in the scratch kitchen of a local Italian restaurant.
I write the website Farm Fresh Feasts where I share how I feed my family year round using fresh (and preserved) produce from the farm share. Typically my recipes involve some sort of locally-sourced ingredient—but not always! Sometimes it’s just a great deal at the store. To help other folks like me, wondering what the heck to do with kohlrabi or beets or a case of oranges from the marching band Fruit Fundraiser, I created a Visual Recipe Index by Ingredient. This alphabetically-structured resource helps folks use the fruits of their farmers’ labors, not waste them, because I hate to throw out food. I even compost the vegetable waste from work!
Eating local, seasonal produce means that my cooking changes over the course of the year depending on what’s grown nearby. We eat salads and grilled items in the summer, soups and baked items in the winter, and on warm Fall or cool spring days anything goes.
One entree I cook year round is pizza. In the summer, when my 1920’s era house cannot cope with a blazingly hot oven, I grill my family’s Friday night pizzas. This photo shows my first ever grilled pizza—I was so proud!
Eating local, seasonal produce means that my cooking changes over the course of the year depending on what’s grown nearby. We eat salads and grilled items in the summer, soups and baked items in the winter, and on warm Fall or cool spring days anything goes.
One entree I cook year round is pizza. In the summer, when my 1920’s era house cannot cope with a blazingly hot oven, I grill my family’s Friday night pizzas. This photo shows my first ever grilled pizza—I was so proud!
I started making pizza when I was trying to economize after I became a stay at home mom. It all began with an excellent book—The Best Pizza is Made at Home by Donna Rathmell German. Trying several of the doughs and suggested toppings gave me the courage to branch out on my own. Now my oldest is in college, at work I make 4 gallons of pizza sauce at a time, and I still make pizzas at home nearly every week. It seemed fitting to share a pizza recipe with ya’ll.
 Prosciutto, Fig Jam and Goat Cheese Pizza
by Kirsten Madaus of Farm Fresh Feasts
This recipe is based off a panini recipe in the pamphlet accompanying a George Foreman grill a dozen years ago or so, and makes a 12-inch pizza
1/4 cup fig jam
1 pound pizza dough
Parchment paper
3 Tablespoons mascarpone cheese
1 to 1 1/2 cups shredded mozzarella cheese
3 slices prosciutto, torn into small pieces
1/2 cup crumbled goat cheese
A couple of grinds of fresh pepper
Preheat oven to 450°F. If you’ve got a pizza stone, make sure to preheat it as well. If you don’t have a pizza stone a cookie sheet will work.
Warm the fig jam briefly (I microwaved mine for 40 seconds), stir, and set aside. Crumple a sheet of parchment paper then flatten it back out—this keeps it from curling up.
Stretch the pizza dough and lay it on the parchment paper. I just use my fingertips for this, and have a pretty good photo tutorial on my Pizza Primer post. You may need to dust the paper with flour, semolina, or a splash of olive oil depending on the stickiness of your dough.
Spread mascarpone cheese across the dough in a thin layer. Top with mozzarella cheese and prosciutto. Dot goat cheese crumbles in the open areas. Drizzle the warmed fig jam over top.
Add a few grinds of fresh pepper.
Bake the pizza, parchment paper and all, on the stone for 5 minutes. Shimmy the paper out from under the pizza and bake the pizza directly on the stone for another 3 to 5 minutes, until the cheese is browned and bubbly and the prosciutto is crispy. Cool on a rack a few minutes, then slice and serve.
37 Cooks members receive products from our sponsors to work with to create their posts; no other compensation is given. All content is solely the opinions of our members. Members also write non-sponsored posts that do not feature any products. These are not compensated in any way..
Wednesday, December 7, 2016
Steak Kue

My parents owned Gee's Restaurant in Houston, Texas for over 35 years. Opened in 1955, the menu featured dishes that were truly the epitome of Cantonese cuisine: Chicken Chow Mein, Egg Foo Young, Sweet & Sour Pork, Moo Goo Guy Pan, and War Shew Duck. I often wax nostalgic about the restaurant and these dishes, and make my own versions as often as I can. One of the classics on the menu was #66 - Steak Kue. At the restaurant, it called for searing one of our "Club Steaks" (boneless ribeye) on the flat top grill, which was on the "American" side of the kitchen, then carried over to the "Chinese" side of the kitchen. There it where would be cubed and added to a wok full of vegetables, and finished with a quick sauce that included "a Touch of Oyster Sauce."
 For my version, I wanted a wok-friendly way to cook the steak, so I simply gave the cubed ribeye a quick flash stir-fry, then cooked all the vegetables, adding the steak back in at the end. The assortment of vegetables can be anything you wish, but the key to this dish is truly that "Touch of Oyster Sauce."
I hope you enjoy this retro recipe as much as I did!
Steak Kue
by Gary Gee
Serves 4
2 pounds boneless beef tenderloin or ribeye, cut into approximate 1" x 2" cubes
Coarse salt
Freshly ground black pepper
2 Tablespoons peanut or vegetable oil
1 teaspoon minced fresh ginger
1 teaspoon minced fresh garlic
2 cups coarsely chopped bok choy
1 large carrot, sliced into coins
1 cup sliced celery
4 stalks asparagus, chopped
4 oz crimini mushrooms, sliced
4 oz water chestnuts, sliced
4 green onions, chopped, plus more for garnish
1 Tablespoon light soy sauce
1 Tablespoon cooking sherry or white wine
1 Tablespoon dark soy sauce
2 Tablespoons oyster sauce
1/2 teaspoon cornstarch, mixed with
1 teaspoon warm water
1 Tablespoon toasted sesame oil
Heat a wok or large skillet over high heat. Season beef with salt and pepper. Add oil to wok, and swirl to coat. When oil begins to smoke, add beef in a single layer. Cook for 30 seconds or until beef begins to release from wok. Turn and cook another 30 seconds, until well-browned. Remove beef from wok, keeping warm on a platter. Leave behind only about 1 tablespoon of oil (add more if needed). Add ginger, garlic, and next 7 ingredients. Toss to combine. Add light soy sauce and sherry, stir, and cover for 1 minute to steam. Return beef and any accumulated juices to the wok, then add dark soy sauce, oyster sauce, and cornstarch slurry. Stir to combine, and cook until sauce forms and thickens, about 1 minute more. Drizzle with sesame oil, remove to a serving platter, garnish with green onions, and serve immediately with steamed white rice.
by Gary Gee
Serves 4
2 pounds boneless beef tenderloin or ribeye, cut into approximate 1" x 2" cubes
Coarse salt
Freshly ground black pepper
2 Tablespoons peanut or vegetable oil
1 teaspoon minced fresh ginger
1 teaspoon minced fresh garlic
2 cups coarsely chopped bok choy
1 large carrot, sliced into coins
1 cup sliced celery
4 stalks asparagus, chopped
4 oz crimini mushrooms, sliced
4 oz water chestnuts, sliced
4 green onions, chopped, plus more for garnish
1 Tablespoon light soy sauce
1 Tablespoon cooking sherry or white wine
1 Tablespoon dark soy sauce
2 Tablespoons oyster sauce
1/2 teaspoon cornstarch, mixed with
1 teaspoon warm water
1 Tablespoon toasted sesame oil
Heat a wok or large skillet over high heat. Season beef with salt and pepper. Add oil to wok, and swirl to coat. When oil begins to smoke, add beef in a single layer. Cook for 30 seconds or until beef begins to release from wok. Turn and cook another 30 seconds, until well-browned. Remove beef from wok, keeping warm on a platter. Leave behind only about 1 tablespoon of oil (add more if needed). Add ginger, garlic, and next 7 ingredients. Toss to combine. Add light soy sauce and sherry, stir, and cover for 1 minute to steam. Return beef and any accumulated juices to the wok, then add dark soy sauce, oyster sauce, and cornstarch slurry. Stir to combine, and cook until sauce forms and thickens, about 1 minute more. Drizzle with sesame oil, remove to a serving platter, garnish with green onions, and serve immediately with steamed white rice.
37 Cooks members receive products from our sponsors to work with to create their posts; no other compensation is given. All content is solely the opinions of our members. Members also write non-sponsored posts that do not feature any products. These are not compensated in any way..
Tuesday, December 6, 2016
Chicken and Spinach Enchiladas

Chicken and Spinach Enchiladas
by Maryjo
Adapted from the Easy Chicken Enchiladas recipe from Southern Living 1986 Annual Recipes
3 Tablespoons butter
3 Tablespoons flour
2 cups chicken stock (or broth)
1/2 teaspoon garlic powder
3 Tablespoons heavy cream
2 cups chopped cooked chicken
1 cup sour cream
2 cups packed fresh spinach
2 cups shredded Monterey Jack cheese
2 cups shredded sharp cheddar cheese
1 4-ounce can chopped green chiles
1/4 cup chopped onion
1 teaspoon salt
1/2 teaspoon black pepper
1 teaspoon ground cumin
12 fresh corn tortillas
Vegetable oil
1/2 cup shredded sharp cheddar cheese
Preheat oven to 350°F. In a medium saucepan, make a roux by melting the butter over medium high heat. When melted, add the flour, stir around until the flour is coated and continue to stir for about 3 minutes on medium high heat so that the flour taste will be cooked out of the sauce. Add the chicken stock and whisk until thickened, about 5 minutes. Add the garlic powder, stir, and set aside to cool.
In a large bowl, add the chopped cooked chicken, sour cream, spinach, Monterey Jack cheese, cheddar cheese, green chiles, chopped onion, salt, pepper, ground cumin, and the roux. Mix well.
Heat about 3 tablespoons of vegetable oil in a skillet and fry each corn tortilla for 5 seconds on each side (to soften them up). Add a little more oil if it runs low. Place the tortillas on a paper towel to drain.
Spray a 13 x 9 x 2-inch casserole dish with non-stick spray. Put about 1/3 cup of the chicken and spinach filling onto each tortilla, rolling them up and placing each tortilla seam side down in the casserole dish. Note: I had filling left over, which I put into a zip top bag and threw into the freezer for another quick meal another day.
Cover with foil and bake for 20 minutes. Remove foil and add the remaining ½ cup of shredded cheddar cheese. Change the oven from bake to broil and turn up the heat to 450ºF. Bake uncovered for an additional 5 minutes. Serve with sour cream, or pico de gallo, or sliced avocados, or black beans, or all of the above. Olé! 1986 Style!
3 Tablespoons flour
2 cups chicken stock (or broth)
1/2 teaspoon garlic powder
3 Tablespoons heavy cream
2 cups chopped cooked chicken
1 cup sour cream
2 cups packed fresh spinach
2 cups shredded Monterey Jack cheese
2 cups shredded sharp cheddar cheese
1 4-ounce can chopped green chiles
1/4 cup chopped onion
1 teaspoon salt
1/2 teaspoon black pepper
1 teaspoon ground cumin
12 fresh corn tortillas
Vegetable oil
1/2 cup shredded sharp cheddar cheese
Preheat oven to 350°F. In a medium saucepan, make a roux by melting the butter over medium high heat. When melted, add the flour, stir around until the flour is coated and continue to stir for about 3 minutes on medium high heat so that the flour taste will be cooked out of the sauce. Add the chicken stock and whisk until thickened, about 5 minutes. Add the garlic powder, stir, and set aside to cool.
In a large bowl, add the chopped cooked chicken, sour cream, spinach, Monterey Jack cheese, cheddar cheese, green chiles, chopped onion, salt, pepper, ground cumin, and the roux. Mix well.
Heat about 3 tablespoons of vegetable oil in a skillet and fry each corn tortilla for 5 seconds on each side (to soften them up). Add a little more oil if it runs low. Place the tortillas on a paper towel to drain.
Spray a 13 x 9 x 2-inch casserole dish with non-stick spray. Put about 1/3 cup of the chicken and spinach filling onto each tortilla, rolling them up and placing each tortilla seam side down in the casserole dish. Note: I had filling left over, which I put into a zip top bag and threw into the freezer for another quick meal another day.
Cover with foil and bake for 20 minutes. Remove foil and add the remaining ½ cup of shredded cheddar cheese. Change the oven from bake to broil and turn up the heat to 450ºF. Bake uncovered for an additional 5 minutes. Serve with sour cream, or pico de gallo, or sliced avocados, or black beans, or all of the above. Olé! 1986 Style!
37 Cooks members receive products from our sponsors to work with to create their posts; no other compensation is given. All content is solely the opinions of our members. Members also write non-sponsored posts that do not feature any products. These are not compensated in any way..
Monday, December 5, 2016
Herbed Chicken Casserole

by Tamela K.
3 chicken breasts, cut in half
1/2 cup butter
Salt and pepper, to taste
3 cups rice, slightly under cooked and drained
3 cups rice, slightly under cooked and drained
1/4 cup chopped green onion
1 can cream of chicken soup
3/4 cup sauterne or white wine
3/4 cup sauterne or white wine
1 5-ounce can sliced water chestnuts, drained
1 3-ounce can mushroom slices with liquid
1/2 teaspoon thyme
Preheat oven to 350°F.
 Brown chicken breasts in melted butter on stove top in pan. Season the chicken with salt and pepper.
Place cooked rice in casserole dish with browned chicken on top. Saute the onions until soft in the pan which the chicken was browned. Add soup to the onions and stir until smooth. Slowly add sauterne or wine to onion mixture, stirring well. Add water chestnuts, mushrooms and thyme to the sauce pan.
Pour the mixture over chicken and rice. Cover and bake for an hour, or until tender.
1 3-ounce can mushroom slices with liquid
1/2 teaspoon thyme
 Brown chicken breasts in melted butter on stove top in pan. Season the chicken with salt and pepper.
Place cooked rice in casserole dish with browned chicken on top. Saute the onions until soft in the pan which the chicken was browned. Add soup to the onions and stir until smooth. Slowly add sauterne or wine to onion mixture, stirring well. Add water chestnuts, mushrooms and thyme to the sauce pan.
Pour the mixture over chicken and rice. Cover and bake for an hour, or until tender.
37 Cooks members receive products from our sponsors to work with to create their posts; no other compensation is given. All content is solely the opinions of our members. Members also write non-sponsored posts that do not feature any products. These are not compensated in any way..
Tuesday, November 29, 2016
Cheese Fondue

Francoise Bernard is a classic French cookbook author that my husband's Mamie would cook from all the time. We have her oldest copy of Les Recettes Faciles (Easy Recipes) from 1965 that is packed with his Mamie's newspaper and magazine clippings. I pulled this book from our shelf and flipped through it to see what classical French fare was. This book is filled with drool worthy recipes. Although, I did not choose a recipe from this book, it did give me an idea of what to make. Cheese fondue. My husband has perfected his recipe through the years and we always look forward to the weather getting cooler so he can make it. This is a recipe that he typically eyeballs amounts, which means that it turns out a little differently each time, but this time I followed him around for measurements!
Cheese Fondue
by Franck and Tonda
Serves 6
1 pound 12 month aged Gruyere cheese
1 pound Jarlsberg cheese
1 pound Comté cheese
6 cloves garlic
2 Tablespoons butter
1/2 to 3/4 bottle dry white wine such as Apremont from Savoie or Entre Deux Mers (Dry White Bordeaux)
1 1/2 Tablespoons Kirsh
Dash of paprika
1/4 teaspoon white pepper
1/8 teaspoon freshly grated nutmeg
Juice from 1/8 of a large lemon
 Cut the cheese into 1/4 to 1/2-inch cubes. Do not shred the cheese. It will turn into a ball when melting it. Cut one clove of garlic in half and rub it on the inside of the cooking pot and fondue pot. Slice one clove of garlic in very thin and place it into the fondue pot. Melt 2 Tablespoons of butter, add four cloves of chopped garlic and sauté. Remove half of the garlic and add approximately 1/4 cup of wine to deglaze the pot. Add about 4 handfuls of cheese. It is important to stir the cheese in an 8 pattern until it melts. Otherwise, it will turn into a big ball in the pan. Alternate adding more wine (approximately 1/4 to 1/2 cup at a time) and cheese (3 to 4 handfuls) and continue until all of the cheese is melted to the consistency that you prefer. Make sure to continuously stir in the 8 pattern. You will use 1/2 to 3/4 bottle of wine. Add 1 1/2 Tablespoons Kirsh and a dash of paprika and stir. Stir in 1/4 teaspoon white pepper along with 1/8 teaspoon freshly grated nutmeg. Finally, stir in the juice from 1/8 of a large lemon. Transfer to the fondue pot.
Enjoy with cubes of baguette. An old French rule is whomever loses their baguette while dipping in the caquelon of cheese has to run around the block naked! Thankfully, it has not been enforced in my years of enjoying this meal.
37 Cooks members receive products from our sponsors to work with to create their posts; no other compensation is given. All content is solely the opinions of our members. Members also write non-sponsored posts that do not feature any products. These are not compensated in any way..
Monday, November 28, 2016
Beef and Broccoli

Having gained quite a bit of cooking experience since then, I've decided to create a spin on the recipe by applying some modern techniques and ideas to the dish. The idea for preparing the broccoli was inspired by the roasted broccoli at local hipster restaurants, and cooking the steak sous vide seemed like a natural fit. Although it diverges from the original version, it is just as delicious and enjoyable.
Note: We will be using the sous vide method to cook the steaks. Therefore, you will require a zip-top freezer bag, an immersion circulator and a container that is high enough to hold water, such as a medium-sized pot.
Beef and Broccoli
by Douglas
1 pound flank steak
Salt and pepper
Water
1/3 cup tahini
1 clove garlic
2 Tablespoon lemon juice
1 Tablespoon olive oil
1 clove garlic
2 Tablespoon lemon juice
1 Tablespoon olive oil
1 head broccoli
Vegetable oil
1 Tablespoon light soy sauce
1 Tablespoon oyster sauce
1 Tablespoon light soy sauce
1 Tablespoon oyster sauce
1 Tablespoon butter
Parmesan cheese
Chili oil
If you have a large piece of flank steak, cut it along the grain so that you have pieces as wide as your palm. Start by seasoning the steak generously with salt and pepper, then place steaks into a zip-top freezer bag. Fill the medium-sized pot 3/4 full of water and dip the bag into the water, going no further than the top of the bag. This will push the air out of the bag and maximize the surface area between the meat and the water (also known as the water displacement method). Put the immersion circulator into the water and set the temperature for 125°F (i.e. cooked to rare, and you can increase to 135°F for medium-rare). Let it run for a minimum 45 minutes, or a maximum of 4 hours.
Meanwhile, add the tahini, garlic, lemon juice, and olive oil to a food processor and blend until smooth. Add water if the mixture still looks like a paste, until it has the texture of a smooth dressing. Load the dressing into a plastic squeeze bottle.
Wash broccoli and cut until you have a bunch of florets. Save the stems for another recipe. Place a medium-sized pot filled with water on the stove and set to high heat. Prepare a large bowl of ice and cold water and place next to the pot. Once the water is boiling, add a pinch of salt and a 2 tablespoons of vegetable oil. Drop the broccoli into the boiling water and let it cook for 60-90 seconds. Using a strainer, take the broccoli out of the boiling water and into the bowl of ice water. Once the broccoli has cooled, take them out of the bowl and on to a plate.
Place an aluminum or carbon steel pan on the stove and set to high heat. When the pan is very hot (carbon steel pans will start smoking), add 2 tablespoons of vegetable oil. Add the broccoli and stir briefly. Let it sit for about 30-60 seconds so that the broccoli develops char marks. Remove broccoli from pan and set aside. Wipe pan with a paper towel to remove any broccoli bits.
Once the steaks have cooked for the desired time, take the bags out of the water and shut off the immersion circulator. Remove steaks and pat dry with a paper towel. Place the pan used to cook the broccoli back on the stove on high heat. When the pan is hot, add 2 tablespoons of vegetable oil and place the steaks on the pan. This will create the crust on the outside of the steak. After 1-2 minutes, flip the steaks once, then remove after searing for another 1-2 minutes. Let the steaks rest on a plate and set aside.
Chili oil
If you have a large piece of flank steak, cut it along the grain so that you have pieces as wide as your palm. Start by seasoning the steak generously with salt and pepper, then place steaks into a zip-top freezer bag. Fill the medium-sized pot 3/4 full of water and dip the bag into the water, going no further than the top of the bag. This will push the air out of the bag and maximize the surface area between the meat and the water (also known as the water displacement method). Put the immersion circulator into the water and set the temperature for 125°F (i.e. cooked to rare, and you can increase to 135°F for medium-rare). Let it run for a minimum 45 minutes, or a maximum of 4 hours.
Meanwhile, add the tahini, garlic, lemon juice, and olive oil to a food processor and blend until smooth. Add water if the mixture still looks like a paste, until it has the texture of a smooth dressing. Load the dressing into a plastic squeeze bottle.
Wash broccoli and cut until you have a bunch of florets. Save the stems for another recipe. Place a medium-sized pot filled with water on the stove and set to high heat. Prepare a large bowl of ice and cold water and place next to the pot. Once the water is boiling, add a pinch of salt and a 2 tablespoons of vegetable oil. Drop the broccoli into the boiling water and let it cook for 60-90 seconds. Using a strainer, take the broccoli out of the boiling water and into the bowl of ice water. Once the broccoli has cooled, take them out of the bowl and on to a plate.
Place an aluminum or carbon steel pan on the stove and set to high heat. When the pan is very hot (carbon steel pans will start smoking), add 2 tablespoons of vegetable oil. Add the broccoli and stir briefly. Let it sit for about 30-60 seconds so that the broccoli develops char marks. Remove broccoli from pan and set aside. Wipe pan with a paper towel to remove any broccoli bits.
Once the steaks have cooked for the desired time, take the bags out of the water and shut off the immersion circulator. Remove steaks and pat dry with a paper towel. Place the pan used to cook the broccoli back on the stove on high heat. When the pan is hot, add 2 tablespoons of vegetable oil and place the steaks on the pan. This will create the crust on the outside of the steak. After 1-2 minutes, flip the steaks once, then remove after searing for another 1-2 minutes. Let the steaks rest on a plate and set aside.
Mix soy sauce, oyster sauce together and 1/8 cup of water in a mixing cup and mix together. Using the same pan that was used to cook the steaks, add butter. Once the butter has melted, add the soy sauce mixture to the pan to deglaze. Scrape any bits from the pan and then reduce to the desired consistency.
To plate the dish, place charred broccoli on to one side of a medium sized dish. Drizzle tahini sauce on top using the plastic squeeze bottle. Grate Parmesan cheese on top of broccoli using a micro-plane. Using as spoon, drizzle chili oil on top of the broccoli. Take the steaks to a cutting board and slice steak into thin slices. Place steak on to the plate and fan them out so that you can see the pink center. With a spoon, drizzle the soy/oyster sauce reduction on to the steak.
To plate the dish, place charred broccoli on to one side of a medium sized dish. Drizzle tahini sauce on top using the plastic squeeze bottle. Grate Parmesan cheese on top of broccoli using a micro-plane. Using as spoon, drizzle chili oil on top of the broccoli. Take the steaks to a cutting board and slice steak into thin slices. Place steak on to the plate and fan them out so that you can see the pink center. With a spoon, drizzle the soy/oyster sauce reduction on to the steak.
37 Cooks members receive products from our sponsors to work with to create their posts; no other compensation is given. All content is solely the opinions of our members. Members also write non-sponsored posts that do not feature any products. These are not compensated in any way..
Tuesday, November 22, 2016
Chicken with Dressing

Whenever I make something, I have to ask myself, will Mark eat this? I don't want to waste time or money on something he won't eat for dinner. He is pretty much a meat and potatoes guy, which is somewhat limiting! I was mulling over options in my head, and Chicken and Dressing came to mind.
For about a year, we had a local woman who had a storefront. She sold oh so good, down home comfort food in single and family portions. She had so many wonderful options. To my dismay, there was a landlord dispute, and she was gone. One of my favorites was her Chicken and Dressing. I never thought she put in enough chicken, but I loved it anyway.
Growing up, my mom always used Pepperidge Farm Herb Seasoned Cubed Stuffing when she cooked our Thanksgiving meal. To this day, I also use it as my base when I make dressing. Mark prefers cornbread dressing, so that’s what I used here. We both loved this. I commented that it was a quick Thanksgiving knock-off meal. When Mark saw the chopped parsley on the top, he said, “Do I have to eat the leaves?” Seriously?
Mark LOVES gravy, like it’s the sixth food group. I had some chicken gravy in the fridge from another dinner, so that made this just perfect. I'm making a double batch next time. We mowed through this like I was feeding an army.
Chicken with Dressing
by Sharyl W.
4 pounds chicken tenders
8 Tablespoons of butter, divided
4 Tablespoons of olive oil
1 medium white onion, chopped
1 14-ounce bag of Pepperidge Farm Cornbread Stuffing
1 teaspoon poultry seasoning
3 cups of chicken broth, divided
Salt
Black pepper
3 Tablespoons fresh chopped, flat leaf parsley
Preheat oven to 350°F.
1 14-ounce bag of Pepperidge Farm Cornbread Stuffing
1 teaspoon poultry seasoning
3 cups of chicken broth, divided
Salt
Black pepper
3 Tablespoons fresh chopped, flat leaf parsley
Preheat oven to 350°F.
Salt and pepper the chicken tenders. Heat 4 tablespoons of the butter, and olive oil, in a skillet, over medium high heat. When the oil/butter is hot, cook the chicken tenders until brown, and then turn over to cook the other side. They don't need to be cooked 100%, since they will finish cooking in the oven. Cook the chicken in several batches, so that the chicken isn't overcrowded.
After all the chicken is cooked, add the chopped onions, and sauté until translucent.
In a large bowl, add the package of Cornbread Stuffing Mix, poultry seasoning, 4 tablespoons of melted butter, 2 1/2 cups of chicken broth and the sautéed onions. Mix to combine. Chop the chicken into bite-sized pieces. Add the chicken to the dressing mix and combine.
Brush the bottom and sides of a casserole dish, with melted butter. Spoon the chicken/dressing mix into the casserole dish. Pour the remaining 1/2 cup of chicken broth over the casserole.
Bake, covered, for 30 minutes. Remove the foil, and bake for another 10 minutes, or until it’s hot. Garnish with fresh chopped parsley. Top individual servings with gravy, for an even moister dressing.
When reheating for leftovers, add more chicken broth to keep the casserole moist.
37 Cooks members receive products from our sponsors to work with to create their posts; no other compensation is given. All content is solely the opinions of our members. Members also write non-sponsored posts that do not feature any products. These are not compensated in any way..
Subscribe to:
Posts (Atom)