Tuesday, February 10, 2015

Pumpkin Monkey Bread with Cranberries and Pecans

Have you ever made monkey bread? Apparently I've been living under a rock, since I didn't even know it existed until about a year ago, but I wanted in on the action!


Monkey bread is a marvelous thing. It’s little blobs of soft dough baked together in a pan. The result is a knobby sweet bread that you can pull together with your fingers. The individual pieces remind me of donut holes.

I based this bread on the sweet potato monkey bread recipe in Make Ahead Bread: 100 Recipes for Melt-In-Your-Mouth Fresh Bread Every Day, substituting pumpkin and warm spices for the sweet potatoes and layering the bread with cranberries, pecans and a syrupy glaze.

Pumpkin Monkey Bread with Cranberries and Pecans
by Lauren
Adapted from Make Ahead Bread: 100 Recipes for Melt-In-Your-Mouth Fresh Bread Every Day by Donna Currie

For the dough:
1/2 cup canned pumpkin
2 1/2 - 3 cups all-purpose flour
1 egg
1/2 cup sugar
2 1/4 teaspoons active dry yeast
1/2 cup room temperature water
1 Tablespoon cinnamon
1 teaspoon nutmeg
4 Tablespoons unsalted butter
1 teaspoon kosher salt
1 teaspoon buttery sweet dough flavor or vanilla extract

For the topping:
1/2 cup chopped pecans
1/4 cup dry cranberries
1/3 cup brown sugar
1/3 cup unsalted butter

Line a mesh sieve with a coffee filter or cheesecloth. Add the pumpkin and let drain 30 minutes. Discard the liquid.

Combine the pumpkin with the remaining ingredients, adding enough flour to form a thick dough. Knead until the dough is smooth and elastic. Cover with a tea towel and let rise until it doubles in size - about 1 hour.

Divide the dough into golf ball sized pieces and arrange in a greased 8-inch pie plate. Scatter the pecans and cranberries between the dough balls. Cover and refrigerate overnight.

The next morning, heat the oven to 325ºF. Remove the pan from the refrigerator. Melt the brown sugar and butter in a saucepan and pour over the bread.

Bake 45 minutes, or until the internal temperature reads 190ºF. Let cool 20 minutes before serving.
Follow my blog with Bloglovin

Monday, February 9, 2015

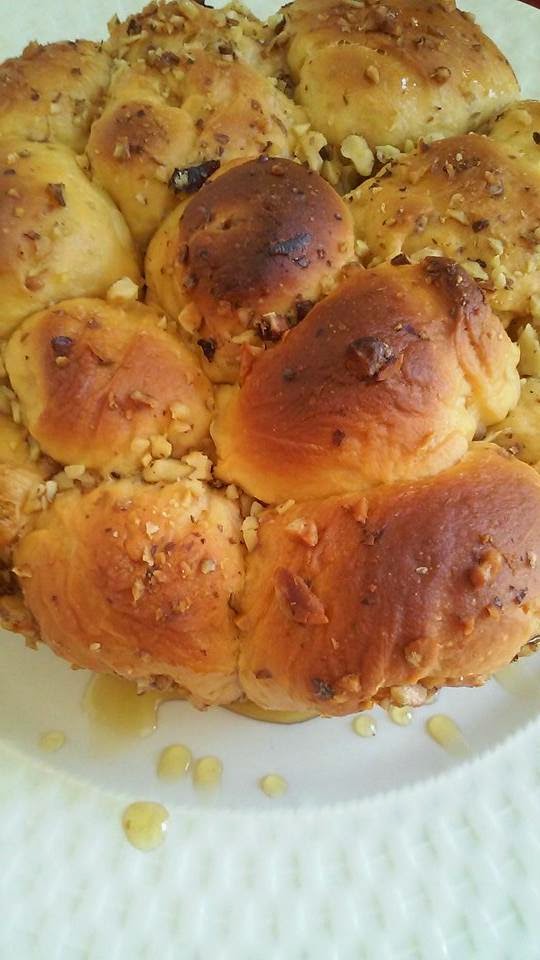
Goat Cheese Stuffed Monkey Bread

Goat Cheese Stuffed Monkey Bread
by Christine
Adapted from Sweet Potato Monkey Bread in Make Ahead Bread: 100 Recipes for Melt-in-Your-Mouth Fresh Bread Every Day by Donna Currie

1 egg
1/2 cup water
1/2 cup sugar
1/2 cup mashed sweet potato
4 Tablespoons soft butter
1 teaspoon kosher salt
2 1/2 cups flour
2 1/4 teaspoon active dry yeast
1 cup honey
2 small logs goat cheese
1/2 cup chopped walnuts
Non-stick cooking spray

In a bread machine, load load the egg, water, sugar, potato, butter, salt, flour and yeast. Use the dough cycle. When cycle is finished place dough in a oiled bowl, cover and let rise for 1 hour.

Spray a baking pan lightly with the non-stick cooking spray. Place honey in a bowl big enough to roll a few balls at a time. Cut each cheese log into 12 pieces. Cut dough into 24 pieces. Poke a hole into a piece of dough and stuff with a piece of cheese. Pinch hole closed and roll in your hands to shape it into a ball. Roll each ball in the honey. Place each stuffed ball randomly in the pan. Sprinkle each layer with walnuts. Drizzle any remaining honey on top and cover pan with plastic wrap. Refrigerate overnight.

Preheat oven to 325°F and bake for 45 minutes until golden brown. Let cool 15 minutes.

Thursday, February 5, 2015

Meatball Stuffed Honey Potato Buns

Meatball Stuffed Honey Potato Buns
by Mary
Adapted from Make Ahead Bread: 100 Recipes for Melt in Your Mouth Fresh Bread Every Day by Donna Currie

1 1/2 cups room temperature water
2 Tablespoons honey
2 Tablespoons unsalted butter, room temperature (omit if using butter potatoes)
3 1/2 cups bread flour, plus extra for dusting
1/4 cup non fat dry milk
1/4 cup instant potato flakes (I used a single serve cup of instant mashed potatoes then omitted the butter, since they already had butter in them)
1 1/2 teaspoons kosher salt
1 Tablespoon Italian seasoning, plus extra for the top of the buns
1 teaspoon instant yeast
8 ounces tomato sauce
8 ounces mozzarella cheese, cubed
12 fully cooked meatballs, diced

On prep day:

I made the dough in a bread maker, first adding all of the liquid ingredients (water and honey, along with butter if using it.) Then add the dry ingredients (flour, dry milk, potato flakes, salt and Italian seasoning. Make a well and add the yeast. Set bread maker to the dough setting and allow the machine to mix and knead the dough. I also let it do a first rise in the bread machine. 
 
Turn out the dough onto a floured work surface, knead lightly then divide into 24 pieces. Roll each piece into a ball and place onto a parchment-covered sheet pan. Dust lightly with flour and cover with plastic wrap. Refrigerate at least overnight, you can refrigerate for 24 hours if needed. 
 
The next day take the pan out of the refrigerator and let sit at room temperature for 15 minutes. This makes the dough easier to work with. 
 
While the dough is warming up, mix the tomato sauce, cheese and meatballs. 
 
Flatten each dough ball into a circle. Add a spoonful of the meatball mixture to the top of the dough and close the dough around the meatball mixture. Sprinkle a bit of Italian seasoning on each bun. Place back on the sheet pan. When all of the buns are finished, let rest for 10 minutes. 
 
Bake at 350°F for about 25 minutes, until the buns are golden brown. Serve with additional tomato sauce, if desired. Enjoy!

Wednesday, February 4, 2015

Cinnamon Chocolate Yeasted Aebleskivers

I am a BREAD lover!! A year ago, I stopped eating bread altogether because of the gluten and sugar. So when I chose this recipe, I KNEW I was going to be in trouble, because I’d want to eat it instead of giving it away as a gift. Well, that’s exactly what happened. I absolutely love these little delicacies and you can add just about anything in the filling, or just leave them plain and serve with jam.

Cinnamon Chocolate Yeasted Aebleskivers
by Debbie
Adapted from Yeasted Aebleskivers from Make Ahead Bread: 100 Recipes for Melt-in-Your-Mouth Fresh Bread Every Day by Donna Currie

1 1/2 cups unbleached all-purpose flour
1 Tablespoon sugar
1 teaspoon cinnamon
1/4 teaspoon kosher salt
1 teaspoon instant yeast (I used bread machine yeast)
1/2 cup milk
1/2 cup room temperature water
1 large egg
1 cup chocolate chips
Vegetable oil, for the pan (I personally used coconut oil)
Powdered sugar for sprinkling

On Prep Day:

Combine all of the ingredients (except the chocolate chips, vegetable oil and powdered sugar) in a medium bowl and mix well, making sure everything is evenly mixed and there are no dry bits. Cover the bowl with plastic wrap and refrigerate overnight.

On Baking Day:

Remove the bowl from the refrigerator.

Heat your aebleskiver pan on medium heat until a drop of water sizzles when it hits the pan. Pour a small amount of vegetable oil in a small bowl and use a silicone brush to very lightly oil each well of the pan.

Use a small spoon to fill each well of the aebleskiver pan with batter to about 1/3 full; the buns will rise as they cook. Sprinkle each well with a Tablespoon of chocolate chips and top with a teaspoon more of the batter. Let them cook for approximately 2-3 minutes before turning. You should see bubbles rising to the top as you would with pancakes.

Test one aebleskiver to see if it is ready to turn. Insert a skewer into an aebleskiver and try to spin it in the well. If it doesn't release easily, continue cooking until it does (test again after another minute.) Once the aebleskivers are willing to release from the wells, use the skewer to turn them over in the pan. Some of the batter might “spill” into the pan -that’s fine.

Continue cooking the aebleskivers, turning them as needed, until they are evenly browned on the outside and cooked through on the inside. You’ll have to break one open to check. You might need to lower the heat if the aebleskivers brown too quickly on the outside before they are thoroughly cooked inside.

When the first panful is cooked, remove the aebleskivers and let cool on a wire rack, brush the wells with oil as before and continue cooking in batches until all the batter is used.

Sprinkle with powdered sugar.

Tuesday, February 3, 2015

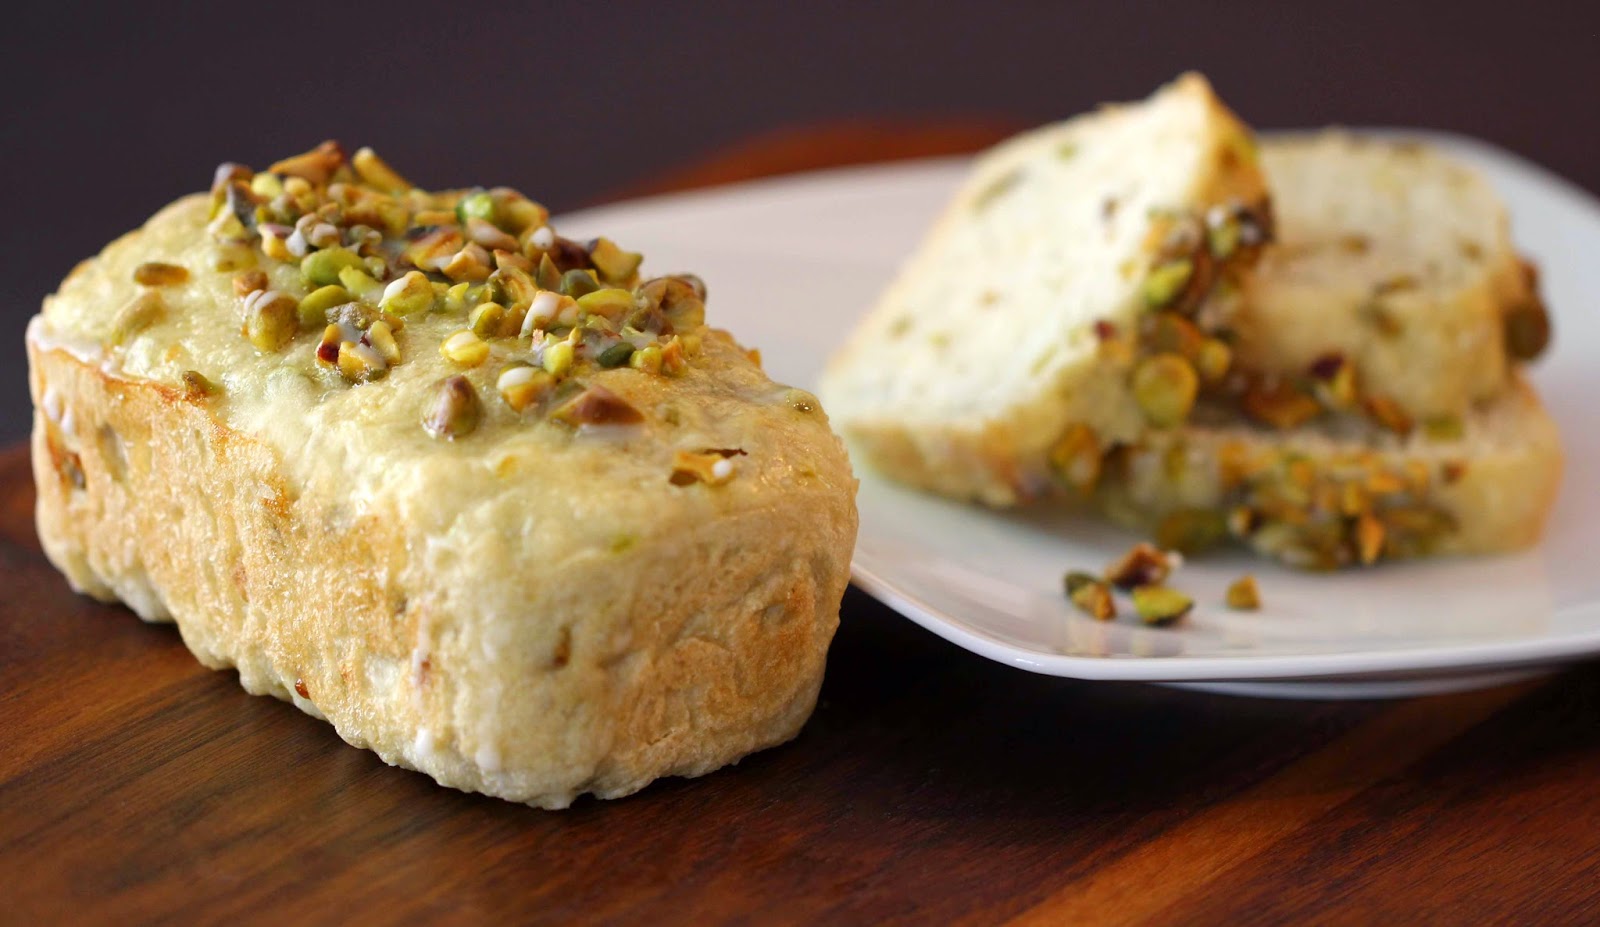
Lemon Glazed Mini Pistachio Loaves

We had a great surprise here at 37 Cooks! One of our own, Donna Currie, has a great new cookbook coming out soon, Make Ahead Bread: 100 Recipes for Melt-Your-Mouth Fresh Bread Every Day, and her publisher generously allowed us a sneak peak at ten of her wonderful bread recipes! She has an awesome, easy method for making bread...make up the dough one day and bake the next. I loved this! Our challenge was to put our own spin on these recipes. I chose Donna’s Mini Sunflower Seed Loaves. Right away pistachios popped into my head, so here is my twist…Lemon Glazed Mini Pistachio Loaves. Enjoy!

Lemon Glazed Mini Pistachio Loaves
by Susan W.
Adapted from Mini Sunflower Seed Loaves in Make Ahead Bread: 100 Recipes for Melt-Your-Mouth Fresh Bread Every Day by Donna Currie

1 1⁄4 cups water, room temperature
2 1⁄4 teaspoons active dry yeast
2 Tablespoons sugar
3 cups (14 1⁄4 ounces) all-purpose flour, plus more for kneading
1 teaspoon kosher salt
1 Tablespoon canola oil
3⁄4 cup chopped pistachios, divided
Nonstick baking spray
1 egg beaten
1 Tablespoon water
Lemon Glaze (recipe below)

The day before baking:

In a large bowl, combine water, yeast, sugar, flour, kosher salt, canola oil and 1/2 cup of the chopped pistachios (reserving the remaining 1/4 cup for baking day.) Turn out onto a lightly floured surface and knead by hand until the dough is elastic. Cover the bowl with plastic wrap and let the dough rise in a warm place until it has doubled in size, (about 1 hour.)

After the dough has risen, spray four mini loaf pans with nonstick baking spray and set aside. Turn the dough out onto a lightly floured surface and divide it into 4 equal pieces. Working with one piece at a time, pat each into about a 5-inch square. Roll each dough-square jellyroll style into a log. Pinch the seam and the ends closed. Place the dough loaves, seam side down, into each of the mini loaf pans. Cover the pans with plastic wrap and refrigerate overnight (and no more than 24 hours.)

The next day (baking day):

Preheat the oven to 350°F. Make the egg wash by whisking the egg with 1 Tablespoon of water.

Take each mini loaf pan out of the refrigerator and remove the plastic. Brush the tops with your egg wash and sprinkle the tops with the reserved 1⁄4 cup of chopped pistachios. Bake the mini loaves approximately 25 minutes, until they are golden (if you wish, you can also check the internal temperature, which is a cool new trick I learned from Donna’s book…it should reach 195°F.) Remove from oven and let loaves sit for about 5 minutes and then remove the loaves from the pans and cool completely on a cooling rack.

Once cooled, make your lemon glaze and drizzle over the tops. They are also delicious without the glaze!

Lemon Glaze
1/2 cup powdered sugar
1 Tablespoon plus 1/2 teaspoon fresh squeezed lemon juice
1/2 teaspoon half and half

Whisk ingredients together in a small bowl, making sure to whisk out any lumps. Drizzle over pistachio loaves.

Monday, February 2, 2015

Make-Ahead Hand Pies

Yes, I know that I could buy frozen puff pastry - or pie crust in a box. Lots of people do. What if I want a homemade all-butter laminated dough that I could just pull out of the fridge to use in all kinds of creative ways?

Donna Currie showed me how in her book Make-Ahead-Bread: 100 Recipes for Melt in Your Mouth Fresh Bread Every Day. It's not just about breads (though the ones in there are absolutely fantastic!) - no, Donna ventures into pizza, English muffins, and, yes, all-butter laminated pastry that's actually easy to do.


I took Donna's cherry turnovers in a different direction, making little hand pies with homemade jam. Use a jam or fruit spread that's full of fruit, preferably homemade and not super-sweet, and you'll be very happy with the result.

Make-Ahead Hand Pies
by Maurita
Adapted from Cherry Turnovers in Make-Ahead-Bread: 100 Recipes for Melt in Your Mouth Fresh Bread Every Day by Donna Currie
Will make 18 little hand pies

2 1/4 teaspoons active dry yeast
3/4 cup milk, plus more as needed
1 large egg
1/3 cup sugar
1 teaspoon pure vanilla extract
1/2 teaspoon almond extract
2 1/2 cups bread flour, plus more as needed
1/2 cup (2 ounces) almond meal
1 teaspoon kosher salt
2 sticks butter, cold (1 salted, 1 unsalted)
Jam - about half a jar in your choice of flavour, best if homemade and not too sweet
Egg wash (1 large egg beaten with 1 Tablespoon water)
Coarse sugar, for sprinkling

On prep day 1 - mix it all together:

Put the yeast, milk, egg, sugar, and extracts in a medium bowl. Whisk to combine, then set aside.

Put the flour, almond meal, and salt into a food processor and pulse a few times to distribute the salt. Cut the butter into a few pieces and add to the food processor. Pulse until the butter pieces are no larger than a lima bean. It’s fine if some pieces (or most of them) are smaller.

Add the flour-butter mixture to the bowl with the liquid. Stir gently until combined. The mixture should be wet, so don’t worry if it seems loose. If it’s not a wet mixture or if you see dry spots in the flour, drizzle in more milk, 1 Tablespoon at a time, to moisten the dough. Cover the bowl and refrigerate overnight.

On prep day 2 - roll and fold, then back in the fridge:

Flour your work surface and turn out the dough. It will still be sticky. Flour the top of the dough, then pat it into a rough square. Using a rolling pin, roll the dough to about 18 inches square, though the shape doesn't matter so much. The point is to flatten the bits of butter that will make the buttery, flaky layers, but you don’t want the butter to soften so much that it starts to mix with the flour, so work as quickly as possible. Flour your work surface and the top of the dough as needed to keep the dough from sticking.

Take the left third of the dough and fold it over the middle, then fold the right side over the middle, like you would fold a letter. Use a dough scraper under the dough to help lift it and fold it over. It’s fine if the dough is sloppy and wants to break apart. Now, fold the top third down over the middle, then fold the bottom third up. You should have a fat square of dough.

Roll this fat square of dough to about 16 inches square, then fold following the same process as above. This time the dough should be easier to roll and fold.

Roll out the dough to 16 inches square one more time and fold as before. If at any time during the roll-and-fold process you feel that the butter is getting soft and squishy, put the dough in the refrigerator for 10 minutes or so to firm up the butter—you don’t want it to mix with the flour.

After three repeats of rolling and folding, flour the fat dough square, wrap it in plastic, and put it in a clean zip-top plastic bag. Refrigerate overnight or up to 2 days.

On baking day - roll the dough, bake the pies:

Line two large baking sheets with parchment paper. Remove the dough from the refrigerator, divide it in half, and re-wrap half and return to the refrigerator – you will work with only half the dough at a time.

Flour your work surface and roll the dough to 12 inches square. Cut the dough into three 4-inch rows, both horizontally and vertically, so you end up with 9 even squares (each about 4 x 4 inches.)

Spoon a generous teaspoon of the jam into the center of each square. Put some water in a small bowl and use your finger or a pastry brush to lightly moisten the edges of the squares. Fold each square into a triangle—you’ll need to stretch the dough a bit to cover the filling. Press a fork along the joined edges of the pastry to help seal it. Place the filled pastries on the prepared baking sheet, leaving an inch or so of space between them to rise. Continue making hand pies with the second half of the dough and the rest of the pie filling, or leave the dough refrigerated for another day.

Cover the pan with plastic wrap and set aside for 20 to 30 minutes. Meanwhile, heat the oven to 400°F. After 20 to 30 minutes, the dough won’t seem to have risen, but it should feel puffy rather than firm.

Remove the plastic, brush the top of the turnovers with egg wash, and sprinkle with coarse sugar. Use a sharp knife or a pair of kitchen shears to snip a few slits in the top of the pastries. Bake the hand pies until they’re nicely browned, 15 to 20 minutes. Be careful with hot little pies - that jam can burn your mouth! Transfer to a rack to cool before serving.