Thursday, July 28, 2016

Try the World - Churrasco BBQ Pork

Hi readers! Here is our third and final Try the World review and recipe! Today we bring you Matt the Butcher's amazing Churrasco BBQ Pork!

*******************************************************************************


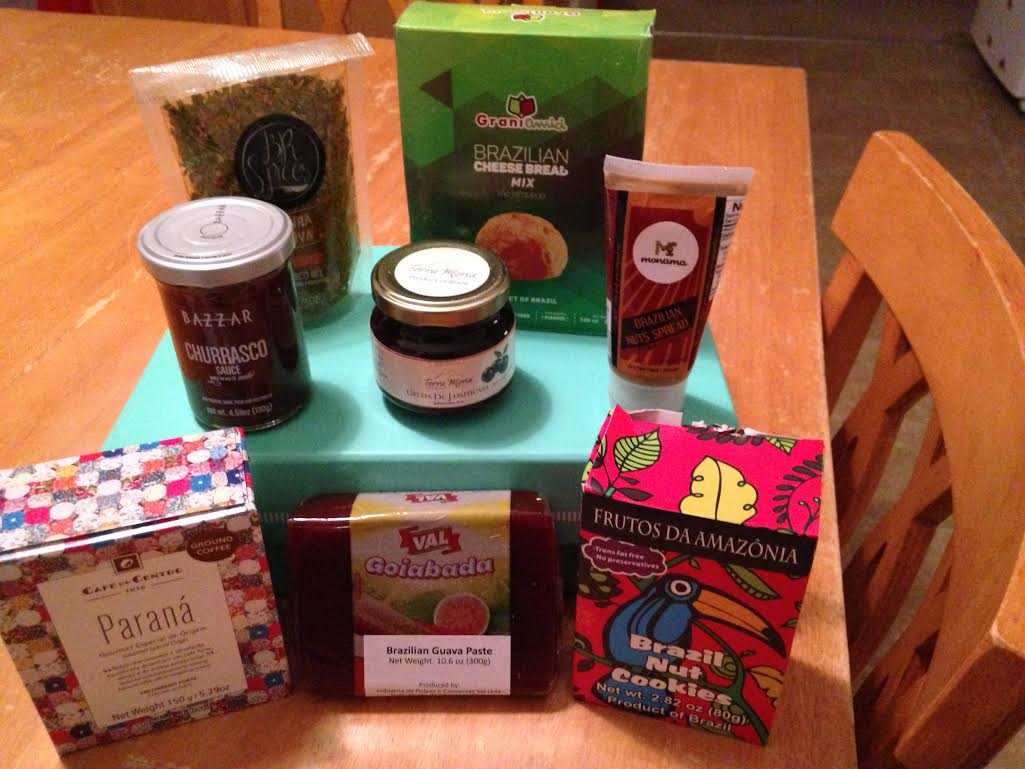
As a member of 37 Cooks, I was one of the lucky three that received a Try the World box to review and, of course, to cook with! I got a Brazil box and was pretty impressed. It was packaged well and contained eight different items. Churrasco dry spice mix, Brazilian coffee, a jar of churrasco sweet bbq sauce, a jar of jam made from a blackberry that is found only in Brazil, a tube of nut butter made from Brazil nuts and cashews, a box of cheese bread mix, a packet of shortbread cookies with chopped Brazil nuts in them, and a block of Brazilian guava paste. These were not simply little sample packs. The coffee, for instance, was a little over 5 ounces, more than enough for a couple of pots of coffee. 

Also included in the box was a Culture Guide, which I thought was pretty cool. It's about the size of a greeting card, and opens five times. It tells you all about the products in the box, with ideas on how to use them. On the reverse side, there's a menu using the products.  

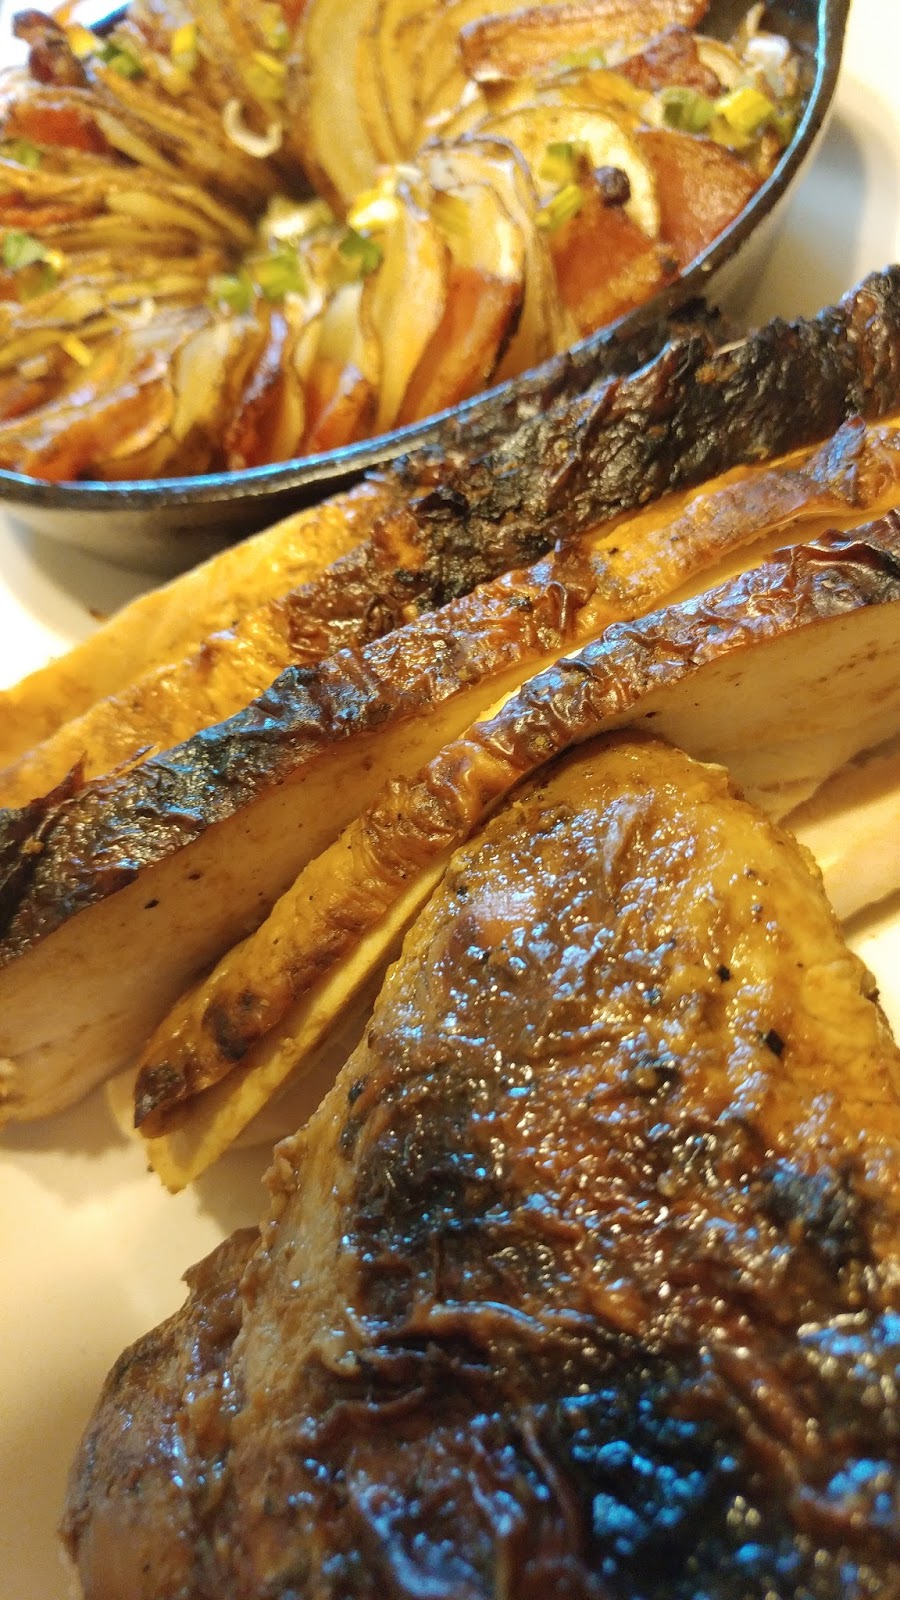
Here's a recipe that I made with the dry Churrasco spice mix. As soon as I saw the Churrasco spice package, I knew I was gonna make something on the BBQ. I just got a new grill and was dying to try it out, along with the rotisserie attachment! Here goes....

Churrasco BBQ Pork
by Matt the Butcher

1 packet Churrasco Spice Mix
1/4 to 1/3 cup olive oil
3 to 4-pound Boston butt, tied with cotton twine (The only reason it needs to be tied is if it's going on a rotisserie. I say cotton, because if ya use polyester twine, it'll melt and that would totally suck.)

Combine the spice mix with just enough olive oil to make a very thick paste. Rub it all over the meat,
really working it in, and use all the rub. Wrap the meat tightly in plastic wrap and refrigerate overnight. I cooked mine for about 5 hours, using indirect heat on my BBQ. You can either BBQ it, or roast it in the oven. 

To roast it in the oven, place the meat in a baking dish and bake at 275°F for 4 or 5 hours, until the internal temp is about 185°F. Tent with foil if it looks like its burning before it's done. 

Low and slow is the key to a nice, tender Boston butt. I like mine almost falling apart. I couldn't use a probe thermometer on mine, as it was going round and round on a rotisserie, so after about 3 1/2 hours, I started poking it with a pointy knife, to see if it was done. When the knife slid in with hardly any resistance, that baby was done! And it was absolutely delicious!

Spatchcocked Creole​​​​ Mustard Turkey

A little known fact about me is that I absolutely love to grill. Over wood or with gas, it doesn't matter. I own three grills that are all used for different things. One thing I have actually mastered is a spatchcocked turkey. I have been making one for Thanksgiving each and every year for 10 years. It is a wonderful piece of work that can be done with ease. When we got the news about Jay Ducote sending us his outstanding BBQ sauce I was thrilled, but when it was accompanied with his Louisiana Molasses Mustard I was in awe!!! This sauce is so flavorful and a pure delight. I recommend it to anyone who wants a little zip to chicken or, like me, a turkey done in the middle of summer!!

Spatchcocked Creole​​​​ Mustard Turkey
by Traci

11 pound turkey with the backbone cut out
1 cup Jay D's Louisiana Molasses Mustard
2 Tablespoons low sodium soy sauce
1 clove roasted garlic, chopped fine
1 green onion, sliced (including top)

Place turkey into a large zip-top bag. Add all other ingredients in and gently massage into the turkey. Remove as much air as possible and refrigerate overnight, if possible. At least for a couple of hours otherwise.

I cooked my marinated turkey over an indirect heated grill for 1 1/2 hours.

This marinade is so wonderful. It would be so good on some roasted vegetables, also. I hope you give Jay D's a try.

Wednesday, July 27, 2016

Try the World - Brazilian Nut Cupcakes with Geleia De Jabutivaba Frosting

Hi readers! Here is our second Try the World review and recipe! Traci made Brazilian Nut Cupcakes with Geleia De Jabutivaba Frosting!

****************************************************************************


The box I received from Try the World, filled with ingredients from Brazil, was so amazing. I was lucky enough to get one in advance and am very thankful. Not only did I get a great variety, everything inside it is so interchangeable. I am still making new things! You'd be amazed at the combinations that can be made out of one single box. The guide also helps, because it describes each and every ingredient to a tee. I decided to use three of the ingredients to create a fantastic cupcake for you. But, there are infinite possibilities within this box.

Brazilian Nut Cupcakes with Geleia De Jabutivaba Frosting
by Traci
Adapted from Natasha's Kitchen Perfect Vanilla Cupcake Recipe and
Our Best Bites Perfect Cupcake Frosting and Filling
Makes 12 cupcakes

For the cupcake:
1 1/2 cups all-purpose flour
1 1/4 teaspoons baking powder
1/2 teaspoon salt
2 large eggs, room temperature
1 cup sugar
1 1/2 cups melted butter
1 cup milk
2.12 ounces Brazilian Nut Spread
Brazilian Nut Cookies, crushed, for sprinkling on at the end

Line a 12-cup cupcake pan with inserts and preheat your oven to 325°F.

In one bowl, mix all dry ingredients. In a mixing bowl, combine eggs and sugar. Mix on medium speed. Gradually add butter. Mix until frothy. Add half of the dry ingredients and combine well. Add all of the milk. Add the rest of the dry ingredients and mix until combined. Add the Brazilian Nut spread until combined.

I used a measuring cup to fill the cupcake pan and make the batter even (use whatever works best for you). Bake at 325°F for about 20 minutes, or until done. Place on cooling rack.

For the frosting:
3 teaspoons milk
1 cup powdered sugar
4.94 ounces Geleia De Jabuticaba

Combine all ingredients well. Chill until firm.

Spread onto cooled cupcakes, sprinkle the crushed cookies on top and serve.

Try the World is a fantastic company! Knowing the country of origin and getting the guide to help you with the ingredients is so awesome. I highly recommend this box. Go Brazil!!!

Jay D's Grilled Bacon Wrapped Onion Rings

Summer is here and it's time to break out the grill. Here is a different appetizer treat to satisfy the bacon loving crowd on a lazy summer day. These can also be made in the oven, but who wants to heat up the house in the summer?

The sweet and tangy taste of Jay D's Louisiana Molasses Mustard sauce pairs well with the bacon in this appetizer. I used a huge 10-15 onion, and it took 3 to 4 slices of bacon to wrap it...a bacon lover's dream!

Jay D's Grilled Bacon Wrapped Onion Rings
by Tonda
Adapted from Grilling 24x7's Smoked Bacon Wrapped Onion Rings

1 large yellow 10-15 onion, cut into thick rings
1/4 cup Jay D's Louisiana Molasses Mustard
1 pound of bacon
Fresh cracked pepper

Brush the onion rings with Jay D's Louisiana Molasses Mustard sauce. Wrap the bacon around the onion ring and skewer through the bacon and onion to keep the bacon secure. Add a generous amount of cracked black pepper on top of the bacon. Grill the onion rings at 275°F - 280°F for 90 minutes. After 60 minutes of cook time, brush the bacon with some more of Jay D's Louisiana Molasses Mustard Sauce to allow it to caramelize for the last 30 minutes. Enjoy!

Tuesday, July 26, 2016

Roasted Arctic Char with Asparagus and Pistachio Gremolata

We're lucky to have a great farmer's market relatively near our home where we can get fresh fish. It takes us about an hour to drive there, but on a sunny day with the car's convertible top down, it's actually a pleasure and Willie and I enjoy the time we get to spend together. You can make this dish without Jay's sauce, but it's tastier with it and I would encourage you to try it. As for the Arctic char, if you can't find it where you live, this fish is similar to salmon, but without the fishy taste that many people object to. I think you can use most any fish you like, but you might need to adjust the cooking time. Perfectly cooked fish is a real treat! One last thing, some fish have pin bones. Sometimes the fishmonger removes them, but if you see your fillet has some, follow these easy and accurate instructions!


Roasted Arctic Char with Asparagus and Pistachio Gremolata
by Sandra Simmons, blogging at Dear Lauren, Love Mom
adapted from Sheet Pan Suppers cookbook (a true treasure!)

1 bunch asparagus, trimmed
2 Tablespoons olive oil
2-4 Arctic char fish fillets, brushed with 1 Tablespoon Jay D's Louisiana Molasses Mustard per fillet
1 red onion, sliced
1 lemon, zest first and set aside, then slice lemon thinly
Salt and pepper
1 cup cherry tomatoes
2 garlic cloves, minced
Handful of parsley (flat-leaf or curly), roughly chopped
1/2 cup pistachios, roasted, salted, shelled and chopped

Preheat the oven to 350°F. Place a rack in the middle of the oven. Line a rimmed baking sheet with parchment. Place the trimmed asparagus on the pan and toss with the olive oil. Scatter the asparagus evenly on the sheet pan. Place the fish fillets over the asparagus. Scatter the onion, lemon, and cherry tomatoes over the fish and asparagus. Sprinkle a pinch of salt and a few turns of pepper over all. Bake 20 minutes, until the fish is just cooked through and the vegetables are crisp-tender. Mix together the zest, garlic, parsley, and pistachios in a small bowl, sprinkle over the contents of the sheet pan and serve immediately.


Try the World - Guava Cheese Ice Cream

Hi readers! Three of our lucky cooks recently had the great opportunity to review boxes they received from a great company called Try the World. For the next three days, along with the recipes we're sharing from our current challenge, you can also check out the reviews and enjoy the recipes created by our friends Lindsay, Traci and Matt! Their boxes contained goodies from the country of Brazil! First up is Lindsay's Guava Cheese Ice Cream! Yum!

*******************************************************************************


Try the World is a subscription box that you can receive monthly or bimonthly. Every box features artisanal products from a specific country. The box arrives with a handy little card that tells you about the items in your box, where they originate and some suggested ways to use the items. I received the Brazil Box to review. I loved that there were items in the box that I have never tried. I like to expose my kids to a lot of cultures and the food from other countries. I think that my kids were just as excited to look at each new item in the box as I was. Try the World also has an online magazine in which they feature additional recipes and tips to plan a party using the box that you received. They also have a playlist on Spotify that correlates to the country of the box you received, perfect to set the atmosphere while you cook or have a party. Churrasco (BBQ) is something that Brazil is well known for and there are several items in this box to throw a great churrasco party. These are the items that arrived in my Brazil box:

Churrasco Sauce: A BBQ sauce from an acclaimed restaurant in Rio de Janeiro. Suggested uses include spreading it on pizza dough or adding it to a sandwich.

Parana Coffee Grounds: A single origin coffee bean from the Parana region. The roasting process leaves it with caramel and hazelnut flavor. I can’t wait to make iced coffee. It can also be added to baked goods.

Churrasco Spice Mix: A dry rub or seasoning for a BBQ. This mixture includes garlic, onion, paprika, parsley, thyme, rosemary, and turmeric among others.

Jabuticaba Jam: A black berry that is unique to Brazil made into jam, I love that this jam is made with a small amount of sugar. It can be mixed into yogurt, added to thumbprint cookies or a caipirinha (I will be making those!)

Pao De Queijo Mix: Brazilian cheese bread mix. The bread is crunchy on the outside and doughy and cheesy in the center it is a breakfast and snack food in Brazil.

Brazil Nut Cookies: These cookies are sweet, crunchy and completely addicting. I may have wanted
to hide them from my kids, but I was nice and shared. They did not last long.

Goiabada: Guava paste. Suggested uses include melting it into a meat glaze or serve with a semi-soft cow’s milk cheese. I like to melt it with butter into a glaze for carrots or make guava cheese turnovers.

Brazilian Nuts Spread: This is a mixture of three nuts peanut, cashew and baru. Baru nuts are native to Brazil and contain over 25% protein! Suggested uses include a PB&J or sliced apples. I used it on banana slices with a little melted chocolate and froze them for a nice little snack.

Guava Cheese Ice Cream
by Lindsay blogging at Kitchen Musings Today
Adapted from Jeni's Splendid Ice Cream Desserts

Ice Cream Base:
2 2/3 cups whole milk
1 Tablespoon plus 2 teaspoons cornstarch
6 ounces cream cheese, softened
1/8 teaspoon sea salt
1 1/2 cups heavy cream
3/4 cup sugar
1/4 cup brown rice syrup

For the Guava Spread:
1/4 cup hot water
1/4 cup guava paste

1. Mix cornstarch with 2 Tablespoons of milk in a small bowl. Set aside. In a large heat proof bowl stir together cream cheese and salt. Set aside.

2. In a 4 quart saucepan over medium heat bring the remaining milk, cream, sugar, and brown rice syrup to a boil. Allow to boil for four minutes. Remove from heat and stir in the cornstarch mixture. Return to heat and while stirring allow to slightly thicken.

3. Slowly add a little of the milk mixture to the cream cheese. Whisk combining the two mixtures. Add the rest of the milk mixture and stir very well. You want a completely creamy mixture. All to cool at room temperature for 20 minutes. Cover and place in the refrigerator until the mixture is completely cooled.

4. Place the hot water and guava paste in a high speed blender or food processor. Blend scraping down the sides as needed until you have a smooth spread. Transfer to a jar or bowl and allow to cool in the refrigerator until needed

5. Freeze according to your ice cream machine directions. Layer the churned ice cream with the guava spread in an ice cream storage container. Place in your freezer for 4 hours or until completely frozen.

We really love the box that I received from Try the World. The one thing to keep in mind is to check the expiration dates on all items and have fun!

Monday, July 25, 2016

The Jay D's BBQ Sauce Challenge


If you’re a fan of the Food Network show “Next Food Network Star”, you’ll recognize our latest sponsor! It’s none other than Jay Ducote, who finished in the top 3 of season 11 last year! He’s also a friend of our very own Donna Currie! Jay is a chef, writer, entertainer and speaker, and he also has his very own BBQ sauce. Donna was so excited about introducing Jay to all of us here at 37 Cooks. And you can believe it...we were beyond thrilled to have him as a sponsor! She already had us cheering him on when he was competing in "Next Food Network Star", so she knew we'd love to work with his sauces. 

Fire up the grill, oven, slow cooker, or anything else you can think of, and get ready to see what our talented cooks created with Jay D’s Louisiana BBQ Sauce and Jay D's Louisiana Molasses Mustard!

To find out more about Jay and his sauces, check out his website. You can also find him on FacebookTwitter and Instagram!


Thursday, July 21, 2016

Broccoli and Caramelized Onion Quiche

Quiche...

I was once at a Jane Austen book club with my friend, Jeff. Our hostess made a wonderful quiche and Jeff asked for the recipe. Later in the day, our hostess' husband asked Jeff a tool question, at which point Jeff looked at him in astonishment and said, “I’m at a Jane Austen book club, asking for quiche recipes and drinking fizzy pink things...you're lucky I’ve even heard of a tool!”

Turns out, of course, that this is the view lots of people have of quiche. Well, not me. To me, quiche is that simple, quick dish that can be subtly flavored or used to get rid of those left over remains of veggies. Like a stew in a pie crust.

I love to make quiche. I love to make little personal ones to take on picnics. I love that if friends drop by, you can whip one up pretty quickly and I love that pretty much anything tastes good in one. They are even great for those gluten free friends, after all, just leave out the crust!

Well when this Chicken Salt challenge came up, I knew I’d make a quiche at some point, so here, for your consumption, is my quiche.

Broccoli and Caramelized Onion Quiche
by T.S. Lamb

1 pie crust (optional)
4 eggs
1 cup milk (use whatever milk you have...1%, 2%, skim, it doesn’t really matter)
2 teaspoons Low Sodium Chicken Salt
1/2 teaspoon Tumeric Chicken Salt
1 crown of broccoli, chopped small
1 cup of caramelized onion
1 cup mozzarella cheese shredded

Place pie crust in a 9-inch pie pan and set aside. If not using a crust, lightly grease the pie pan and set aside.

Whisk the eggs and milk in a medium-sized mixing bowl. Add the salts and stir. Add the broccoli and onions and mix. Pour mixture into the pie pan. Sprinkle cheese on top.

Bake at 375°F for 40-50 minutes, until quiche is no longer jiggly. Let cool 10 minutes and serve with a salad and possibly a splash of barbeque sauce to dip the quiche in.

Wednesday, July 20, 2016

Paleo Turmeric Cauliflower - Mashed Potato Style

Everyone has their favorite recipe when it comes to mashed potatoes. Well, I have a mashed potato recipe for you with one twist, it’s a Paleo diet version - you won’t find any potatoes in this dish! Jada Chicken Salt provides wonderful flavor without being too salty.

Paleo Turmeric Cauliflower - Mashed Potato Style
by Lori C.
Serves 4-5

1 head cauliflower about 2 pounds
6 Tablespoons salted butter
3/4 to 1 cup whole milk
3 1/2 teaspoons Jada Tumeric Chicken Salt
1/4 cup freshly grated Pecorino Romano
1/4 cup freshly grated Parmesan
Fine ground black pepper
4 or 5 roasted garlic cloves
A couple of shakes of Jada Lime Chicken Salt
4 or 5 Ramekins 3 inches in diameter by 2 inches deep, buttered

Begin by filling a stock pot 2/3 full with water, chop cauliflower into pieces, so that it will cook quickly, and add it to the stock pot. Bring to a boil, then reduce to a simmer until it is soft enough to mash.

When cauliflower is ready, drain off the hot water and add butter, milk, Turmeric Chicken Salt, Pecorino Romano, Parmesan and black pepper. Mix together.

Place in buttered ramekins and top with one clove roasted garlic, a liberal sprinkle of Jada Lime Chicken Salt, and a shake of pepper. Place each ramekin on a baking sheet, then place in the oven under the broiler until slightly brown and crispy, not more than 10 minutes. Remove from oven, let cool for 5 minutes and enjoy.

I paired this with marinated grilled chicken, steamed artichokes and steamed broccoli.

I hope you enjoy this simple side dish, it’s become a favorite in our house!

Tuesday, July 19, 2016

Stuffed Rolls of Delight

Little bundles of bread, hiding...well, anything. Perfect little snapshot of lunch in a roll. Cheese and ham, pulled pork and veggies, caramelized onions with mushrooms and blue cheese. Anything you can think of to stuff these little bread rolls with will turn out wonderful.

These are perfect for my family. Throw them in a backpack to eat on a bicycle ride, or at an art fair. The kids love them at lunch. And, of course...they are perfect for playing tricks on the kids for lunch. Okay kids, which one did you get today? The stuffed corn and pork one? Or the dreaded blue cheese and mushroom...hm.

So, for this little challenge I thought they would be perfect. They are a fun little package that is so adaptable, its just...well, they are just perfect.

Stuffed Rolls of Delight
by T.S. Lamb
Adapted from King Arthur Flour's Hamburger Potato Buns

1 cup lukewarm water
2 teaspoons instant yeast
3 cups all-purpose flour
1/4 cup potato flour
1/4 cup nonfat dry milk
2 Tablespoons sugar
2 teaspoons Low Sodium Chicken Salt
4 Tablespoons unsalted butter, softened
1 cup diced Swiss cheese
10 mushrooms, diced
1 teaspoon unsalted butter, melted to brush on top
Low Sodium Chicken Salt to sprinkle on top of butter

In a measuring cup with the lukewarm water, sprinkle the yeast on top and set aside for 5 minutes or until it starts to foam.

Mix all other ingredients in large bowl, except the mushrooms and Swiss cheese. Add water and yeast to the mixture. Mix until combined and have made a firm dough.

Place dough in a greased bowl in a warm area. Cover with a tea towel and let rise 1 hour or until doubled.

On a lightly floured surface, turn out the dough, divide into 6 medium balls (or if wanting smaller, more bite-sized buns, 10 balls). Flatten each ball into a circle. Place a teaspoon-sized ball of desired filling in the center (in this case, some Swiss cheese and mushrooms). Wet the edge of the dough and fold the dough over the filling and press together with the other side to lock in the filling. Pinch the edges to seal and place seam side down on a greased baking sheet to rise. Cover and let rise 60 minutes.

Heat oven to 350°F. Brush rolls with butter and sprinkle Low Sodium Chicken Salt on top. Bake for 15 to 20 minutes.

Monday, July 18, 2016

Taiwanese Popcorn Chicken


Popcorn chicken in Taiwan, otherwise known as Yiansu Ji, is a popular and tasty snack. It is very common in snack bars, as well as bubble tea shops. I have probably spent too many nights debating random trivia with friends over several plates of these, while chasing them down with a cold beverage as neon bright as disco lights mixed with chewy black peals of tapioca. Amazingly, the Barbecue flavoured Chicken Salt makes a great seasoning for this snack. Enjoy!

Taiwanese Popcorn Chicken
by Douglas
Recipe modified From Food52's "How To Make Taiwanese Popcorn Chicken"

2 pounds chicken thighs (boneless)
3 garlic cloves, minced
1/2 teaspoon minced ginger
1 Tablespoon soy sauce
1 Tablespoon Shaoxing Rice Wine
1/2 teaspoon white pepper
1/8 teaspoon black pepper
1 teaspoon Original Chicken Salt
2 Tablespoons sugar
1 teaspoon Chinese five-spice powder
1 cup sweet potato flour
1/2 teaspoon baking powder
2 cups neutral oil
1/2 teaspoon Barbecue Chicken Salt + 1/4 teaspoon black pepper + 1/4 teaspoon white pepper

Cut up chicken thighs into bite-sized pieces. In a zip-top bag, toss the chicken in with the garlic, ginger, soy sauce, rice wine, white and black pepper, salt, sugar, and five spice powder. Seal the bag and gently massage the contents to ensure that everything is mixed together thoroughly. Marinate for at least an hour in the refrigerator, or overnight.

In a medium bowl, add the sweet potato flour and baking powder and mix together. Take the chicken pieces out of the bag and dredge them in the flour mixture until well-coated. Let the chicken sit for a few minutes so that the coating can fully adhere to the meat.

Set a heavy pot or wok over a stove set to medium heat. Add the oil and let it warm up until it measures between 350°F to 375°F on an instant-read thermometer. Fry the chicken in batches, until golden brown. Take the chicken out using a metal strainer and drain over paper towels.

Season the chicken by tossing it with the Barbecue Chicken Salt combination, or set the salt aside for dipping.

Thursday, July 14, 2016

Jada Fried Green Tomatoes

Fried green tomatoes are terrific as a snack on their own. They are also a wonderful accompaniment to macaroni and cheese, or with shrimp cocktail and a green salad for a light dinner. Or, for a different spin on a Caprese salad, layer them with fresh mozzarella, basil and ripe tomatoes with a drizzle of good olive oil, a splash of sherry vinegar and a sprinkle of coarse sea salt. The Jada Turmeric Chicken Salt perfectly seasons the flour that the green tomatoes are dredged in, resulting in a flavorful, golden crust. For a zesty sauce to serve with the fried green tomatoes, try a mixing some sour cream with a bit of the Jada Lime Chicken Salt and Jada Red Pepper Chicken Salt.

Jada Fried Green Tomatoes
by Diana
Serves 3 to 4 as a side dish or first course

3 Tablespoons vegetable oil or light olive oil
2 Tablespoons butter
1 cup white rice flour or corn flour or corn meal
1 Tablespoon Jada Turmeric Chicken Salt
2 large green tomatoes, sliced 3/8 inches thick
1 cup buttermilk

Heat the oil and butter together over medium heat in a large skillet. Don't let it get too hot.

Mix the flour of choice and Jada Turmeric Chicken Salt together on a plate. Dip the sliced green tomatoes in buttermilk and dredge lightly in seasoned flour mixture.

Pan fry or saute tomatoes in the hot oil and butter, turning once until golden brown on each side. Serve a couple of slices with dipping sauce (recipe below), or as a side with macaroni and cheese, shrimp cocktail or as part of a Caprese salad.

Jada Lime Chicken Salt Dipping Sauce
by Diana

2/3 cup sour cream
1/2 teaspoon Jada Lime Chicken Salt
1/2 teaspoon Jada Red Pepper Chicken Salt

Mix all of ingredients together and chill for an hour or more. Serve with fried green tomatoes, baked potatoes, or any other dish that you would like a zesty sauce to dip with.

Wednesday, July 13, 2016

Avocado Salsa

I always like to throw a nice fresh side dish to go together with a meal. Great as an appetizer too. Avocado Salsa flavored with Jada Lime Chicken Salt is the best thing to put on a table for just that. Fresh, healthy and so flavorful. Chicken Salt has many flavors to choose from. You could even use the Red Pepper flavored one in this.

Avocado Salsa
Traci

3 Roma tomatoes, chopped
1/2 cup purple onion, chopped
1/4 cup cilantro, chopped
1 1/2 teaspoons Lime Chicken Salt
1/4 teaspoon garlic powder
2 medium avocados chopped

In a medium bowl, mix all together until combined. Cover with plastic wrap and refrigerate until chilled. Serve with tortilla chips for dipping.

Tuesday, July 12, 2016

Southwestern Grilled Chicken Salad


My husband and I love salads, especially during the hot summer months. The beauty of this salad is that you can prepare most of the ingredients earlier in the day (while it's still cool), and then simply assemble right before serving.

We enjoy Mexican, Tex-Mex and Southwestern style dishes. One of my favorite seasonings is a chile lime seasoning that I came across a few years ago. And now I have a new favorite seasoning in my spice cabinet from our newest sponsor, Chicken Salt. Their new Lime Chicken Salt was fantastic on the grilled chicken and sprinkled on the sauteed corn. Give it, and their other delicious flavors of Chicken Salt, a try!

Southwestern Grilled Chicken Salad
by Susan W.
Makes 4 entree-sized salads

1 large boneless, skinless chicken breast
Lime Chicken Salt
2-3 hearts of romaine lettuce
1 package grape tomatoes
1 can black beans, rinsed
1 Tablespoon butter
1 cup frozen corn, thawed (or the kernels cut off a fresh ear of corn if it's in season)
2 avocados, diced right before serving
1 lime
1 cup shredded Monterey Jack cheese
Crushed tortilla chips
Your favorite Southwestern style salad dressing (our favorite is Cardini’s Red Jalapeno Caesar)

Fire up your indoor or outdoor grill. Sprinkle Lime Chicken Salt all over both sides of chicken breast. Grill the breast until done. Remove to a plate, cover with foil and let rest for 10 minutes. Slice thinly, sprinkle on a little more of the Lime Chicken Salt to taste, if desired, and refrigerate.

Chop the romaine lettuce and rinse and dry using a salad spinner. Slice in half cross-wise as many grape tomatoes as you desire to add to your salads. Rinse and drain black beans. Refrigerate all until you're ready to assemble the salads. Now it's time to saute your corn...

Melt butter in a skillet over medium-high heat and add corn. Sprinkle in some of the Lime Chicken Salt and saute until the corn starts to turn golden. Remove to a bowl, let cool and refrigerate until it's salad time.

Just before you’re ready to assemble the salads, dice the avocados, squeeze on some lime juice and toss around.

Now you're finally ready for dinner! Divide the romaine between 4 plates. Top romaine with corn, tomatoes, black beans and avocado. Drizzle the desired amount of dressing on top, add the crushed tortilla chips, shredded cheese and chicken. Pour a nice glass of chilled white wine and you're all set!

Monday, July 11, 2016

Chicken Kofta

Chicken Kofta
by Sarah M.

1 pound ground chicken
1/2 large white onion, finely minced
3 cloves garlic, finely minced
2 handfuls parsley, finely minced
1 teaspoon Red Pepper Chicken Salt
1 teaspoon ground cumin
1/2 teaspoon cinnamon
1/2 teaspoon paprika
4-5 grinds of fresh black pepper

Mix the ground chicken with all the above listed ingredients. Heat a grill pan over medium-high heat. Don't forget to coat the pan with oil! Form the chicken mixture around a metal skewer (if you don't have metal, use wood or form into flat patties). Grill each chicken kofta until brown on all sides and fully cooked through, about 6-8 minutes on each side.

Thursday, July 7, 2016

Spicy Roasted New Potatoes

Jada Chicken Salts come in many different varieties, and offer so many new options for your dinner table! Here, the Barbecue Blend and Red Pepper Blend turn ordinary roasted potatoes into a quick, zesty side dish, the perfect accompaniment for your next weeknight dinner. Try different herbs to compliment the delicious Chicken Salt blends.

Spicy Roasted New Potatoes
by Gary Gee, blogging at My Cooking Blog
Serves 4-6

1 1/2 pounds medium red potatoes, scrubbed, rinsed, halved, and patted dry
2 Tablespoons olive oil
2 teaspoons Barbecue Chicken Salt
1 teaspoon Red Pepper Chicken Salt
1/2 teaspoon dried thyme
Freshly ground black pepper
1 Tablespoon chopped fresh parsley

Preheat oven to 425°F. Prepare rimmed baking sheet by lining with foil.

Place potato halves on baking sheet, and drizzle with olive oil. Sprinkle with Chicken Salts, thyme, and black pepper. Toss to coat evenly. Arrange cut side down on baking sheet.

Place in oven and bake for 10 minutes. Carefully turn each potato half over, rotate pan, and continue baking until just fork-tender and evenly browned, about 10 minutes more.

Remove to serving dish and sprinkle with parsley and additional seasoning, if desired.

Wednesday, July 6, 2016

Barbecue Chicken Salt Caramel Popcorn

Alrighty friends. I came up with this idea early on in this challenge (even before we received the Jada Foods Chicken Salt Seasoning samples) and I’ve refused to let it beat me. This was a tough challenge! But, I think I made it tough on myself with my hair-brained idea to make a sweet-n-savory Barbecue Chicken Salt caramel popcorn. Yes…you read that right. CRAZY! I know, I know, I know. But, that’s what just kept screaming at me in my head. So rather than doing something safe and, well, normal, I opted for something weird and a little upside down. My thought was that barbecue has sweet elements in it (molasses, brown sugar) and smoky flavor too. These flavors are meant to be together…like beans and rice, like peas and carrots, like peanut butter and maple syrup…right? It’s fate. So, if you’re into weird and upside down, you’re gonna love this! Honestly, we can’t stop eating it in my house! We may need an intervention.

Barbecue Chicken Salt Caramel Popcorn
by Maryjo
Adapted from Classic Caramel Corn by Karo on allrecipes.com

9 cups Skinny Pop popcorn (pre-popped plain popcorn)
4 ounces unsalted butter
1 cup brown sugar
1/2 cup Karo light corn syrup
1/2 teaspoon baking soda
1 Tablespoon Barbeque Chicken Salt (plus additional shaken onto popcorn)
1 Tablespoon liquid smoke
2 ounces roasted, unsalted pistachios

Preheat your oven to 250°F. Place the popcorn onto a 13 x 18 baking sheet and warm in the oven while you prepare the caramel (heating the pre-popped corn will help to take any possible moisture out).

In a medium saucepan, melt the butter, corn syrup, and brown sugar on medium-high heat, stirring constantly, until the sugar is dissolved. Bring the sugar mixture to a low boil and let it boil for
5 minutes without stirring.

While the caramel is cooking, remove the popcorn from the oven and put into a large heatproof bowl. Add the pistachios to the popcorn.

After five minutes, remove the caramel from heat. Add the baking soda, Barbecue Chicken Salt and the liquid smoke to the caramel and whisk together until well-blended (about 20 seconds). Pour the caramel over the popcorn and pistachios and stir to cover well with the caramel mixture. Spread onto a baking sheet, shake additional Barbecue Chicken Salt over the popcorn and bake for 15 minutes. Stir the popcorn, shake additional Barbecue Chicken Salt flavor on top of the popcorn and bake for another 15 minutes. Stir the popcorn again, shake additional Barbecue Chicken Salt flavor on top and bake for a final 15 minutes. Remove from oven, separate popcorn into smaller bite-sized pieces, and let cool. Serve!

Tuesday, July 5, 2016

Haluski


I am in several food groups. Recently one of them, The Cooler, had a discussion on Haluski. Since I love cabbage and buttered noodles, I knew I had to make it. This is one of those dishes with many variations and with roots in Central and Eastern Europe. After reading all the comments in The Cooler and researching the Internet, I decided to adapt a version from A Family Feast Blog. Since one of my friends in the Cooler mentioned that smoked sausage was often used, I decided to add smoked sausage to mine. My son and his wife had just hosted a barbecue dinner over the weekend and they sent mom and dad home with lots of sausages!

I pulled out my onion and cabbage and started chopping away. Then another thought hit me, this would be a great dish to use my Jada Low Sodium Chicken Salt in! I am so glad I did, because it was so good. My husband isn’t a huge fan of cabbage, but he actually liked this and said he would be happy if I made it again. Score!

Haluski
by Linda Mire
Adapted from Haluski (Fried Cabbage and Noodles) by A Family Feast Blog

1 bag extra broad noodles, 12-ounce size
3 thick-cut slices of bacon, cut into 1/2-inch squares
1 large yellow onion, cut into rings
1 whole cabbage, sliced into 1-inch strips
3 links (about 7 ounces of smoked sausage), diced
1/2 stick unsalted butter
4 teaspoons of Jada Low Sodium Chicken Salt, divided into 2 & 2

1. Cook noodles according to package directions, include 2 teaspoons of Low Sodium Chicken Salt in water.
2. Drain noodles and set aside.
3. In a large Dutch oven, brown bacon bits.
4. Add yellow onion and saute until translucent and slightly brown.
5. Add cabbage and saute for 5 minutes or until wilted (Be sure to stir frequently and thoroughly to bring the bacon and onion up from the bottom.)
6. Stir in diced sausage, butter and 2 teaspoons of the Low Sodium Chicken Salt.
7. Fold in noodles. Simmer on low for 3-4 minutes, occasionally stirring.
8. Serve immediately. Enjoy!